Building a Real-Time Weather Alert System in 10 Minutes
This article has guided you through creating a simple real-time weather alert system with Node.js and a free API.
In this article, we will approach the development of a complete real-time weather alert system using Node.js and a free third-party API data. While we won’t delve into highly complex technologies, the goal is to inspire and provide a practical example.
Step 1: Finding a Free Weather API
There are many free APIs available online to obtain weather data.
Once you apply successfully, a request key will be generated in your account center. You'll need this key to send requests.
Step 2: Using the Weather API and Generating Code
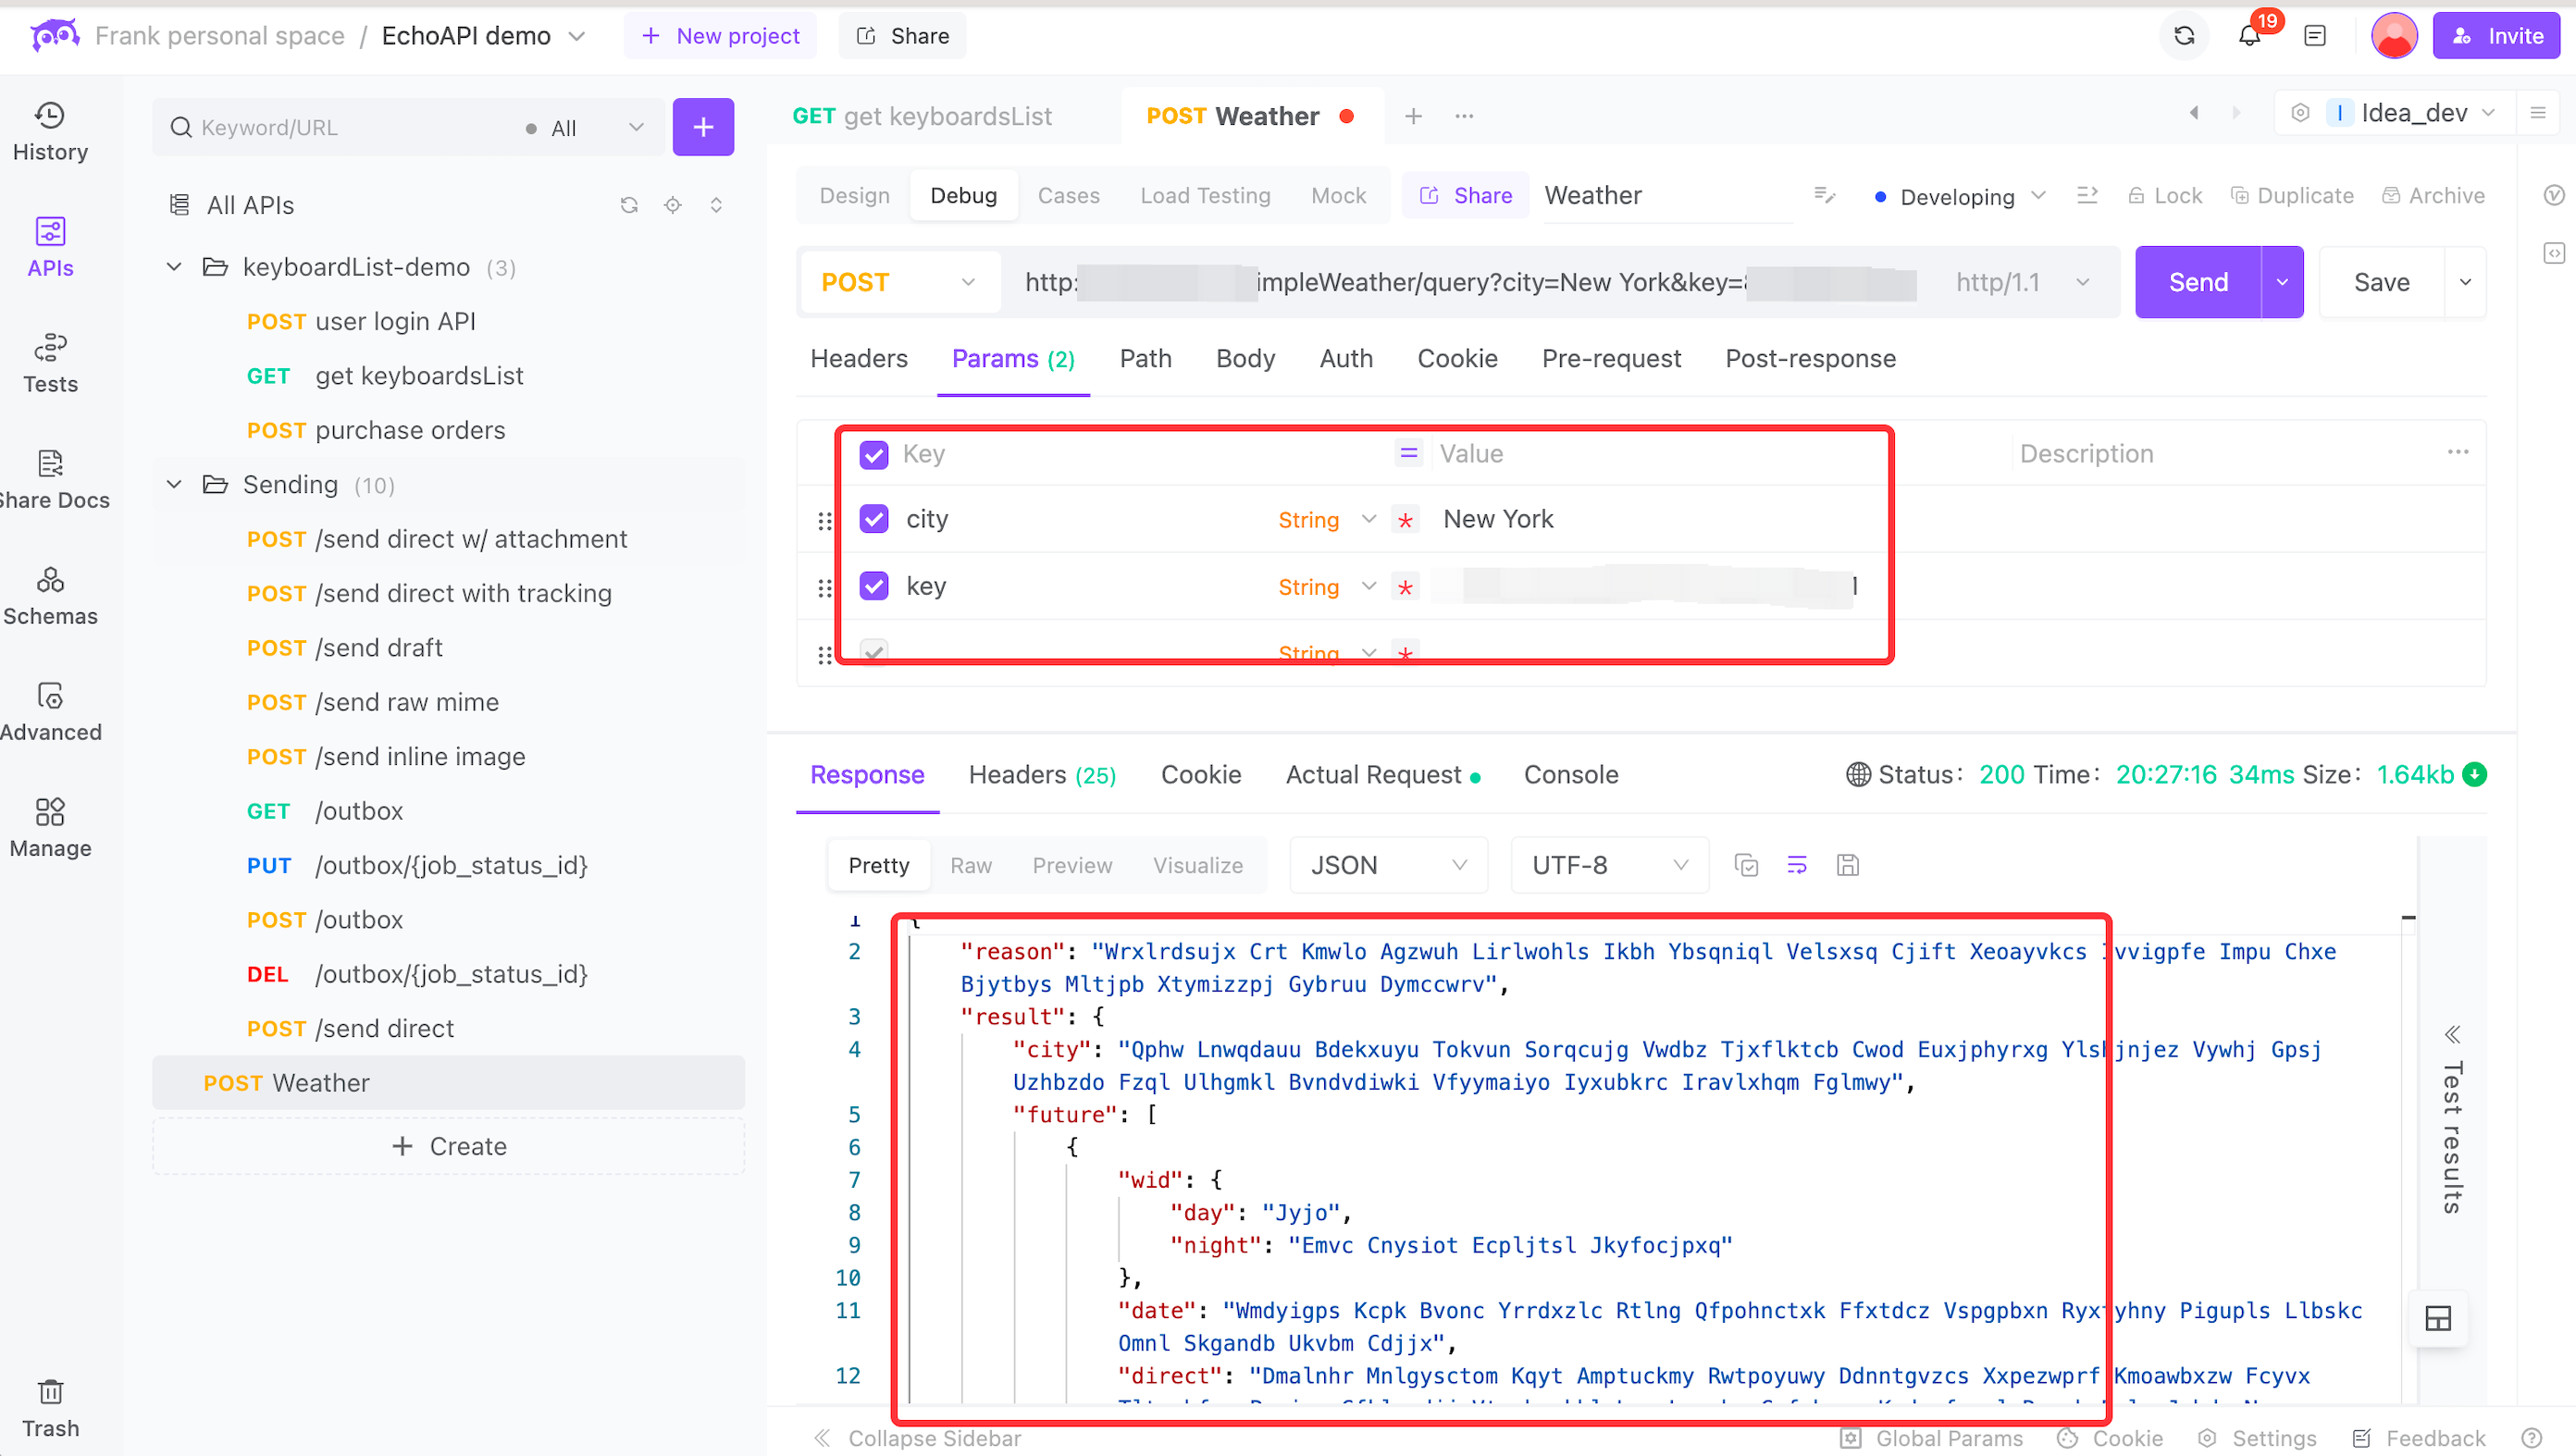
We can test the API using a tool like EchoAPI.

You can see that the JSON format of a successful request looks like this:
{
    "reason": "Query successful!",
    "result": {
        "city": "New York",
        "realtime": {
            "temperature": "24",
            "humidity": "100",
            "info": "Light rain",
            "wid": "07",
            "direct": "Northeast wind",
            "power": "Grade 2",
            "aqi": "32"
        },
        "future": [
            {
                "date": "2024-07-23",
                "temperature": "23/28℃",
                "weather": "Light rain turning overcast",
                "wid": {
                    "day": "07",
                    "night": "02"
                },
                "direct": "East wind turning north"
            },
            {
                "date": "2024-07-24",
                "temperature": "24/31℃",
                "weather": "Light rain turning cloudy",
                "wid": {
                    "day": "07",
                    "night": "01"
                },
                "direct": "Northeast wind turning east"
            },
            {
                "date": "2024-07-25",
                "temperature": "23/31℃",
                "weather": "Cloudy",
                "wid": {
                    "day": "01",
                    "night": "01"
                },
                "direct": "East wind turning southeast"
            },
            {
                "date": "2024-07-26",
                "temperature": "24/31℃",
                "weather": "Light rain",
                "wid": {
                    "day": "07",
                    "night": "07"
                },
                "direct": "Northeast wind"
            },
            {
                "date": "2024-07-27",
                "temperature": "23/31℃",
                "weather": "Light rain turning clear",
                "wid": {
                    "day": "07",
                    "night": "00"
                },
                "direct": "Northeast wind turning south"
            }
        ]
    },
    "error_code": 0
}
At this point, we have obtained the weather data for the next seven days.
Step 3: Sending Emails with Nodemailer in Node.js
We can use Nodemailer in Node.js to send emails easily. You can install it using the following command:
npm install nodemailer
Here’s a function I wrote to send emails, where the email account and authorization code can be obtained from the respective email service provider.
/**
 * Node.js Email Sending Function
 */
function sendEmail(text) {
    let nodemailer = require('nodemailer');

    let transporter = nodemailer.createTransport({
        service: "gmail",  // Email service
        secure: true,    // Secure sending mode
        auth: {
            user: "be***er@gmail.com", // Sender's email
            pass: "MLQ***PYU"  // Authorization code, obtainable from the email service provider
        }
    });

    let mailOptions = {
        from: "be***er@gmail.com", // Sender's email, must match above
        to: "3257132998@gmail.com", // Recipient's email for receiving weather alerts
        subject: "Real-Time Weather Monitoring System", // Email subject
        text: text // Email body
    };

    transporter.sendMail(mailOptions, (err, data) => {
        if (err) {
            console.log(err);
            res.json({ status: 400, msg: "Send failed..." });
        } else {
            console.log(data);
            res.json({ status: 200, msg: "Email sent successfully..." });
        }
    });
}

// Test email sending
sendEmail('It is raining!');
Create a file named weather.js, and input the above code. You can test the email sending with the command:
node weather.js
You should see a successful email sent.
Step 4: Periodically Fetching Weather Data in Node.js
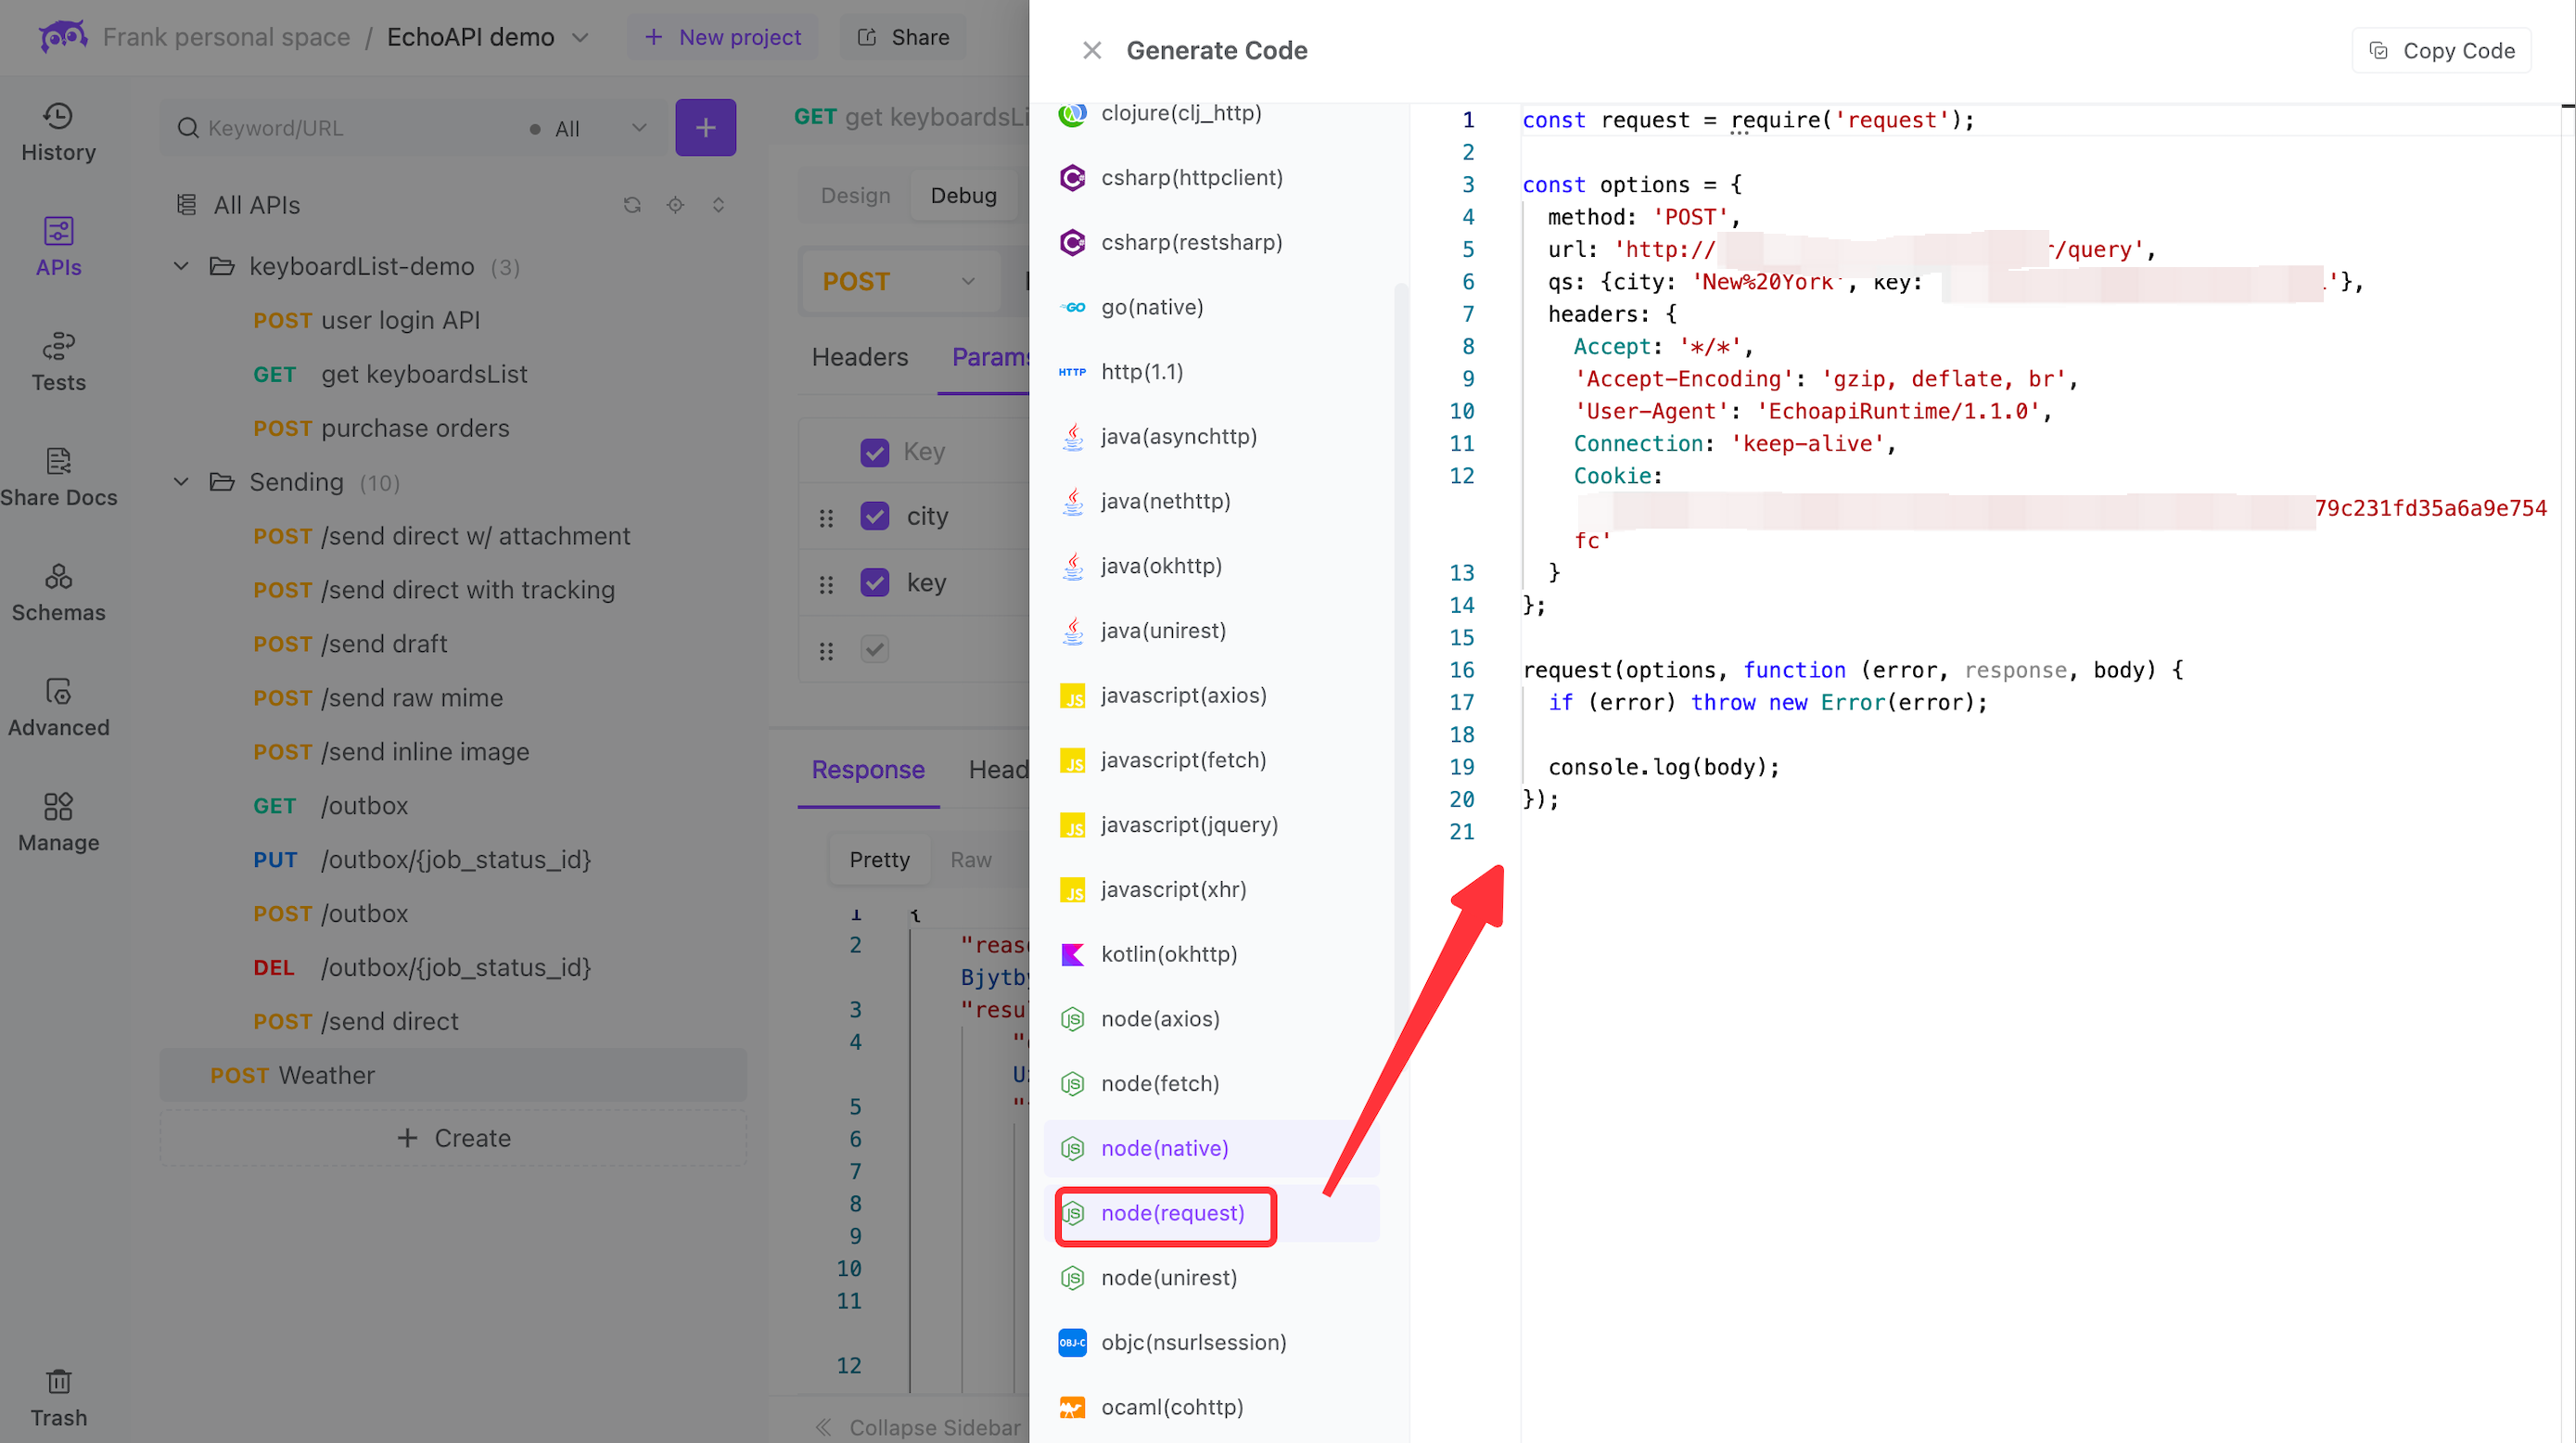
By clicking the "Generate Node.js (Request)" code in EchoAPI, you can generate the program code to request the Weather API. We can use setInterval to implement the desired functionality.

Here’s the complete code:
/**
 * Node.js Email Sending Function
 */
function sendEmail(text) {
    let nodemailer = require('nodemailer');

    let transporter = nodemailer.createTransport({
        service: "gmail",  // Email service
        secure: true,    // Secure sending mode
        auth: {
            user: "be***er@gmail.com", // Sender's email
            pass: "MLQ***PYU"  // Authorization code
        }
    });

    let mailOptions = {
        from: "be***er@gmail.com", // Sender's email
        to: "3257132998@gmail.com", // Recipient's email
        subject: "Real-Time Weather Monitoring System", // Email subject
        text: text // Email body
    };

    transporter.sendMail(mailOptions, (err, data) => {
        if (err) {
            console.log(err);
            res.json({ status: 400, msg: "Send failed..." });
        } else {
            console.log(data);
            res.json({ status: 200, msg: "Email sent successfully..." });
        }
    });
}

setInterval(function() {
    var request = require('request');

    var headers = {
        'User-Agent': 'EchoAPI client Runtime/+https://www.echoapi.com/'
    };

    var options = {
        url: 'http://apis.juhe.cn/simpleWeather/query?city=%E9%83%91%E5%B7%9E&key=8763efe2a90b025c03e03fef95621cbc',
        headers: headers
    };

    function callback(error, response, body) {
        let json = JSON.parse(body);
        console.log(json.result);
        if (!error && response.statusCode == 200) {
            sendEmail('Zhengzhou Weather: ' + json.result.future[0].weather);
        }
    }

    request(options, callback);

}, 300000); // Fetch weather every 5 minutes
And there you have it! The entire system has been set up. We just need to run the following command on a small server:
node weather.js
This will send weather updates to the specified email every 5 minutes, although you can adjust this interval as needed.
Conclusion
This article has guided you through creating a simple real-time weather alert system with Node.js and a free API. We've shown how to obtain weather data, set up email notifications using Nodemailer, and automate the process with periodic data fetching. This basic system can be a starting point for further development and customization to suit various needs.


 EchoAPI for VS Code

 EchoAPI for IntelliJ IDEA

 EchoAPl-Interceptor

 EchoAPl CLI
 EchoAPI Client
 API Design
 API Debug
 API Documentation
 Mock Server


