EchoAPI for VS Code FAQ (1): Enhancing API Debugging and Team Collaboration Efficiency
EchoAPI users face challenges in debugging, collaboration, and data storage. We’ve compiled FAQs with detailed answers to help you use EchoAPI more efficiently.
Many users face challenges while using EchoAPI, whether it's related to API debugging, team collaboration, or data storage. To help you use EchoAPI more efficiently, we've compiled some of the most frequently asked questions and provided detailed answers.
1. Where does EchoAPI store data? How can I view locally stored request data?
A lot of users want to view their locally stored data during API debugging, whether it's request history, environment configurations, or global variables. Here’s where you can find them.
Solution:
The storage location of EchoAPI data depends on the operating system you're using:
| Operating System | Data Storage Path |
|---|---|
| Windows | C:\Users\<username> |
| macOS/Linux | /home/<username> or /Users/<username> |
In these directories, you will find EchoAPI-related files, including request history, environment configurations, variables, and more.
Best Practice:
To avoid data loss—especially when working in teams—it’s recommended to regularly back up this data. Also, periodically clean up old request data to keep your local storage efficient and organized.
2. How can team members share API requests and test data?
Sharing API requests and test data is a common need in team collaboration. EchoAPI offers flexible features to ensure smooth data sharing among team members.
Solution:
- EchoAPI Format: For quick sharing among EchoAPI users.
- Postman Format: If your team uses Postman for testing, you can export data as a
.jsonfile. - Thunder Client Format: If your team uses Thunder Client, export data as
.json. - cURL/OpenAPI Format: For collaboration with other tools or platforms, EchoAPI supports exporting in cURL or OpenAPI formats.
Import/Export Functionality:Import Data:
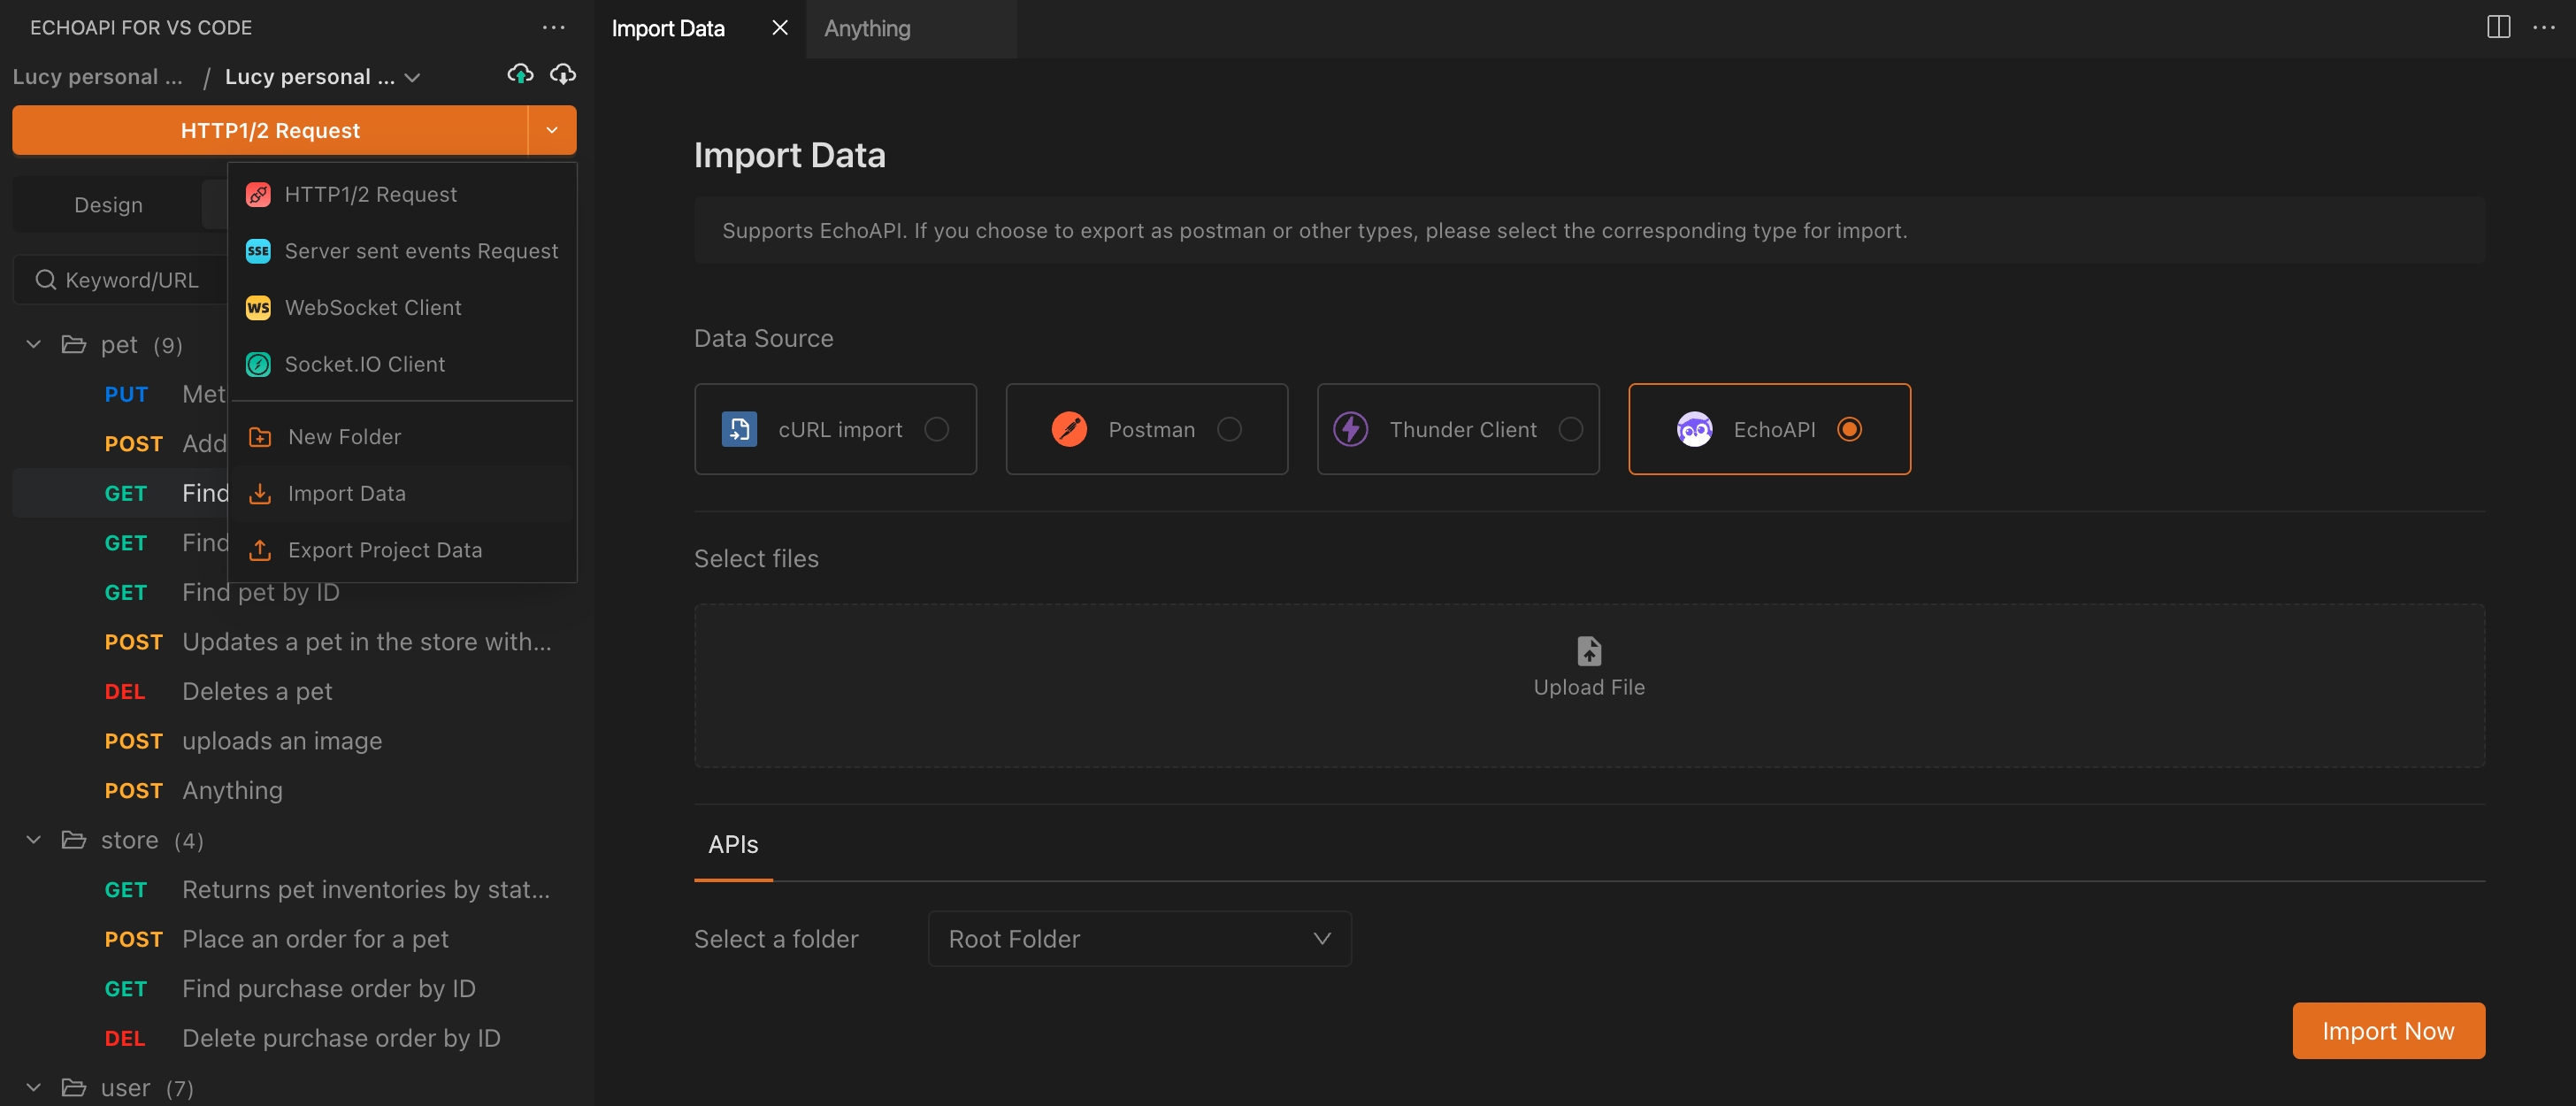
Export Data:

Team Collaboration:
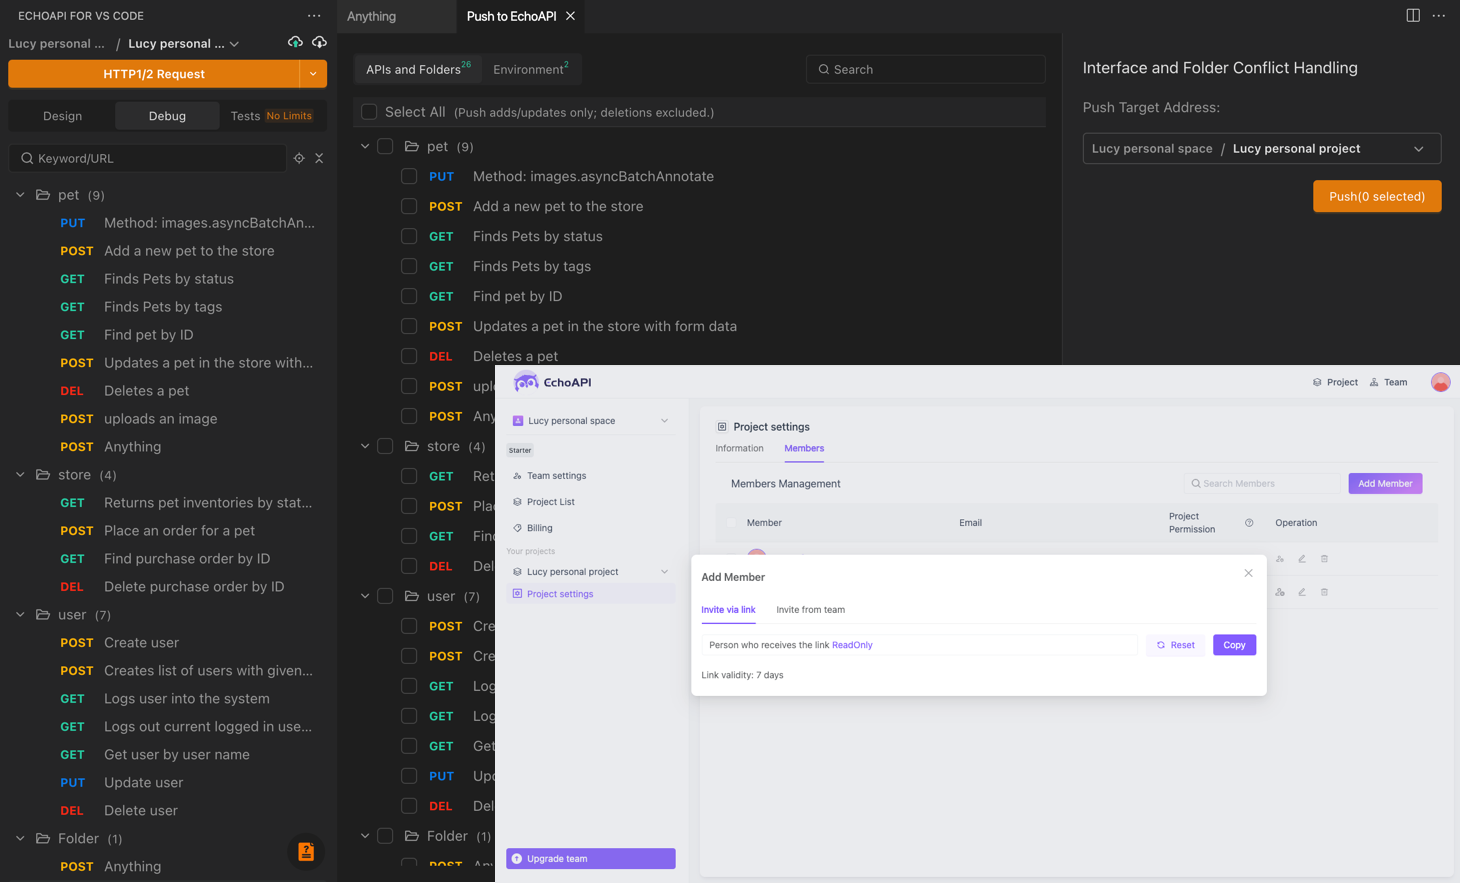
Use EchoAPI’s team collaboration feature to upload data to a shared team space and invite members to collaborate in real-time. All requests, environments, and variable configurations will sync automatically, ensuring everyone stays on the same page.
Best Practice:
Choose the most suitable export format based on the tools your team is using to avoid data compatibility issues. Ensure the exported file is complete and validated to avoid accidental errors.
3. How can I add assertions in EchoAPI to validate API responses?
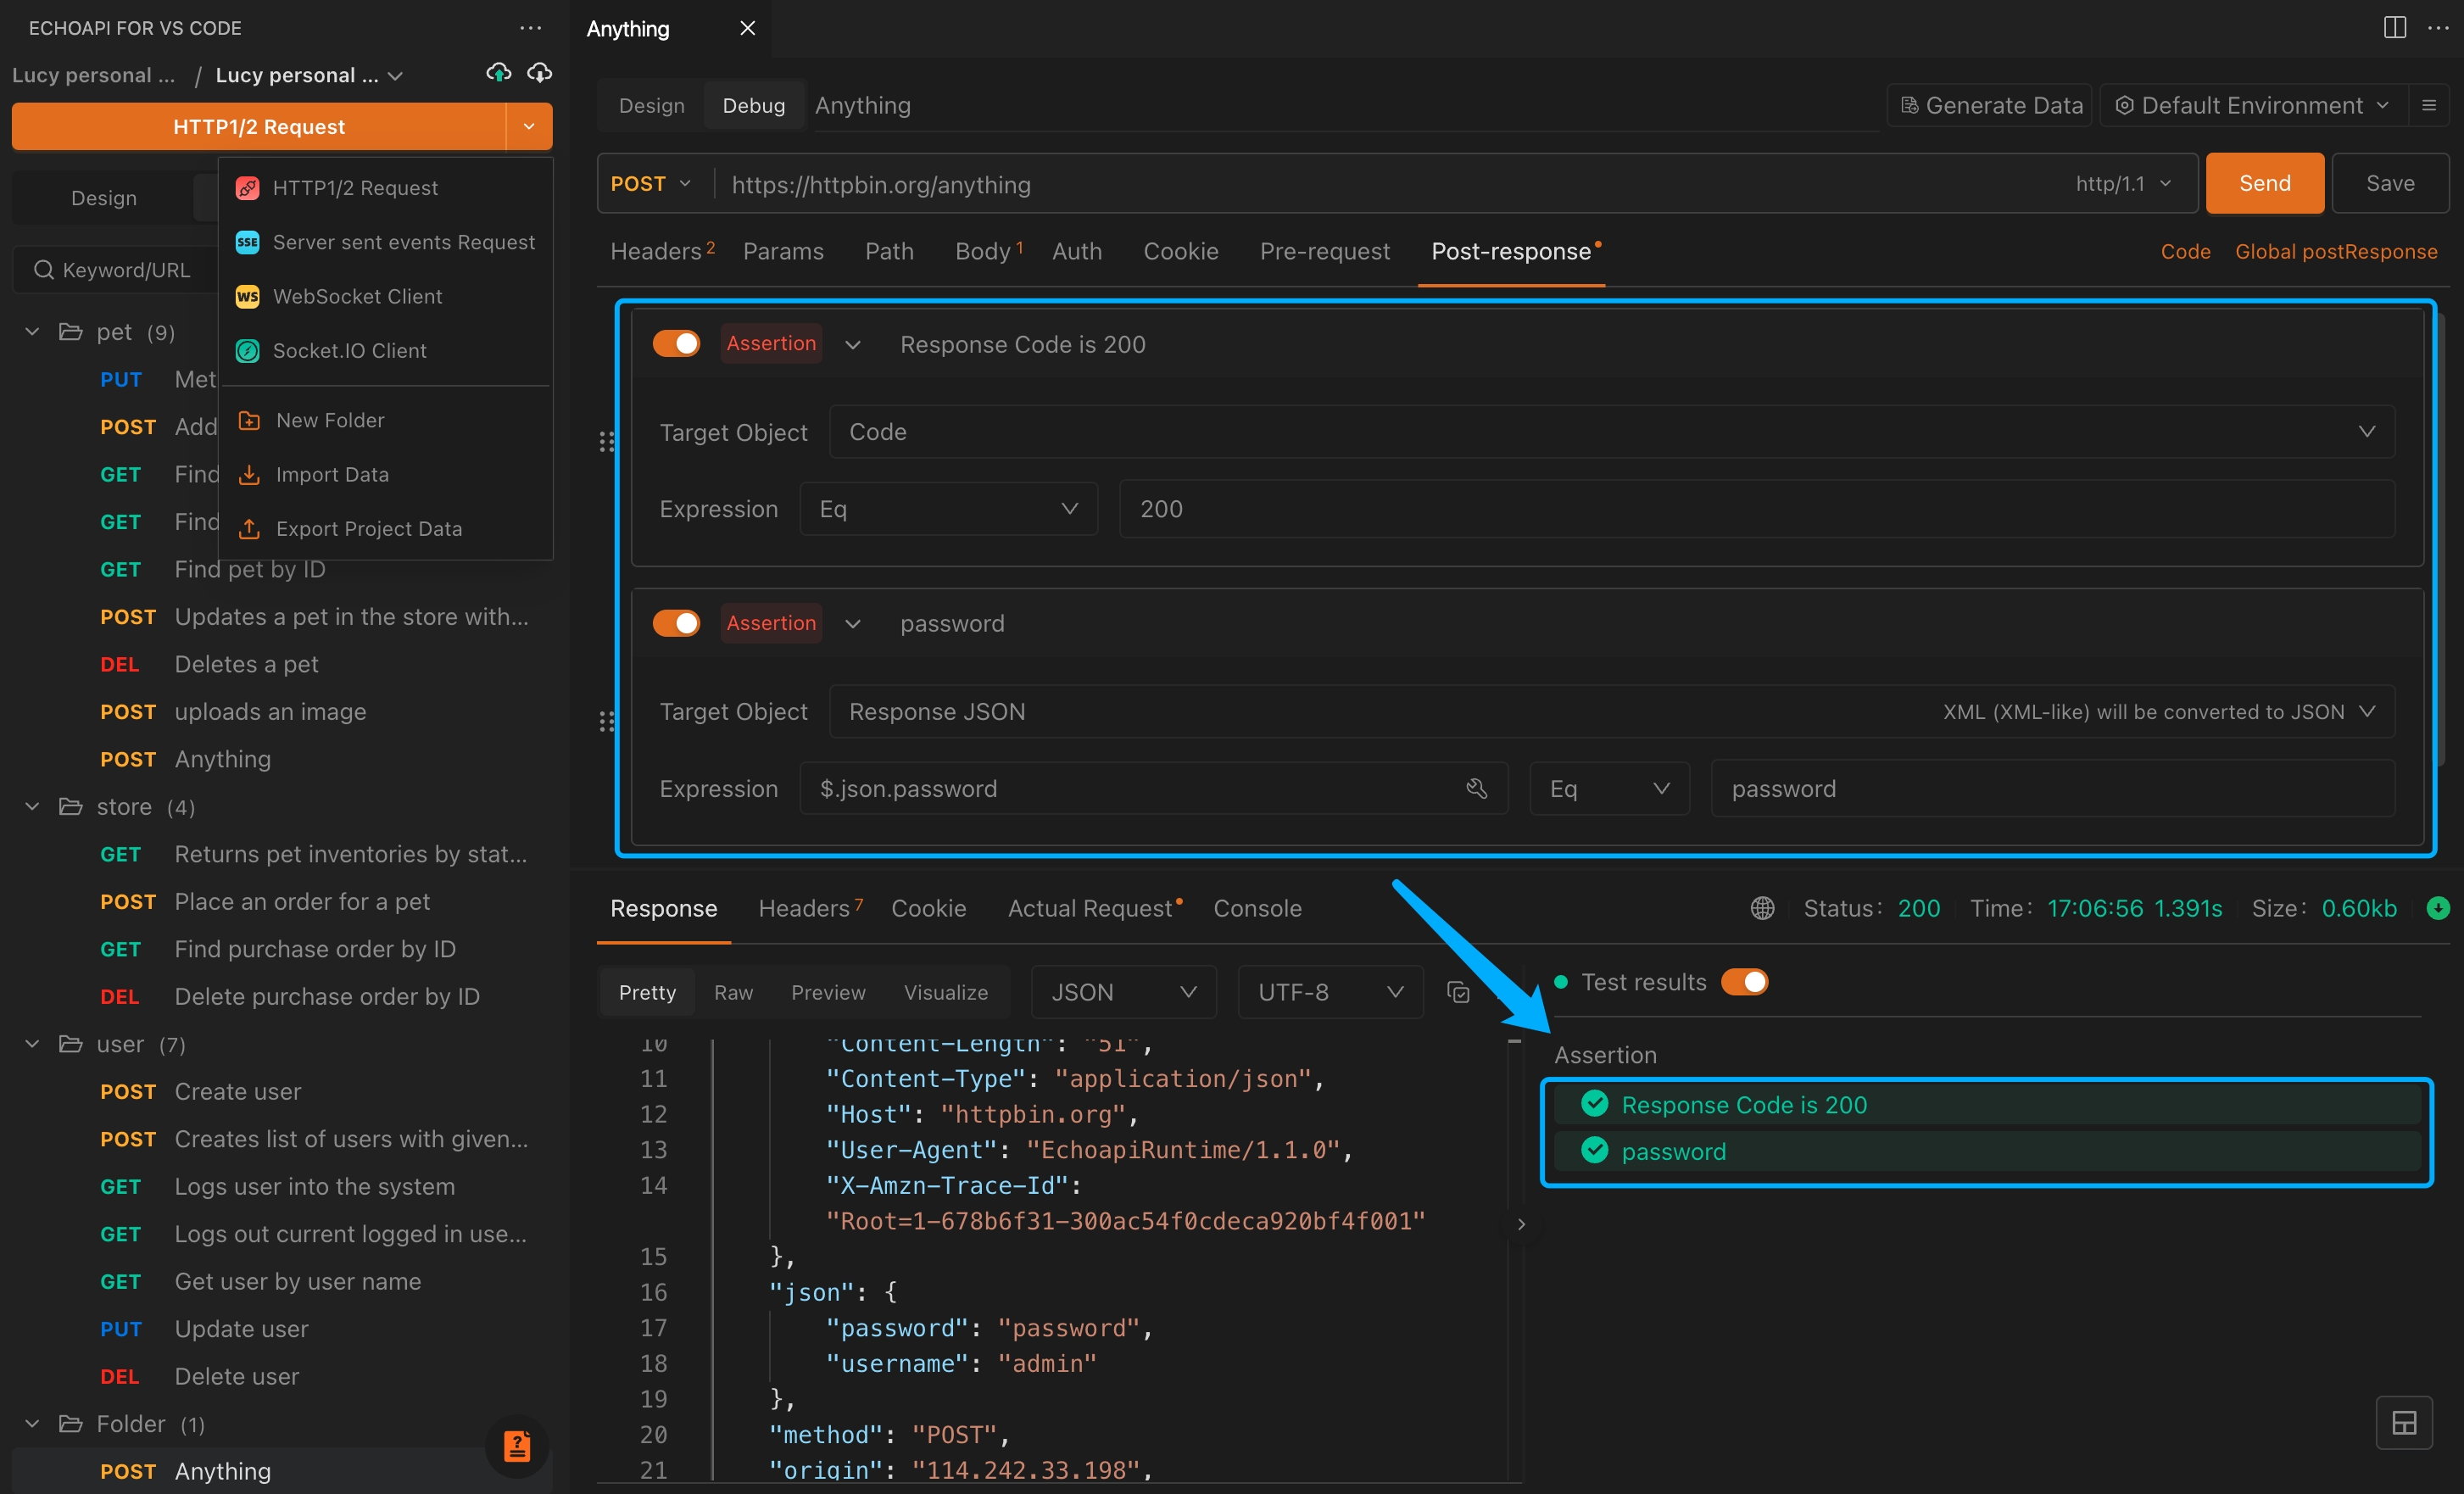
Assertions are a key part of API debugging to ensure the API response matches expectations. EchoAPI provides two methods for adding assertions: visual and script-based. Whether you're a beginner or an experienced developer, EchoAPI can meet your needs.
Solution:
Script-Based Assertions:
For users familiar with JavaScript, EchoAPI also allows you to write custom assertions using scripts under the Post-response section. You can precisely verify response content, status codes, response time, headers, etc., to meet advanced testing requirements.
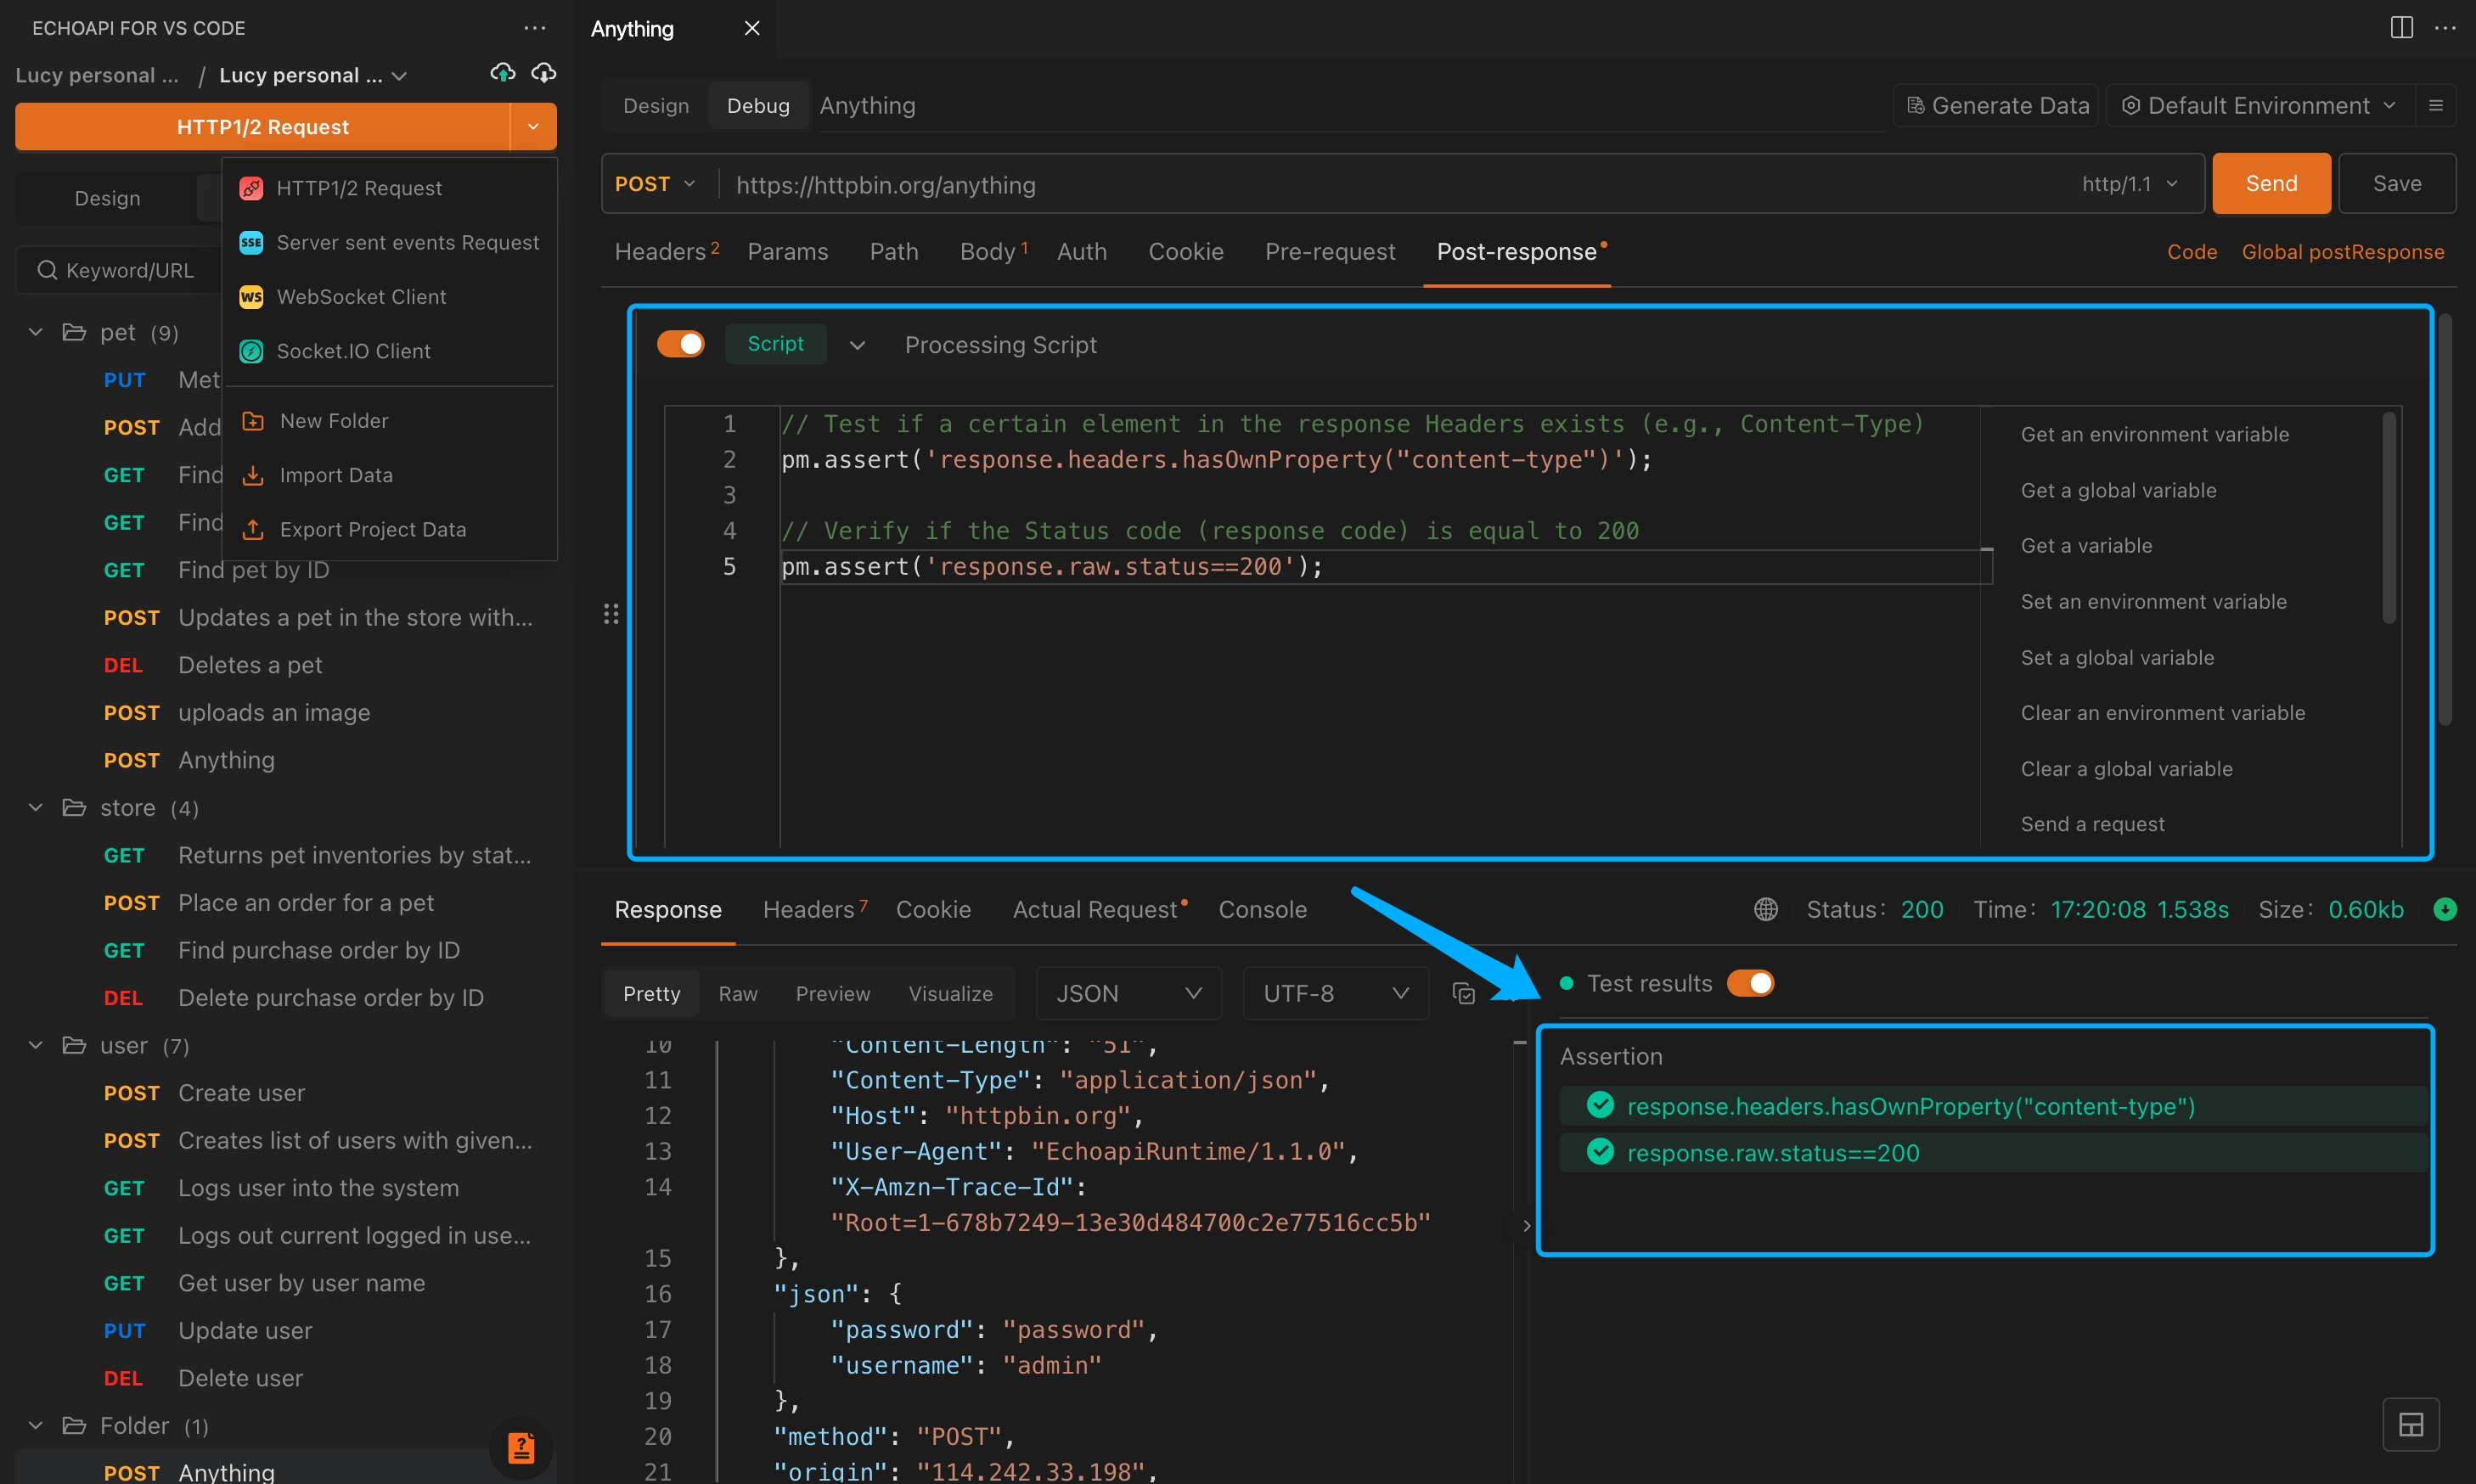
Visual Assertions:
For those who aren’t familiar with scripting, EchoAPI offers an intuitive visual interface. You can set assertions by simply selecting response elements (like status code, response time, headers) and defining expected values. The system will automatically generate the assertion logic, no coding required.
Best Practice:
- If you need to quickly verify a response, the visual method is ideal with little to no coding required.
- For finer control and complex logic, scripting provides more flexibility, especially for advanced users.
4. How can I perform batch execution of API tests in EchoAPI?
Batch testing is essential for performance and stress testing, and many users need the ability to run multiple requests simultaneously. EchoAPI offers several features that make batch execution and report generation easy.
Solution:
Historical Report Viewing:
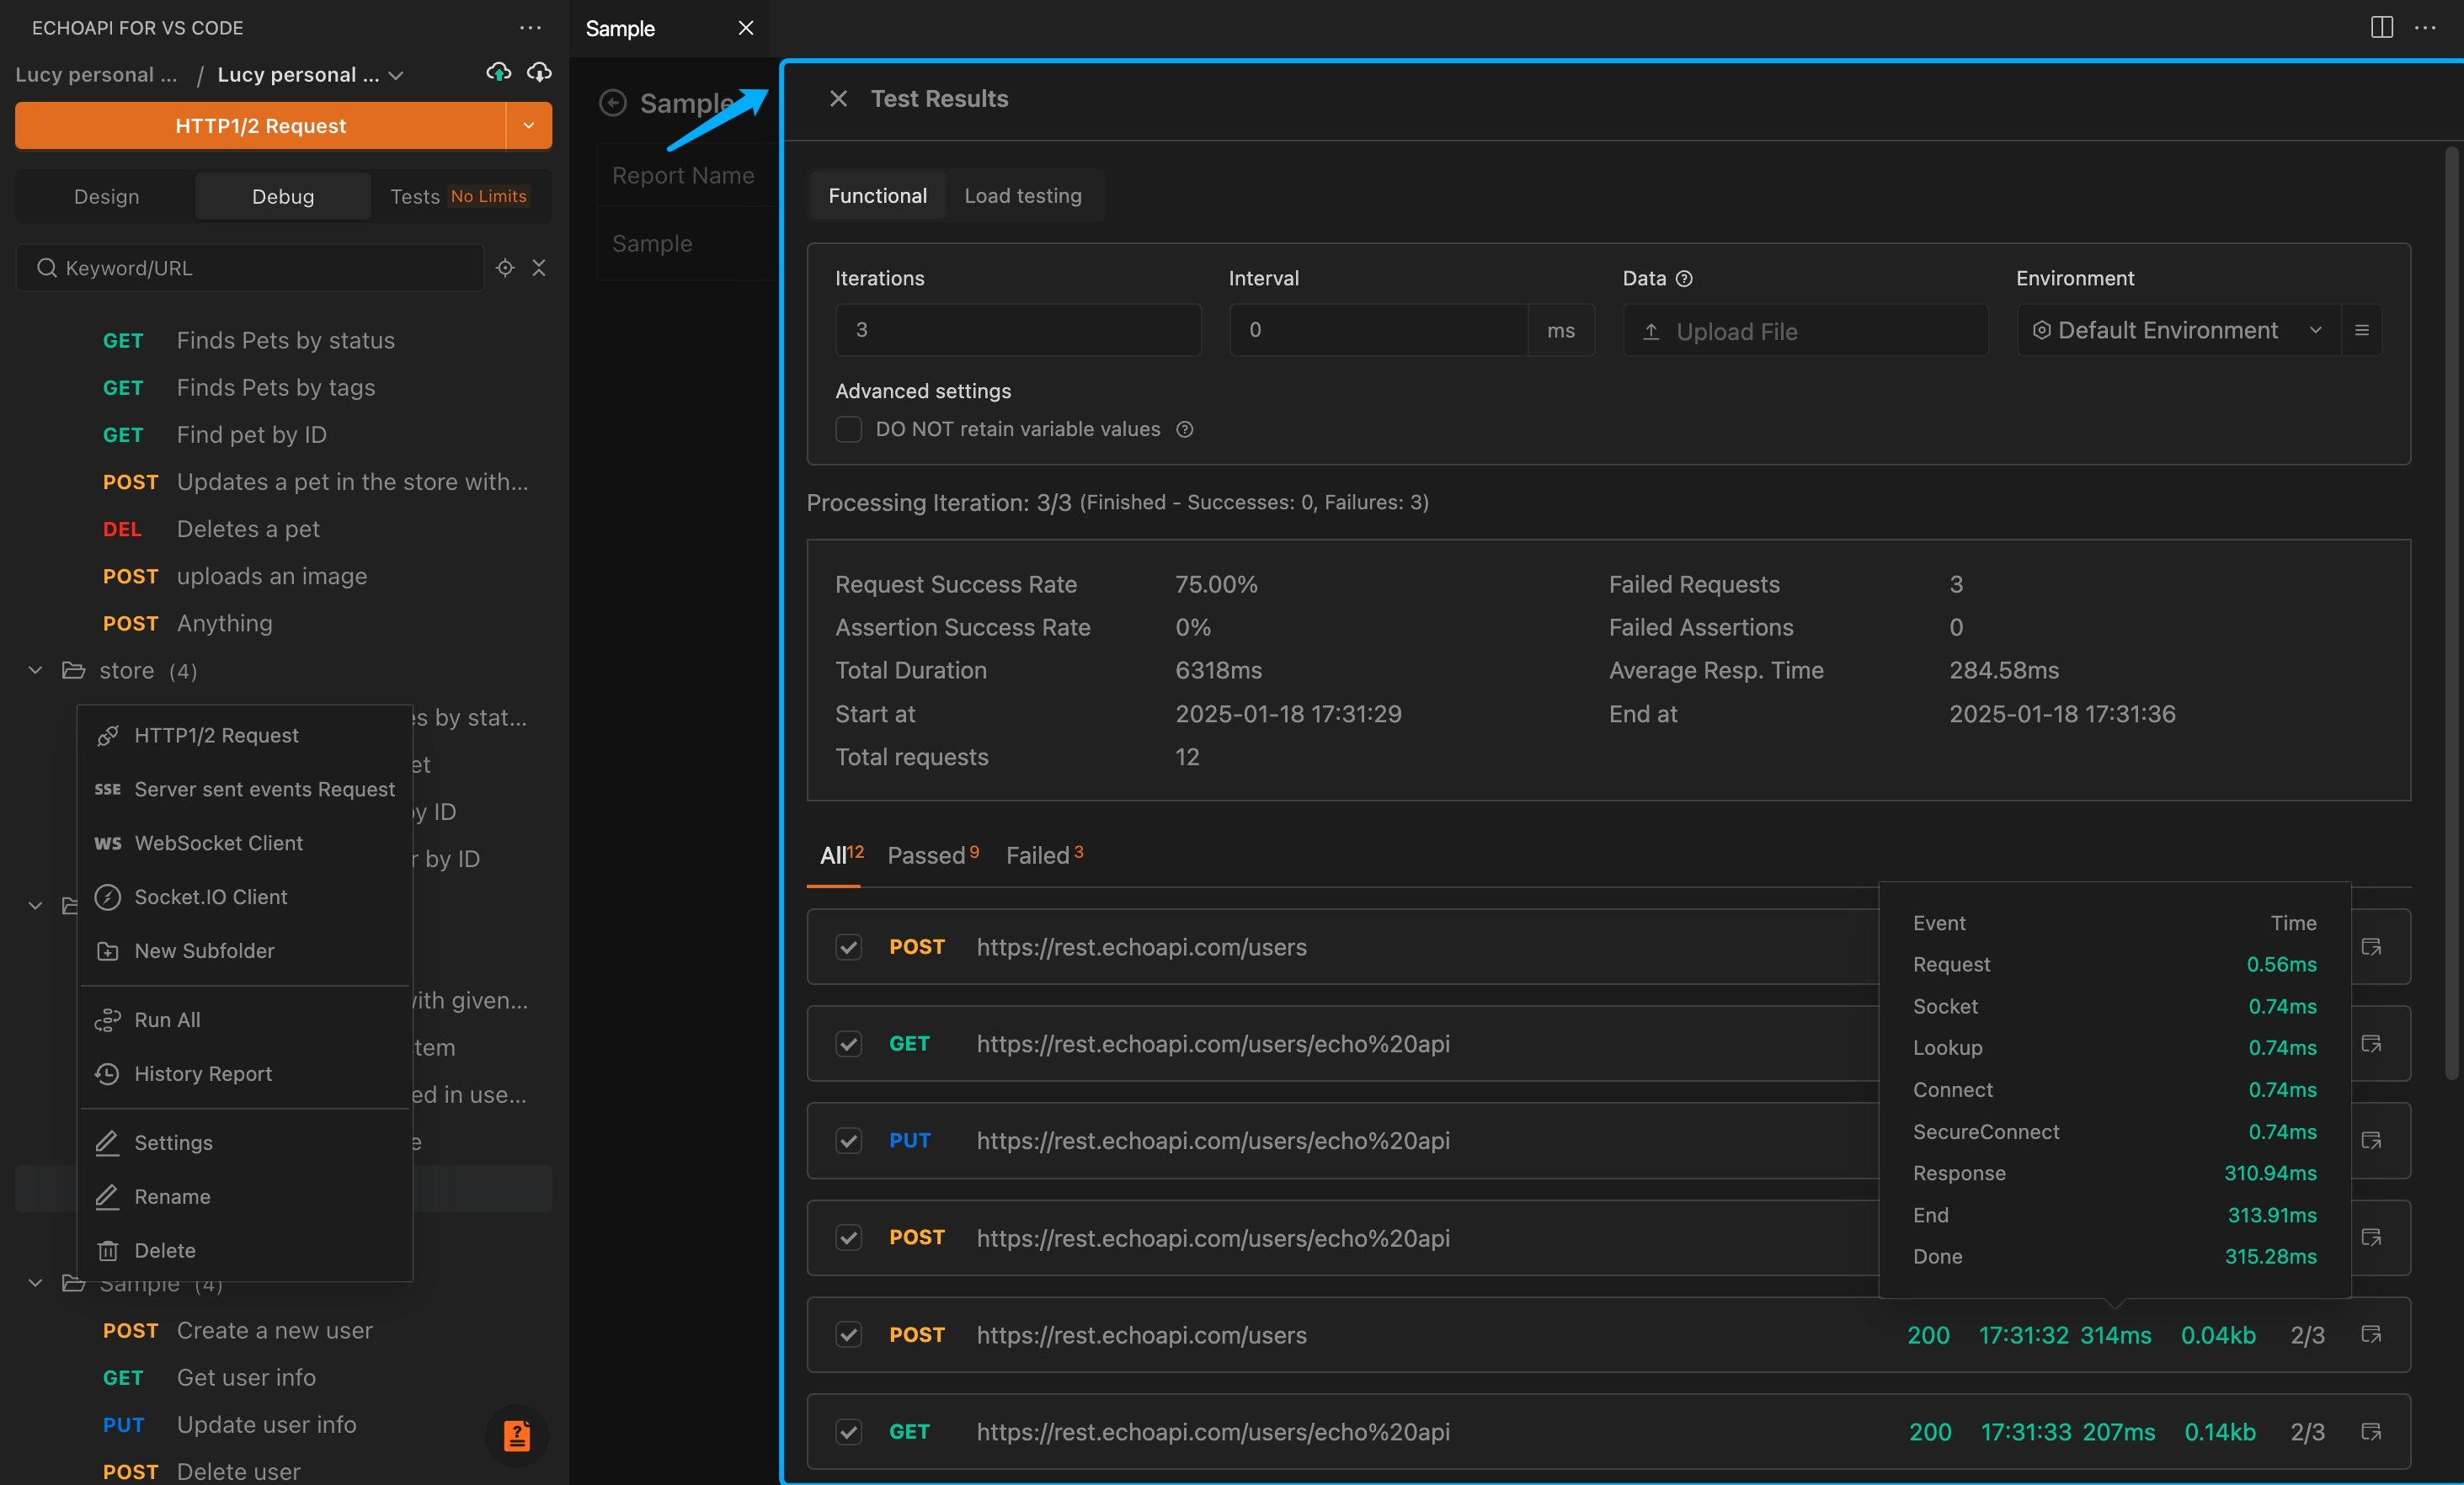
EchoAPI automatically saves detailed logs of each batch execution, including status codes, response times, error logs, and more. You can review historical reports at any time to analyze API performance.
Data-Driven Testing:
You can import CSV files to automatically populate variables in your requests, enabling batch testing with different sets of data. Additionally, you can use Mock variables to generate dynamic test data, with fresh data generated on each execution.

Collection Run:
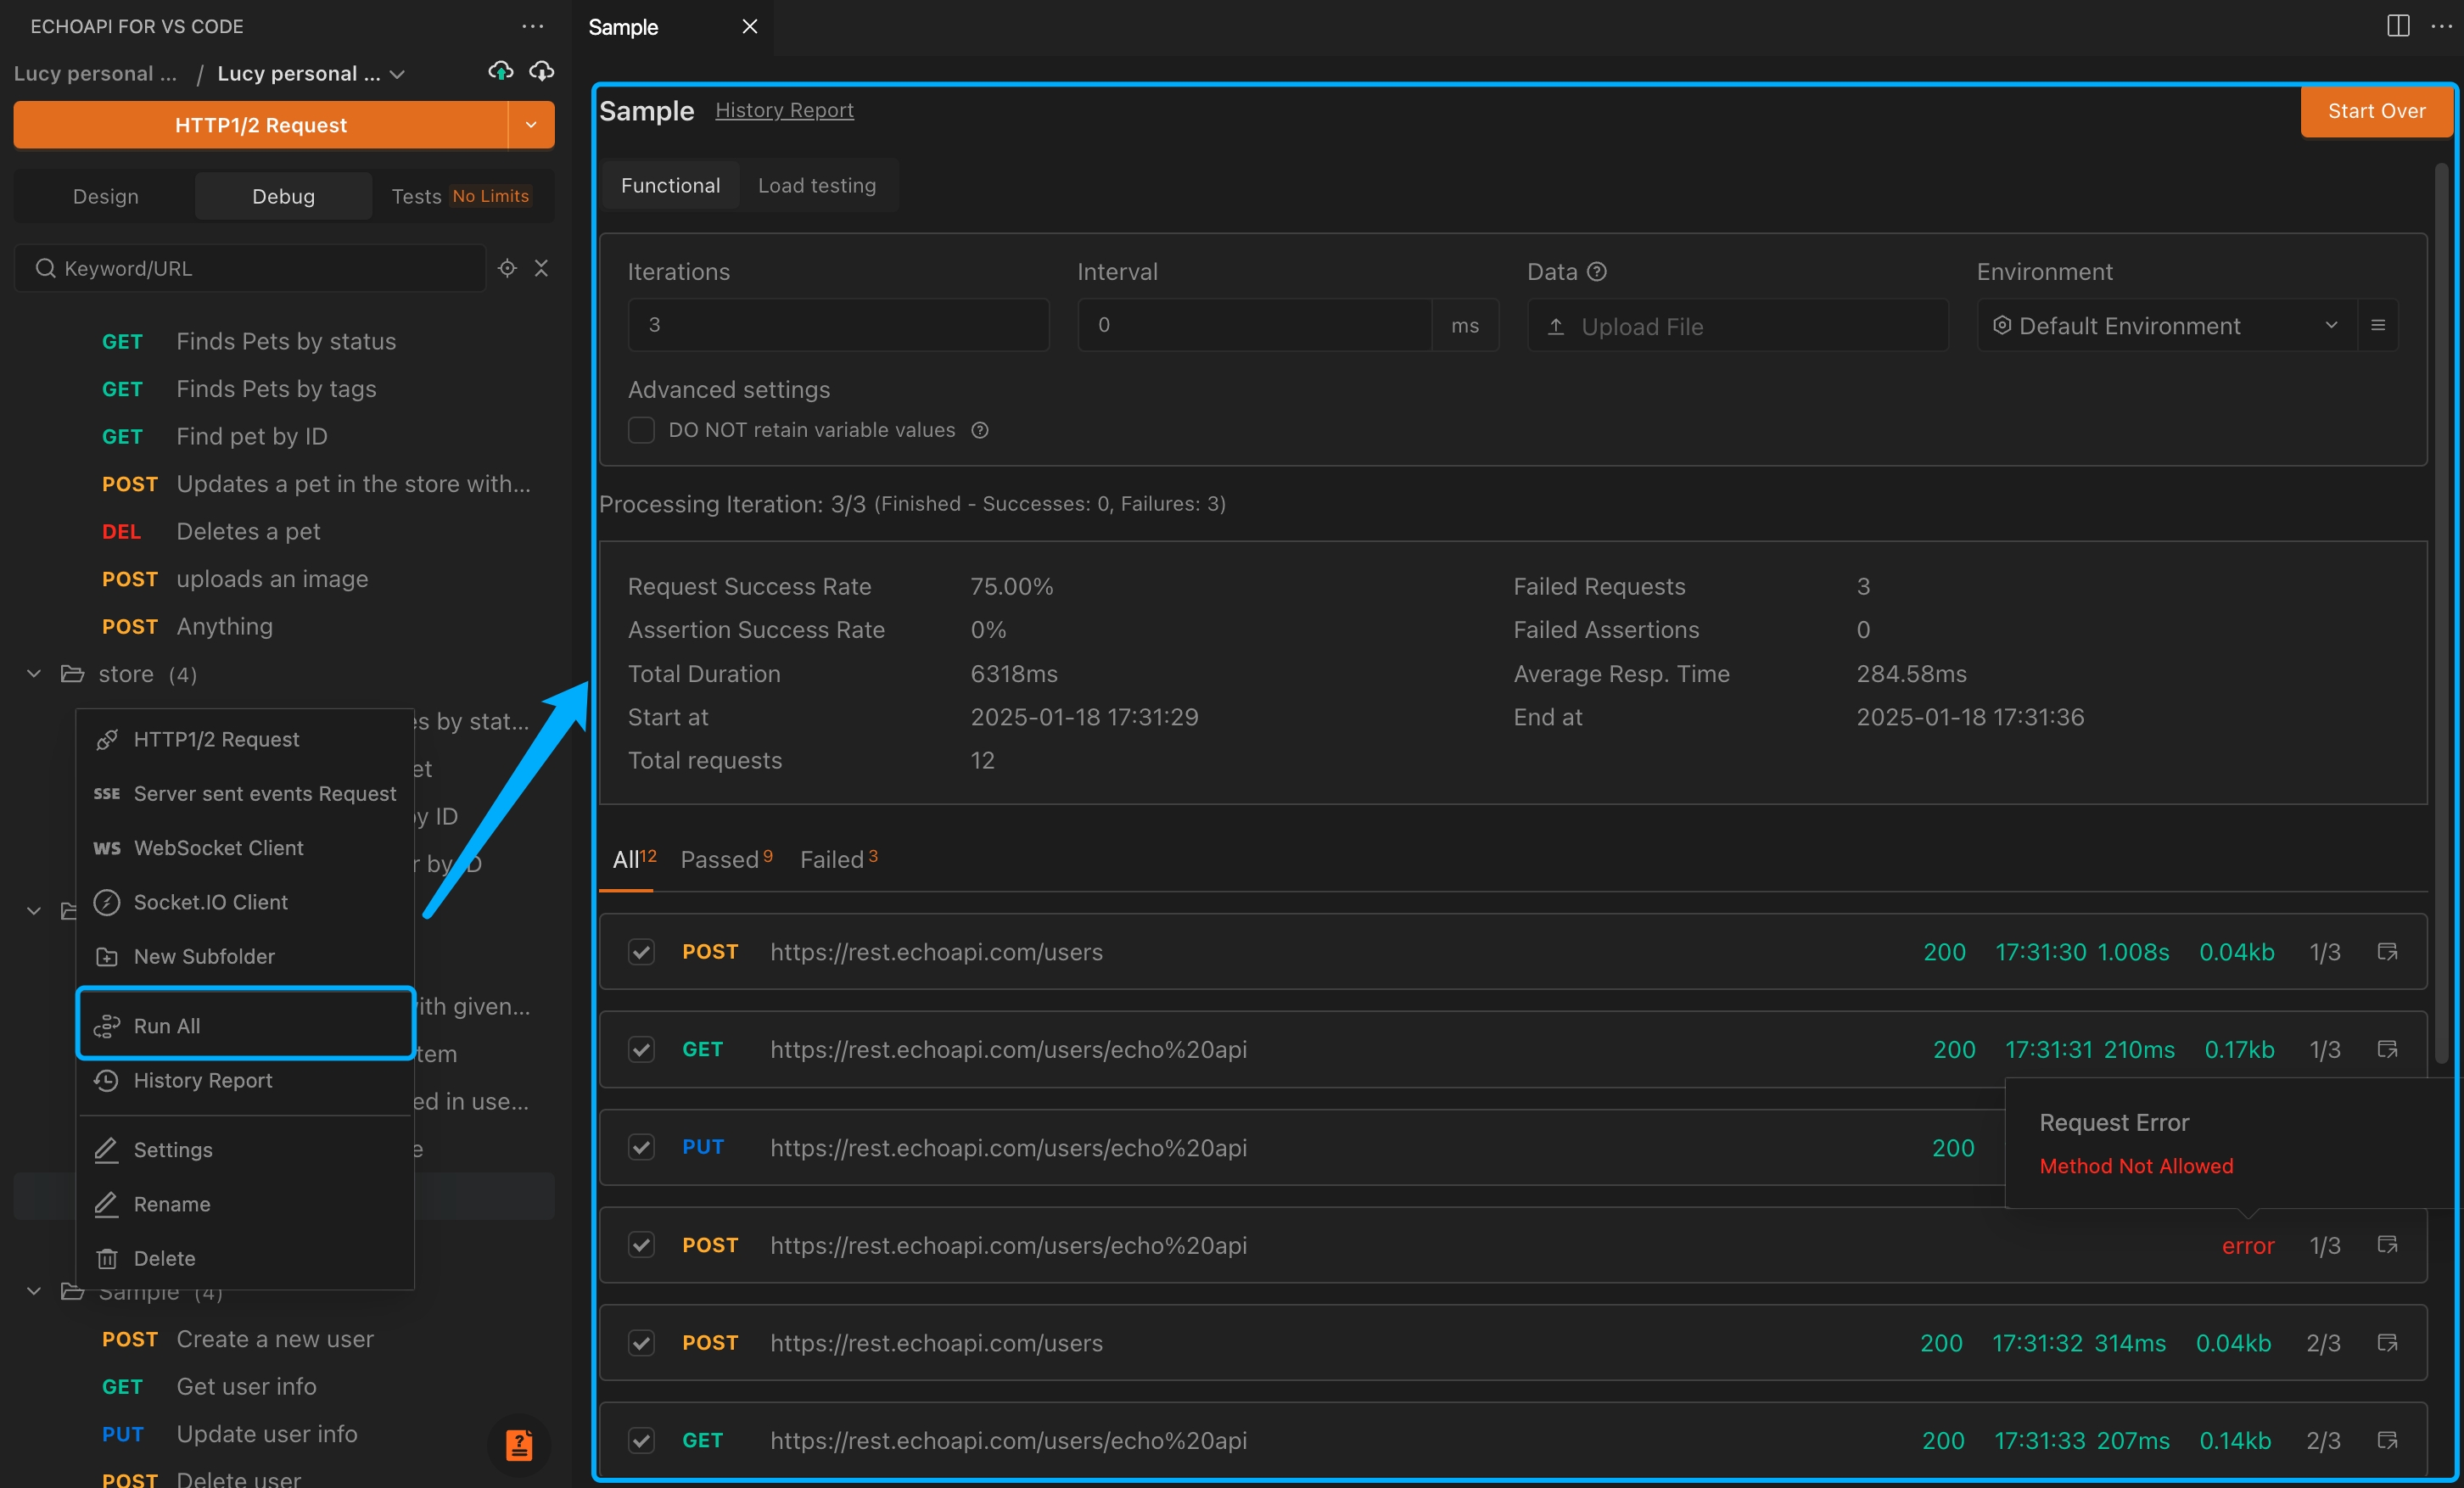
EchoAPI allows users to execute all requests in a collection in batch. By clicking the "Run" button, all requests in the collection will be executed, and a test report will be automatically generated. This is especially useful for large-scale API testing.
Best Practice:
- Combine data-driven testing with batch execution to improve testing efficiency and coverage.
- Regularly review historical reports to analyze API performance and identify potential bottlenecks or issues.
5. How can I design and generate API documentation in EchoAPI?
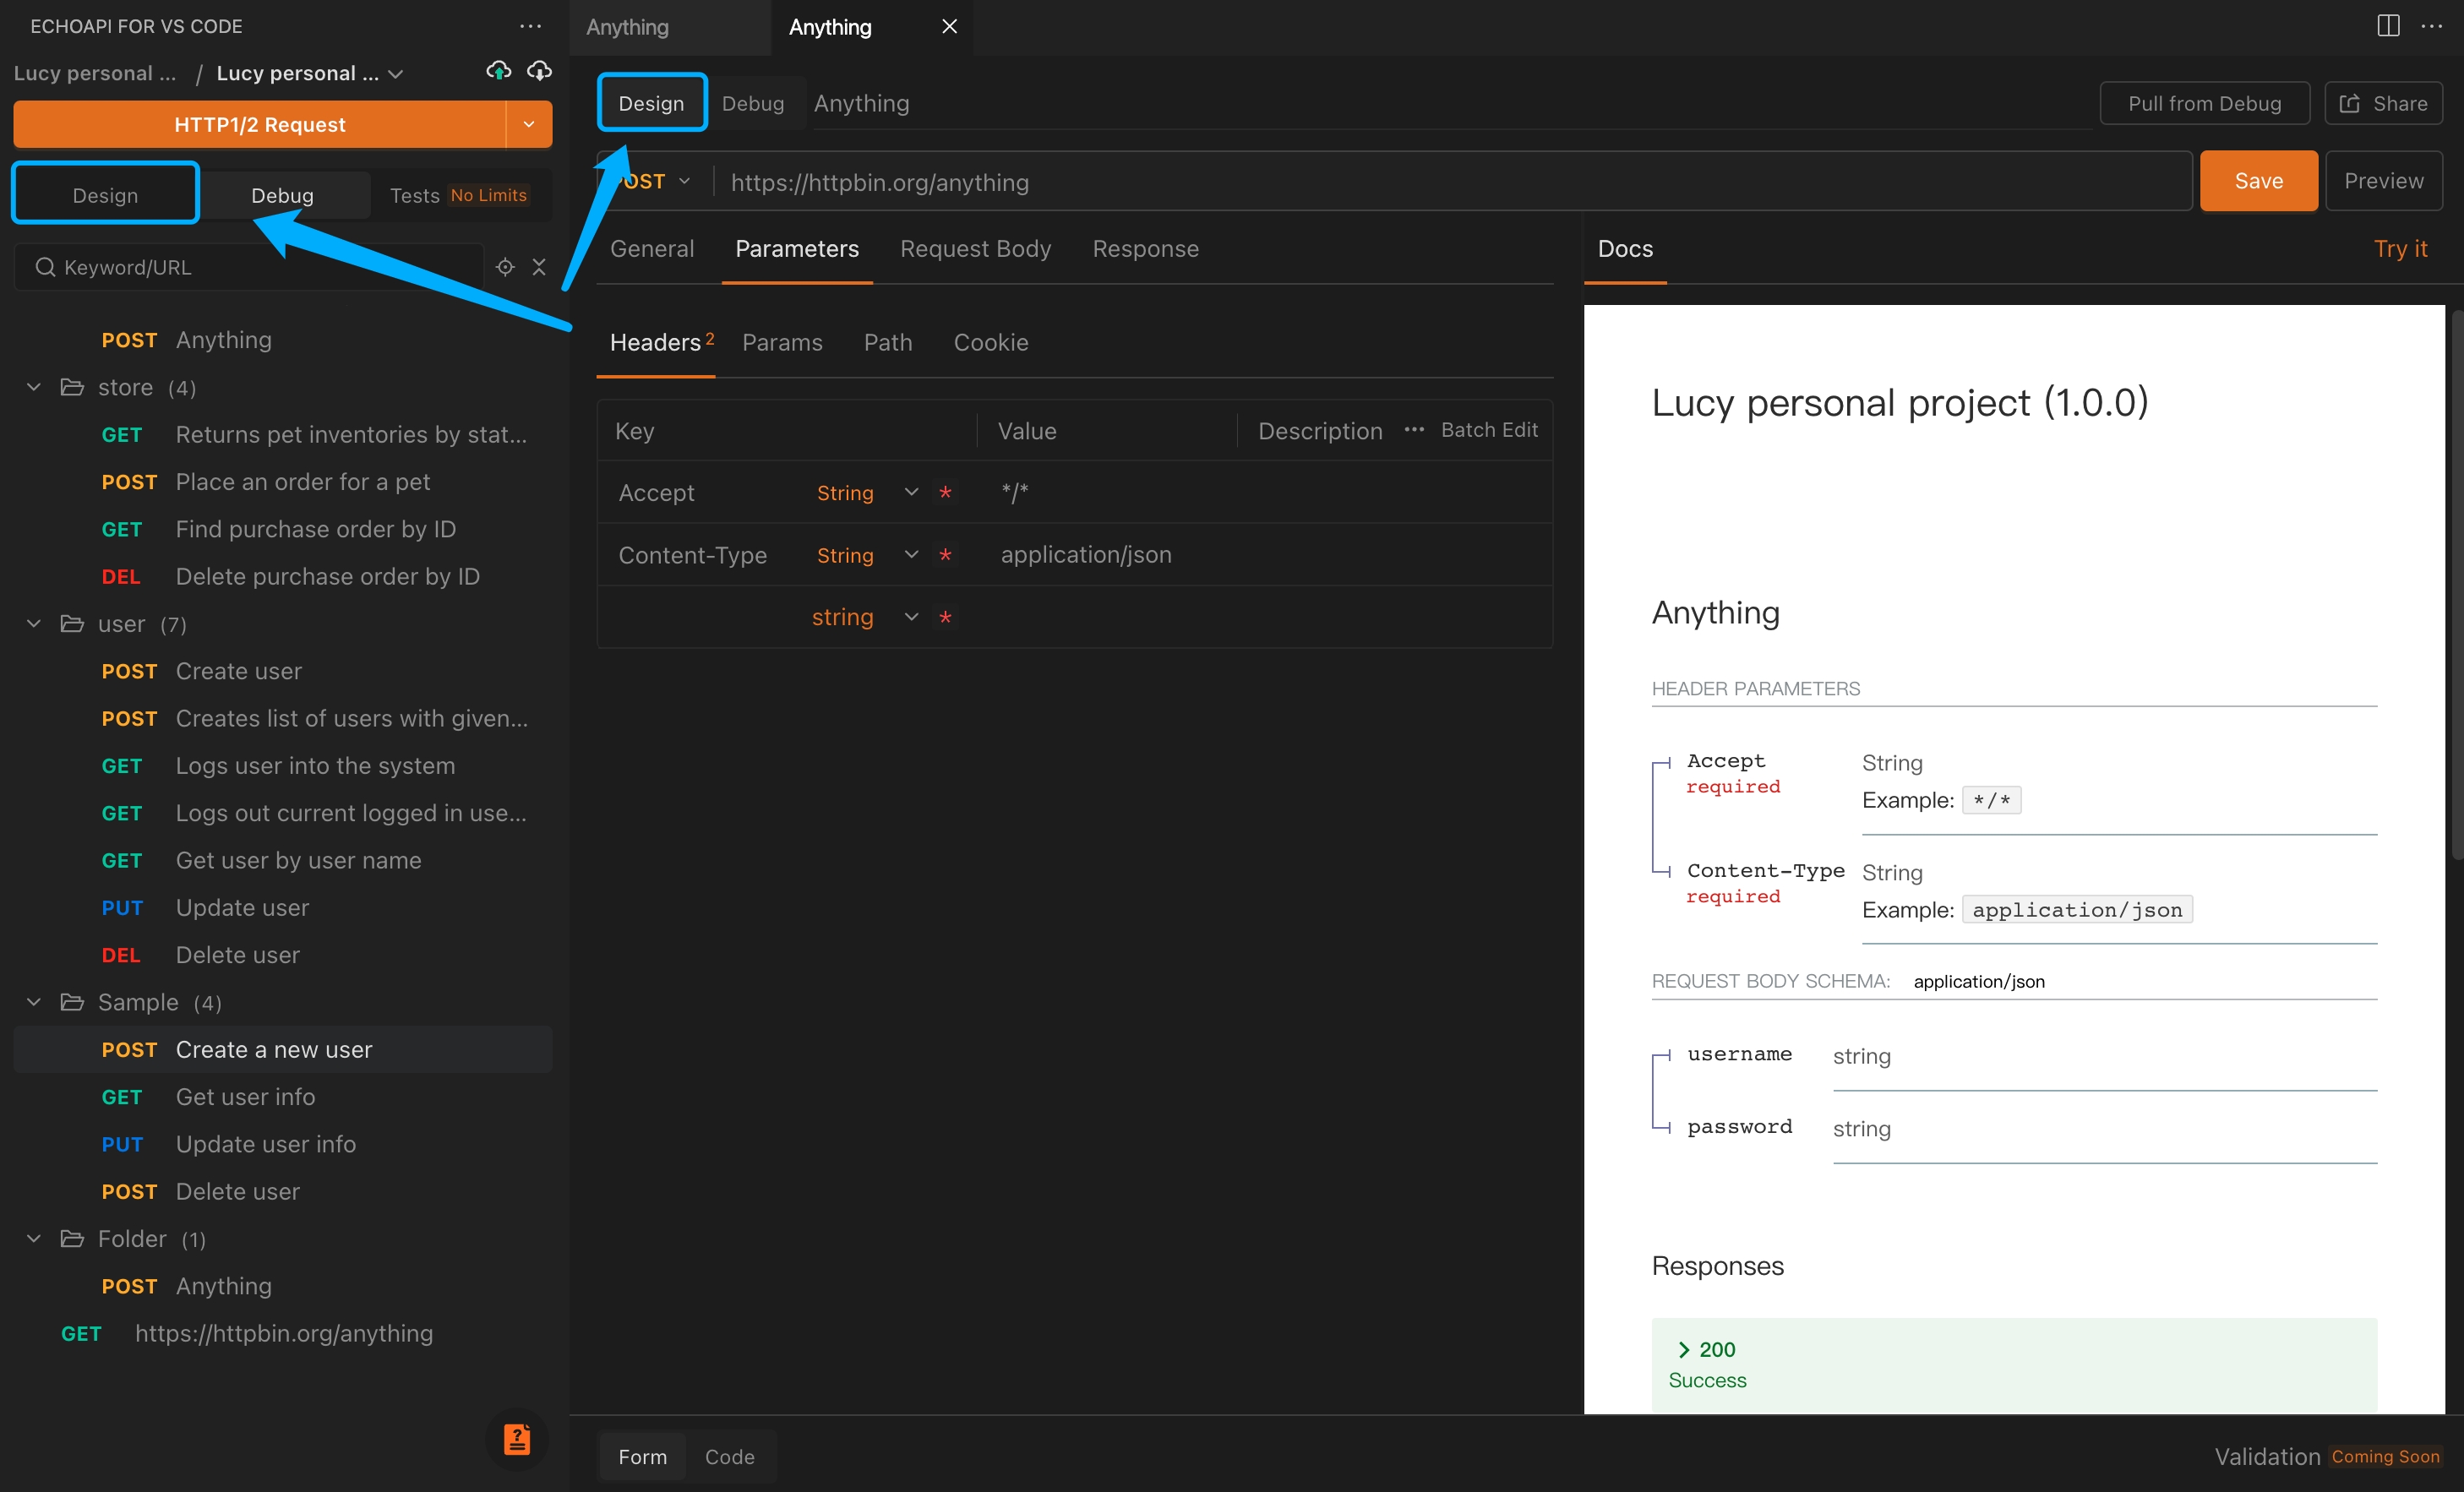
API documentation is the bridge between developers and testers, ensuring everyone has a shared understanding of the API. EchoAPI provides an easy-to-use interface for designing and generating API documentation quickly.
Solution:
Generate API Documentation:
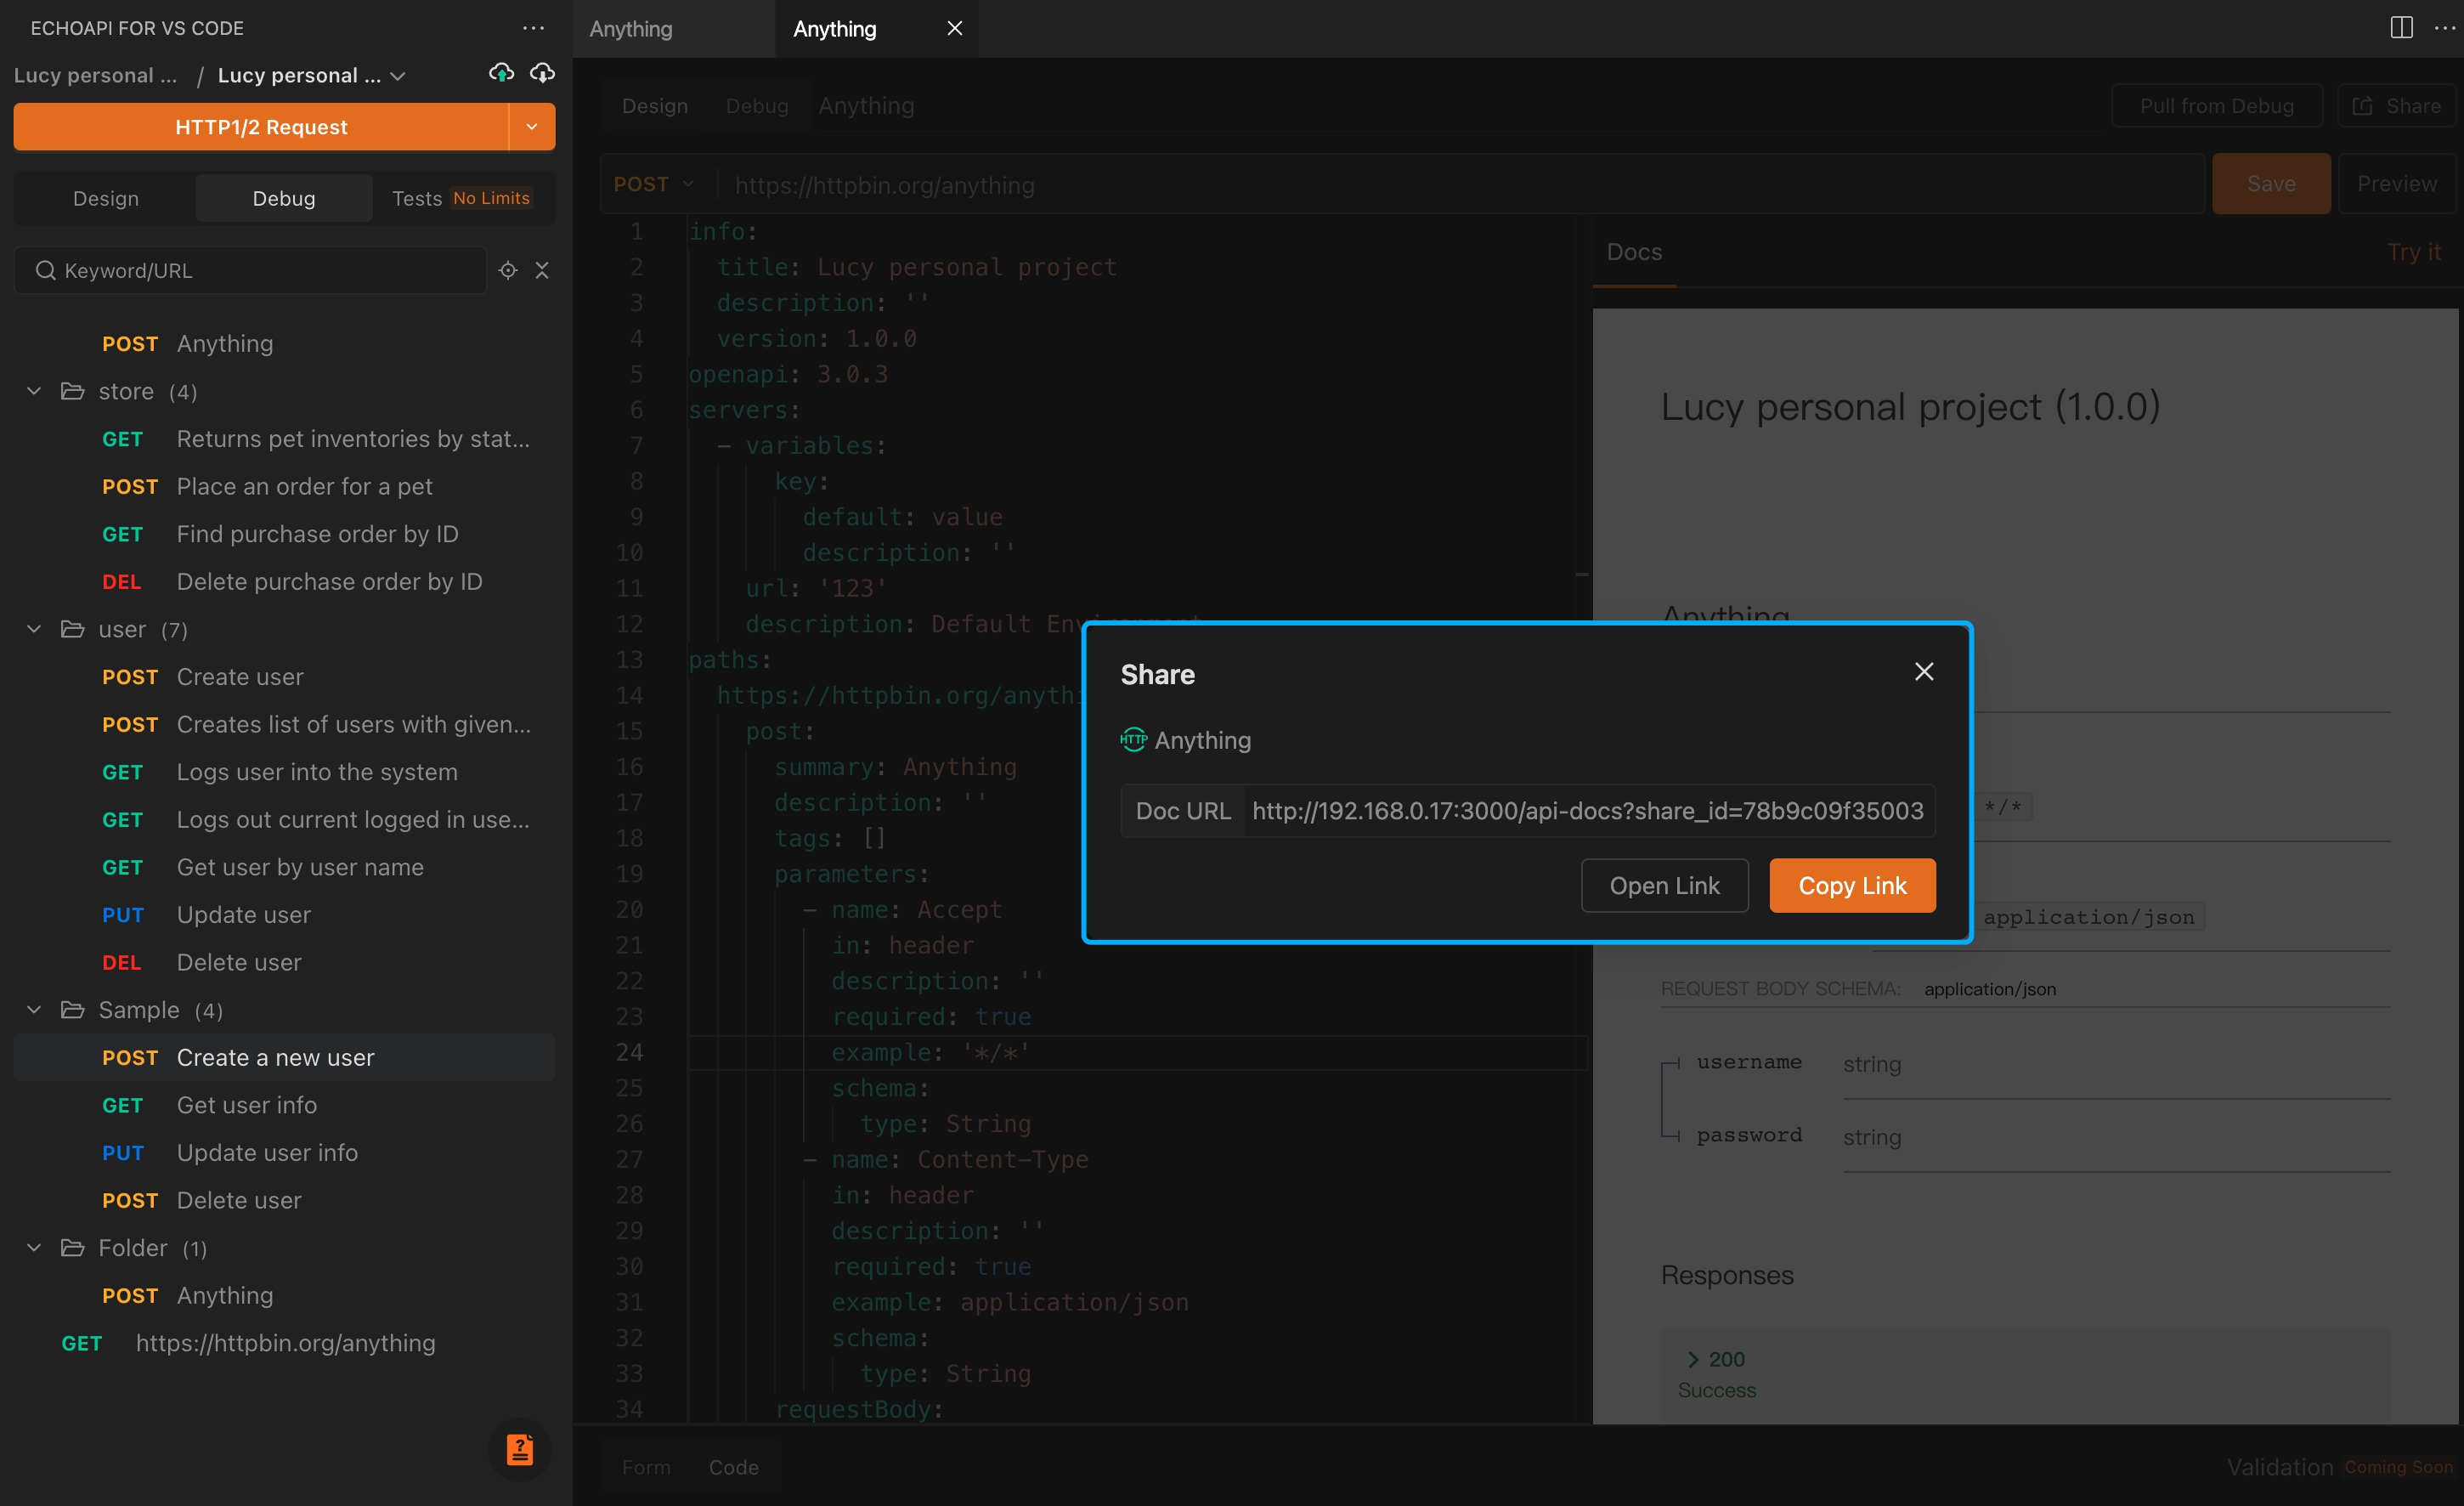
Once you’ve completed the API design, the system will automatically generate the API documentation. You can share the document with your team to ensure everyone has the most up-to-date and accurate information.
Design the API:
After creating an API in EchoAPI, click the "Design" button to enter the API design interface. Here, you can fill in the details such as request methods, parameters, response data, and more.
Best Practice:
- Ensure API documentation is updated promptly whenever changes are made to the API.
- For complex APIs, include detailed explanations and examples to make it easier for your team to understand.
We hope this guide helps you use EchoAPI more efficiently. Whether you're dealing with data storage, team collaboration, assertions, or batch testing, EchoAPI offers powerful features to meet the needs of different developers. If you have more questions or need further assistance, don’t hesitate to reach out to the EchoAPI team!


 EchoAPI for VS Code

 EchoAPI for IntelliJ IDEA

 EchoAPl-Interceptor

 EchoAPl CLI
 EchoAPI Client
 API Design
 API Debug
 API Documentation
 Mock Server


