From Code to Heart: How Developers Can Create Meaningful Valentine’s Day Experiences With EchoAPI
Using our geeky superpowers—the coding languages we know best—to craft something uniquely special. How awesome does that sound?
Ah, Valentine's Day! A day to show love and affection, but as coders, we have a chance to flip the script and add a little sparkle to the usual clichés. Instead of following the well-worn path—flowers, chocolates, and fancy dinners— why not get a bit wild, a bit creative, and bring our love to life in the one language we understand the most: code?

One of the most exciting parts of receiving a gift is the unboxing. That moment when you first hold it in your hands—the weight, the mystery of what’s inside—and with each passing second, your curiosity grows. The anticipation, the slow peeling away of the layers—it’s the whole experience that brings joy, not just the gift itself.
What if we could transform that magical moment into something truly unforgettable—not just by handing over a gift, but by turning the whole experience of receiving it into an adventure? Using our geeky superpowers—the coding languages we know best—to craft something uniquely special. How awesome does that sound?
Crafting a Special, Personalized Gift Through APIs
As developers, we have the ability to express our feelings in uniquely creative ways. By combining our technical expertise with a personalized touch, we can create something truly special. Join me as we use EchoAPI to craft an experience that will make our loved ones feel cherished and celebrated. Let’s build something memorable together!
Prerequisite 1: EchoAPI
To get started, we’ll be using EchoAPI, a free and incredibly useful tool for building and testing APIs. With EchoAPI, we can easily design, test APIs tailored to our needs.
EchoAPI also offers a fantastic documentation sharing feature, which allows us to include all the API endpoints in an easy-to-share format. Additionally, it provides a mock environment that helps us design and generate the APIs without the need to fully deploy them.
Prerequisite 2: PoetryDB
Link: https://poetrydb.org
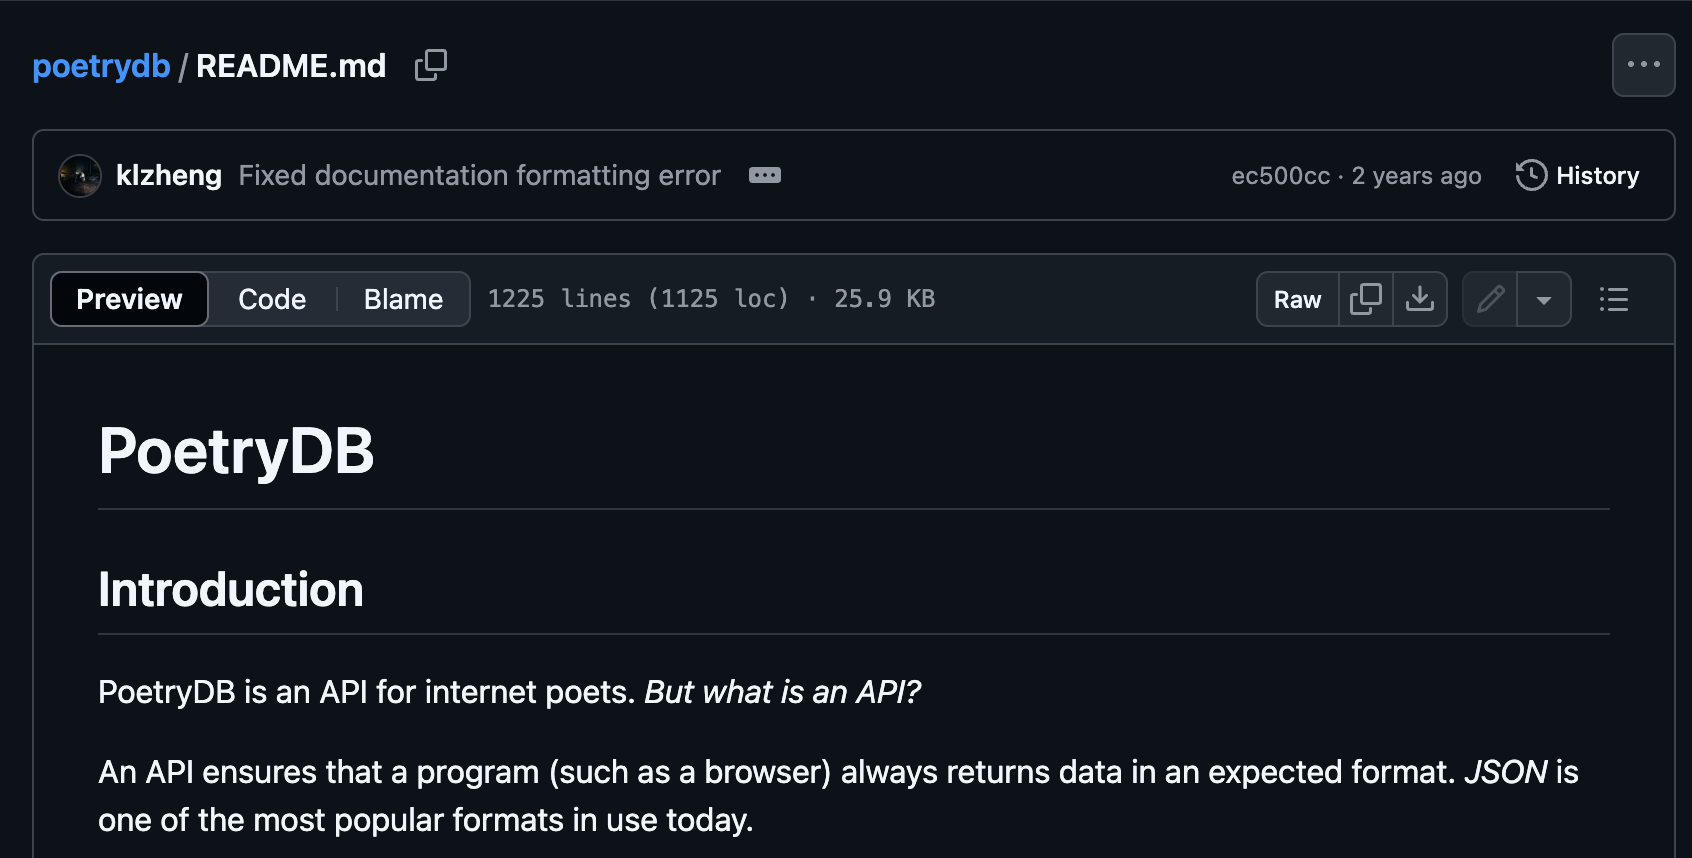
To add a personal touch, we’ll also use PoetryDB, an API designed for internet poets. PoetryDB allows us to access a vast collection of poetry, which can add beauty and sentiment to our custom APIs. It’s perfect for incorporating love poems into our messages.
(The API setup here may require some extra work, but don’t worry—we’ve already set it up for you. You can follow the steps I’ve laid out, and later make any adjustments if needed.)
Prerequisite 3: Patience
While the process is straightforward, it’s important to remember that crafting something truly special for our loved one requires time and attention to detail. Patience is key. Even though the steps are easy, we want to ensure that every part of the gift is well-designed, carefully crafted, and thoughtfully executed. Putting effort into every step ensures that the end result will be something memorable and meaningful. Let’s make sure we take the time to get it just right.
First: Create the Greeting API
The first step is to build the APIs that will deliver our greeting messages.
Let’s create something special with a personalized greeting API with EchoAPI!
Here’s a fun, step-by-step guide to make sure a sweet message can be sent to a loved one.
Step 1: Create a New API
Start by creating a new API! Follow the simple instructions below:
1. Create a New Request:
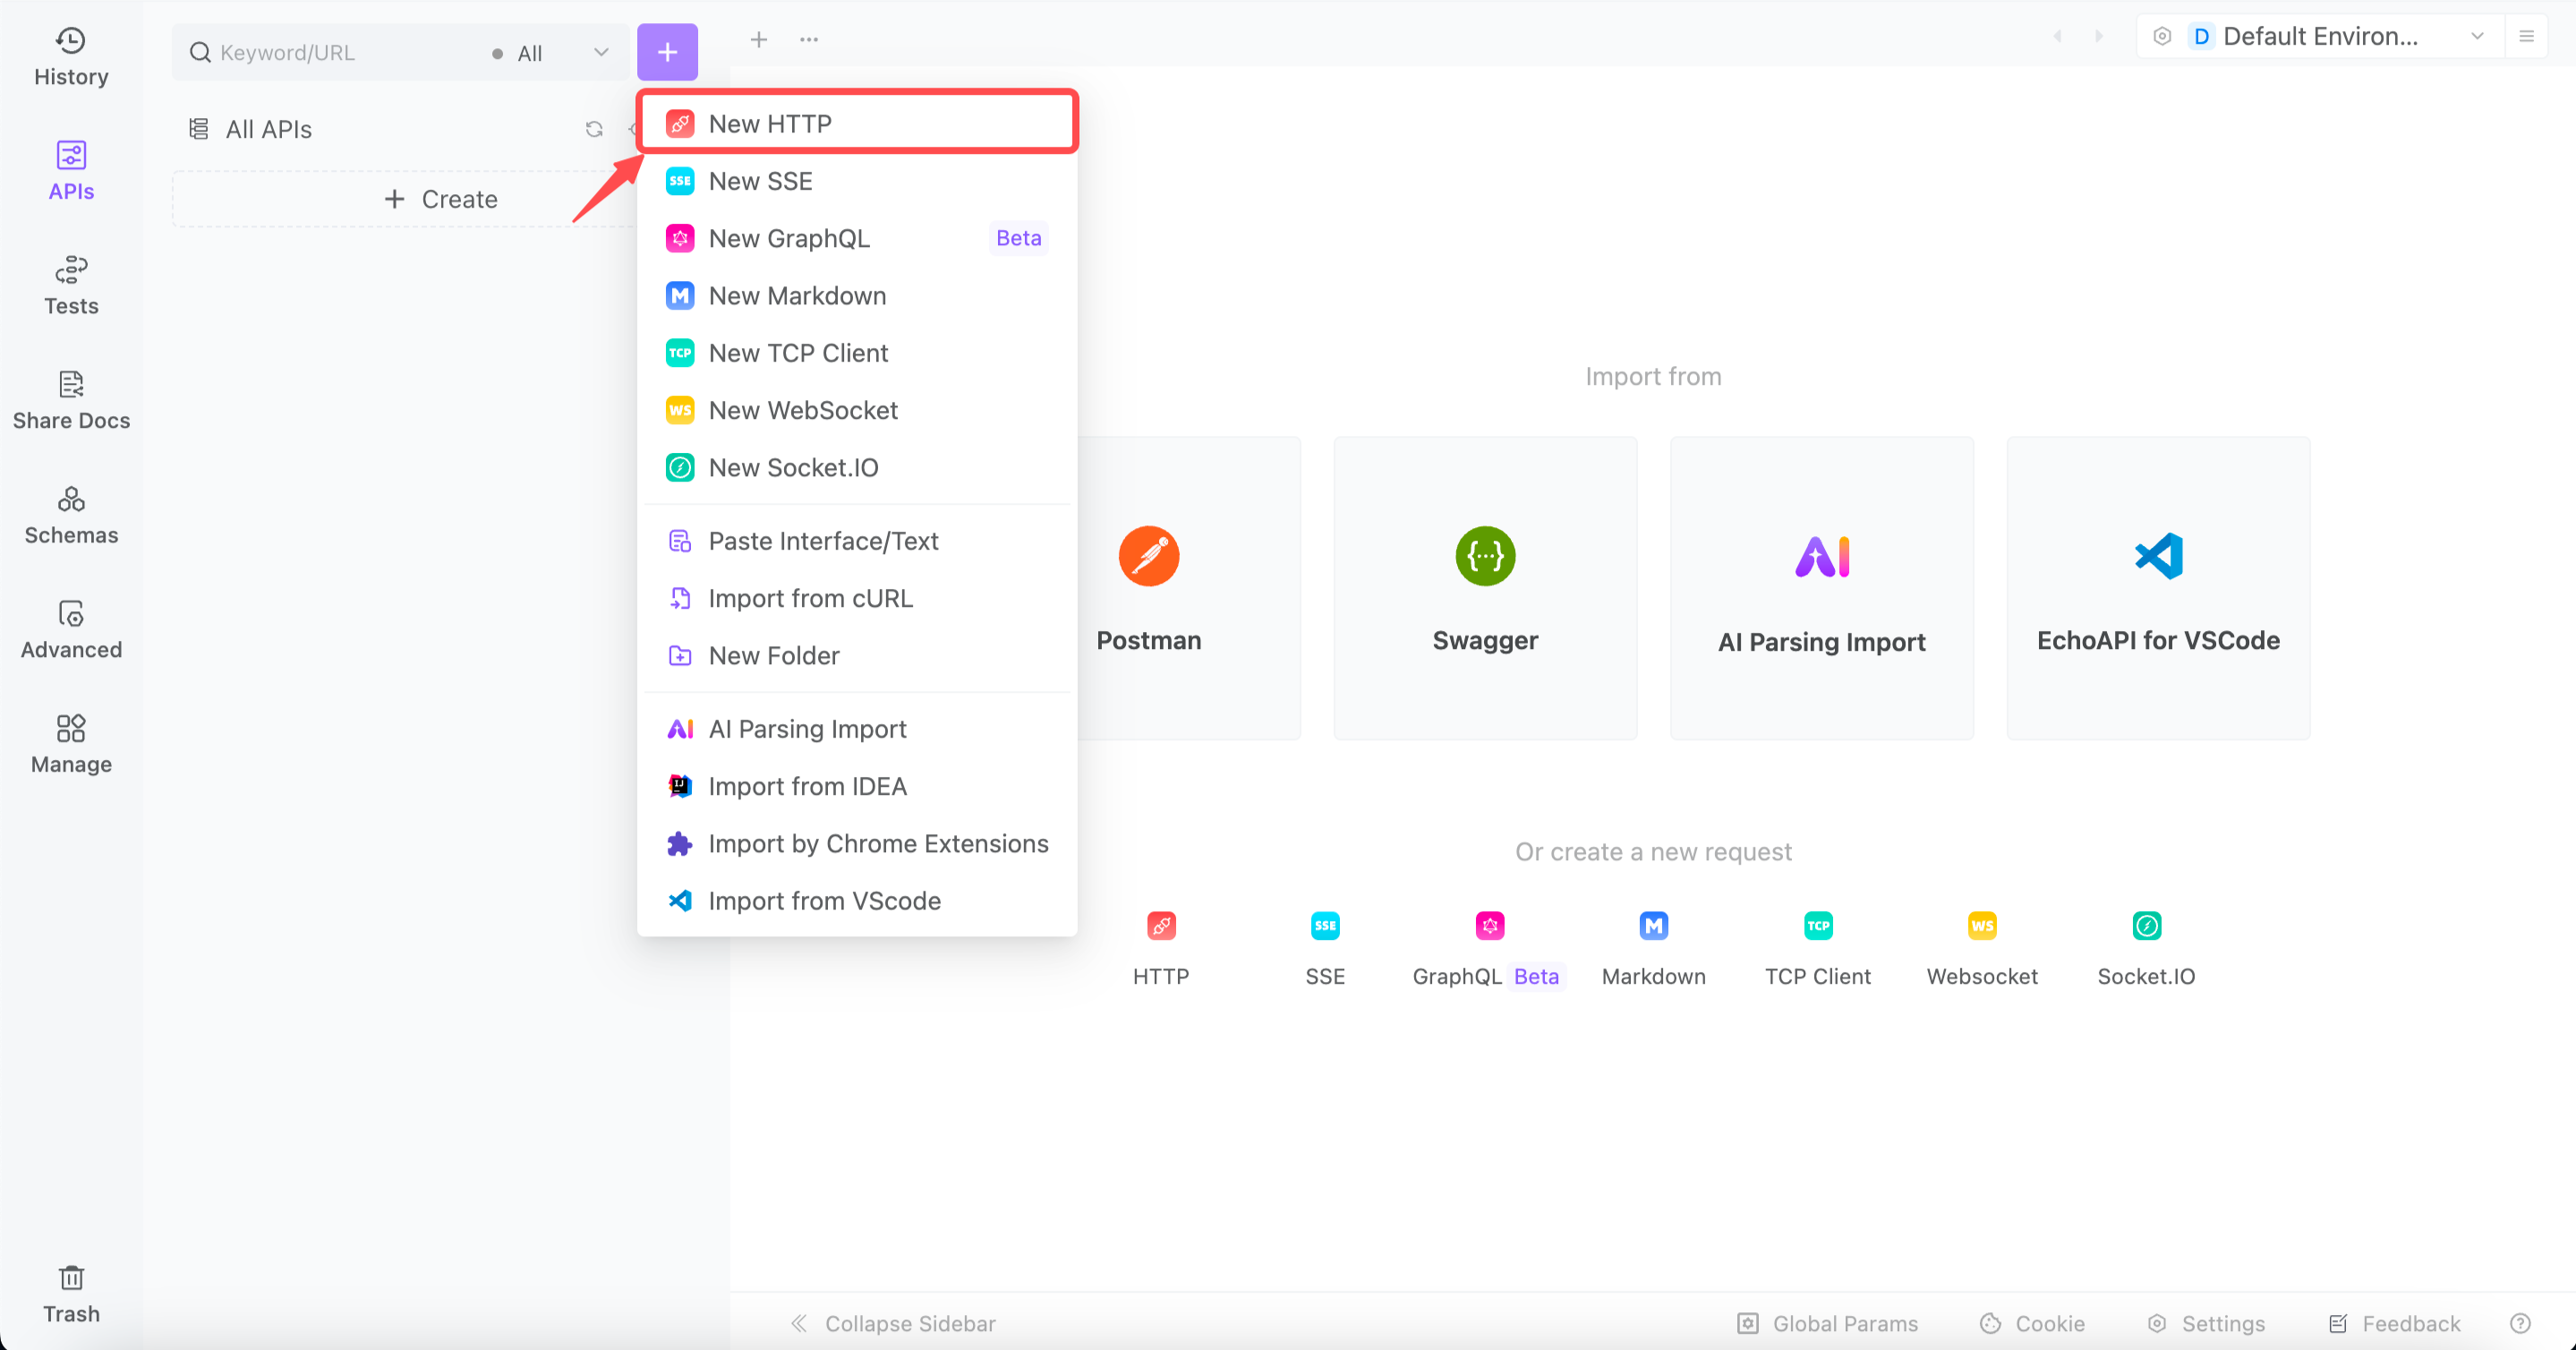
Click on the highlighted section to create a new HTTP request. Since we want to return something, we’ll be using the GET request type.
2. Name the API:

In the space bar next to the "Share" button, name the new API something meaningful, like "Hi"—this will be the foundation for the greeting.
3. Set the URL:

In the highlighted bar, define the URL name. This will be the address for sending the message.
Step 2: Design the Greeting
Now, let’s craft the perfect message:
1. Switch to the Design Tab:
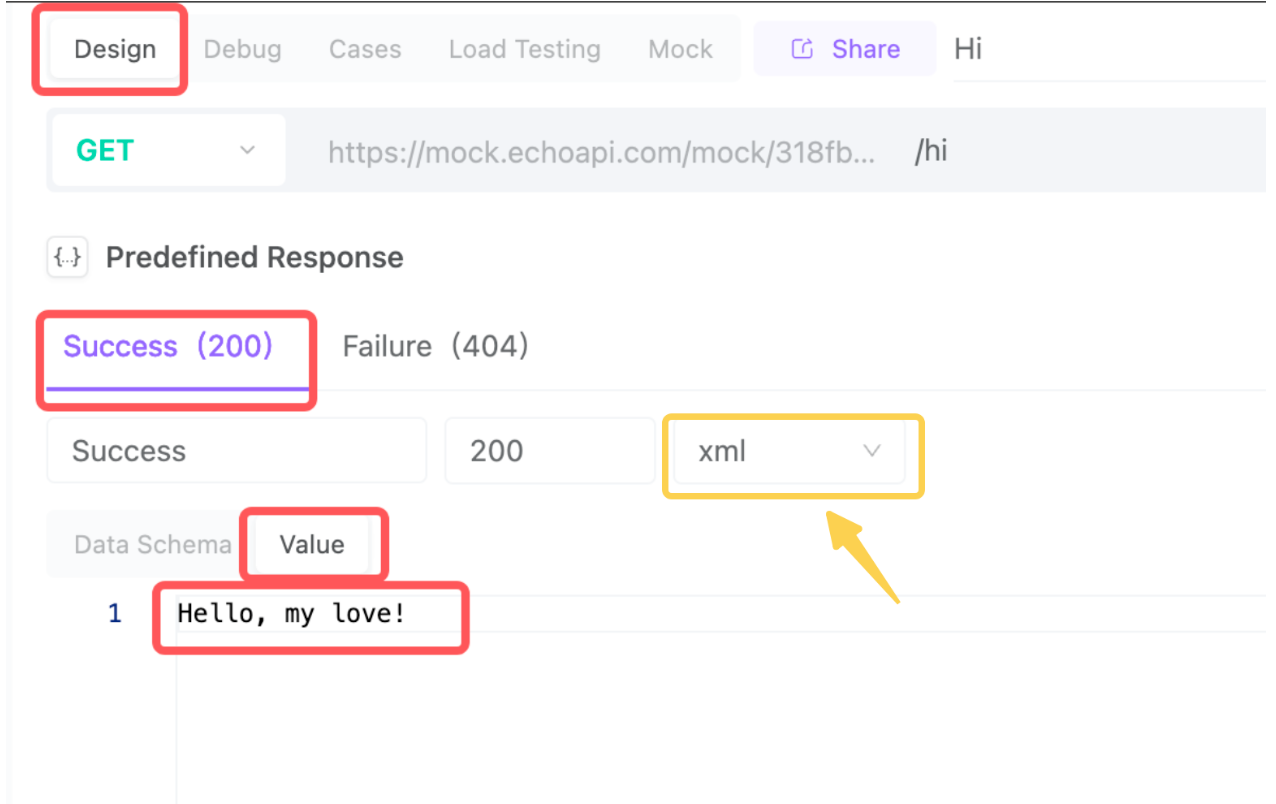
Head over to the "Design" tab and change the data schema to "values."
2. Write the Greeting:
Here’s where creativity comes in. A classic greeting might be "Hello, my love!" but feel free to personalize it however you like. Whether it’s a short, sweet message or a longer, heartfelt expression of love, it’s all yours.
P.S. If inputting words directly into the API, remember to switch from JSON to XML
Step 3: Set Up Mocking
Let’s bring it to life:
Turn on Mocking and Set the Response:

Go to the Mock Settings and toggle the mock button. This lets the API simulate the response without needing to fully deploy it.
Change the expected response status to 200 (a success code). This ensures that when others use the API, they’ll see the default successful response.
Step 4: Test the API
It’s time to see the magic:
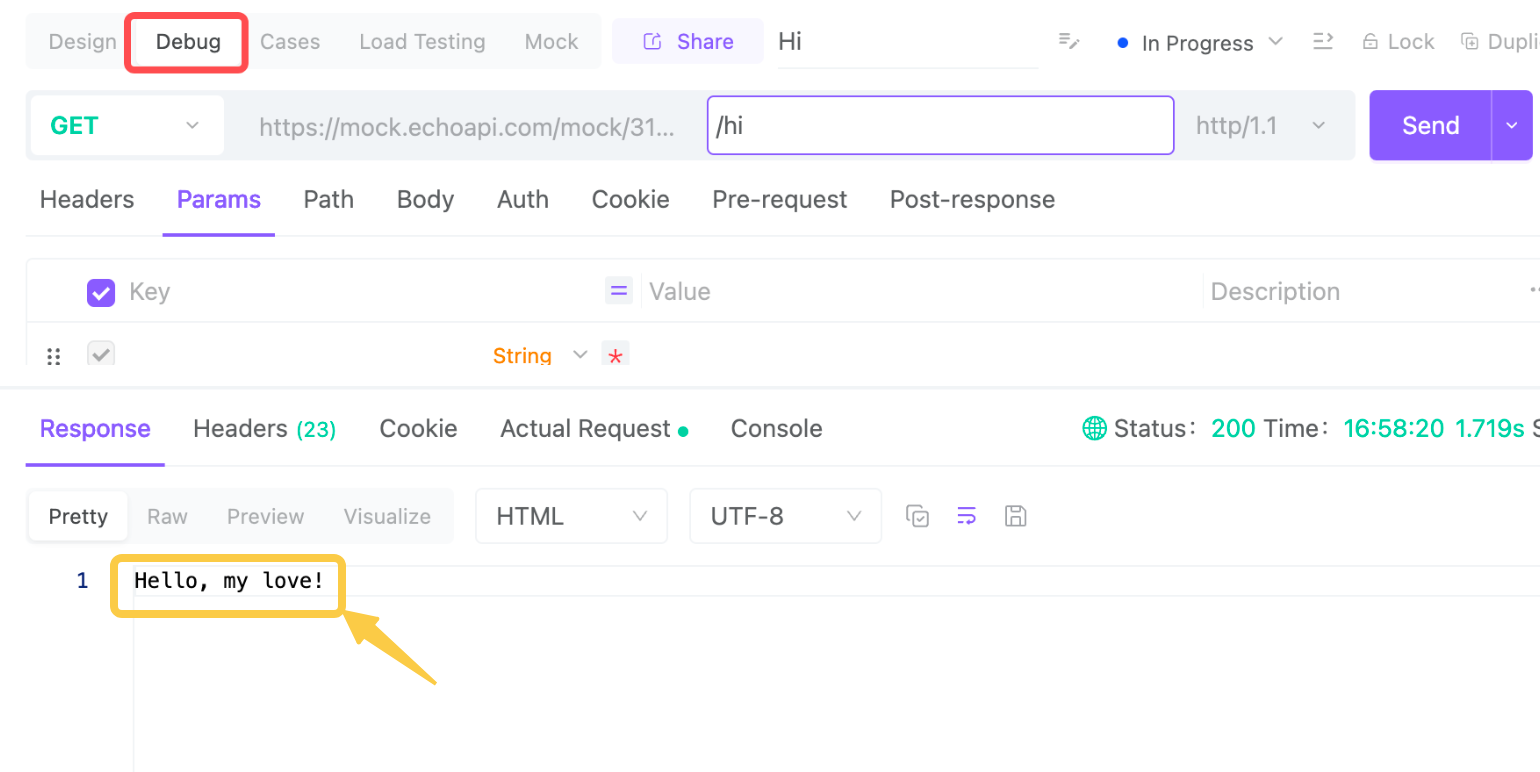
1. Go to Debug: Head to the Debug tab and click "Send."
2. See the Result: Watch as the greeting is returned in the mock environment! The message, "Hello, my love!" will show up as the response section.
Now, a personalized greeting API is ready to send sweet messages. When the API documentation is shared, others can interact with it too, experiencing the same lovely greeting. A creative and unique way to express affection!
Second: Set Up the Love Poetry API
This part is simple. After creating a new request, change the name to something meaningful.
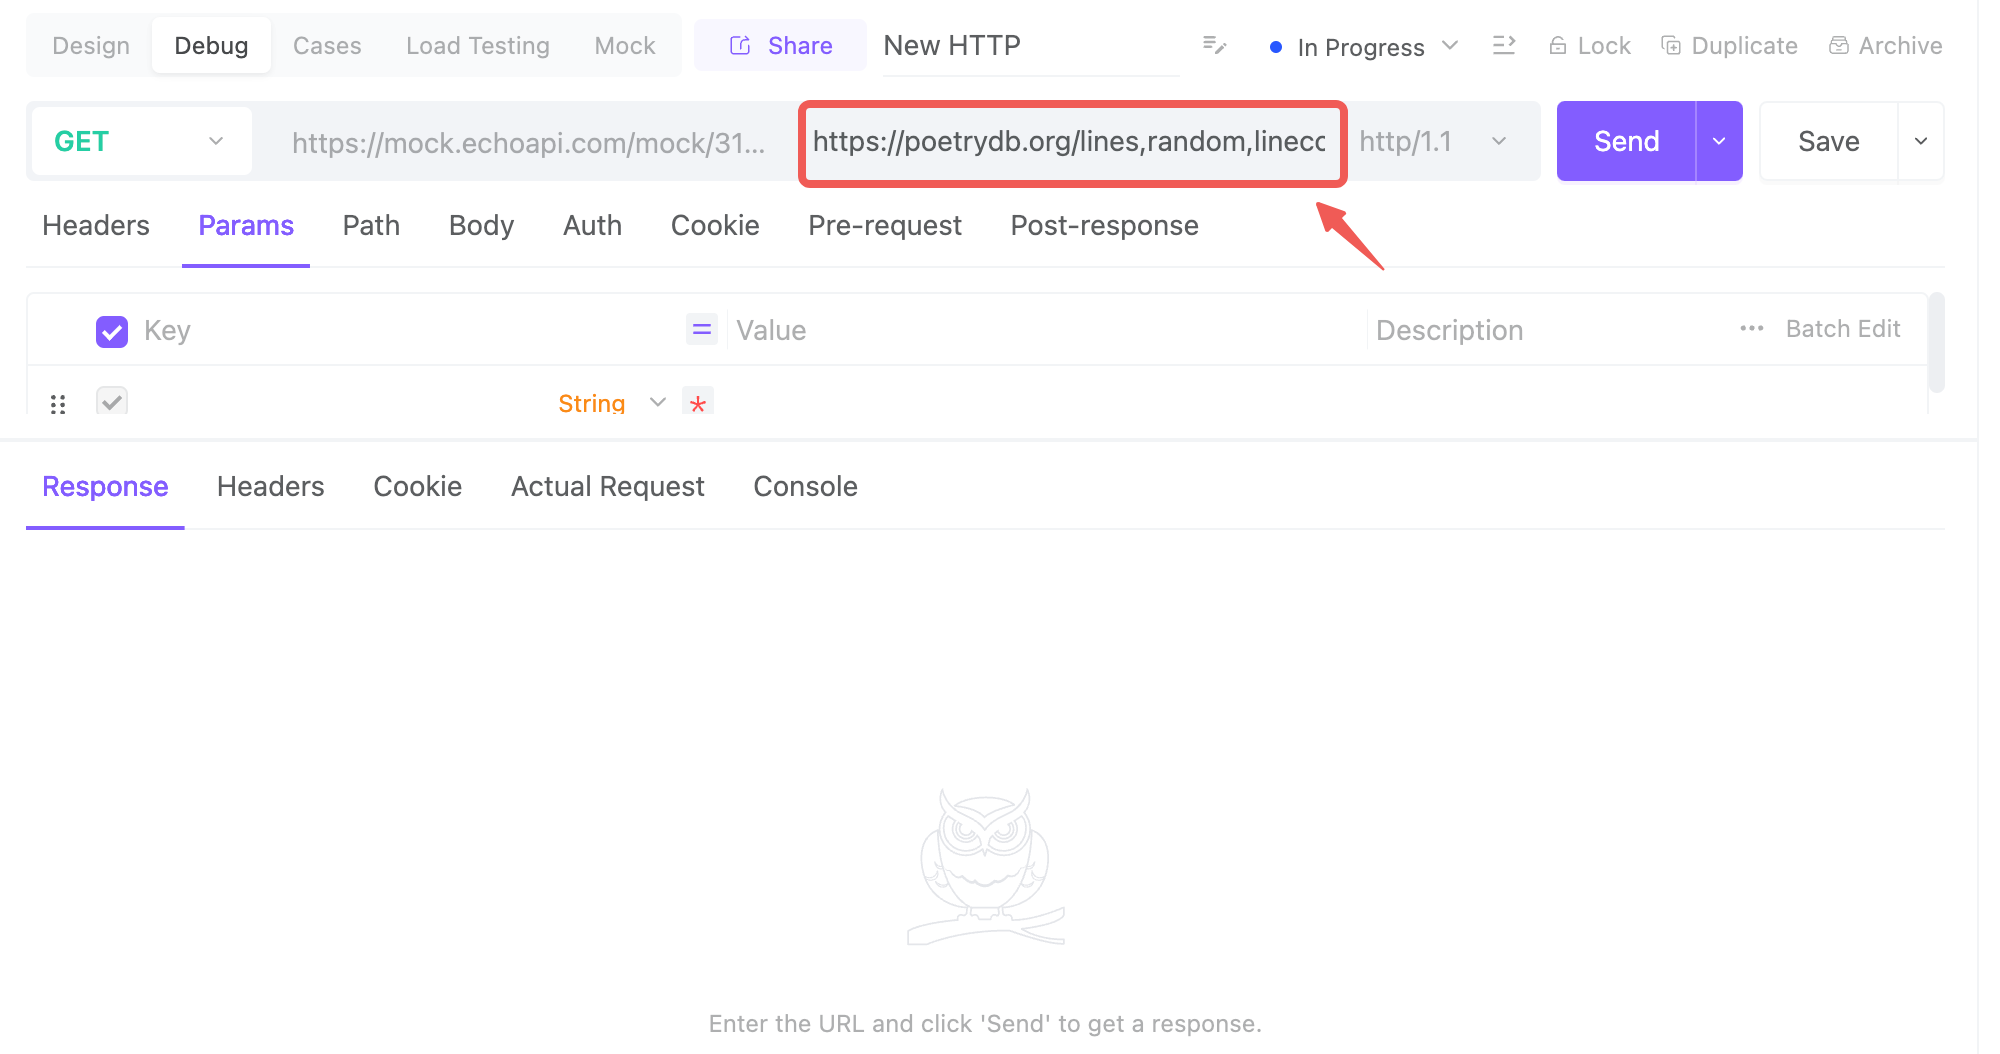
Then, head over to the Debug section, and use the URL here.https://poetrydb.org/lines,random,linecount/love;1;15/lines.text
We set the URL to return a random love poem with a 15-line count. If you need further customization or setup, you can refer to the API documentation generated by the creator for more details.
The great thing about EchoAPI is that even though we’re in the mock setting, if the system detects two URLs, it will automatically use the second one without any extra configuration. This makes testing APIs super easy.
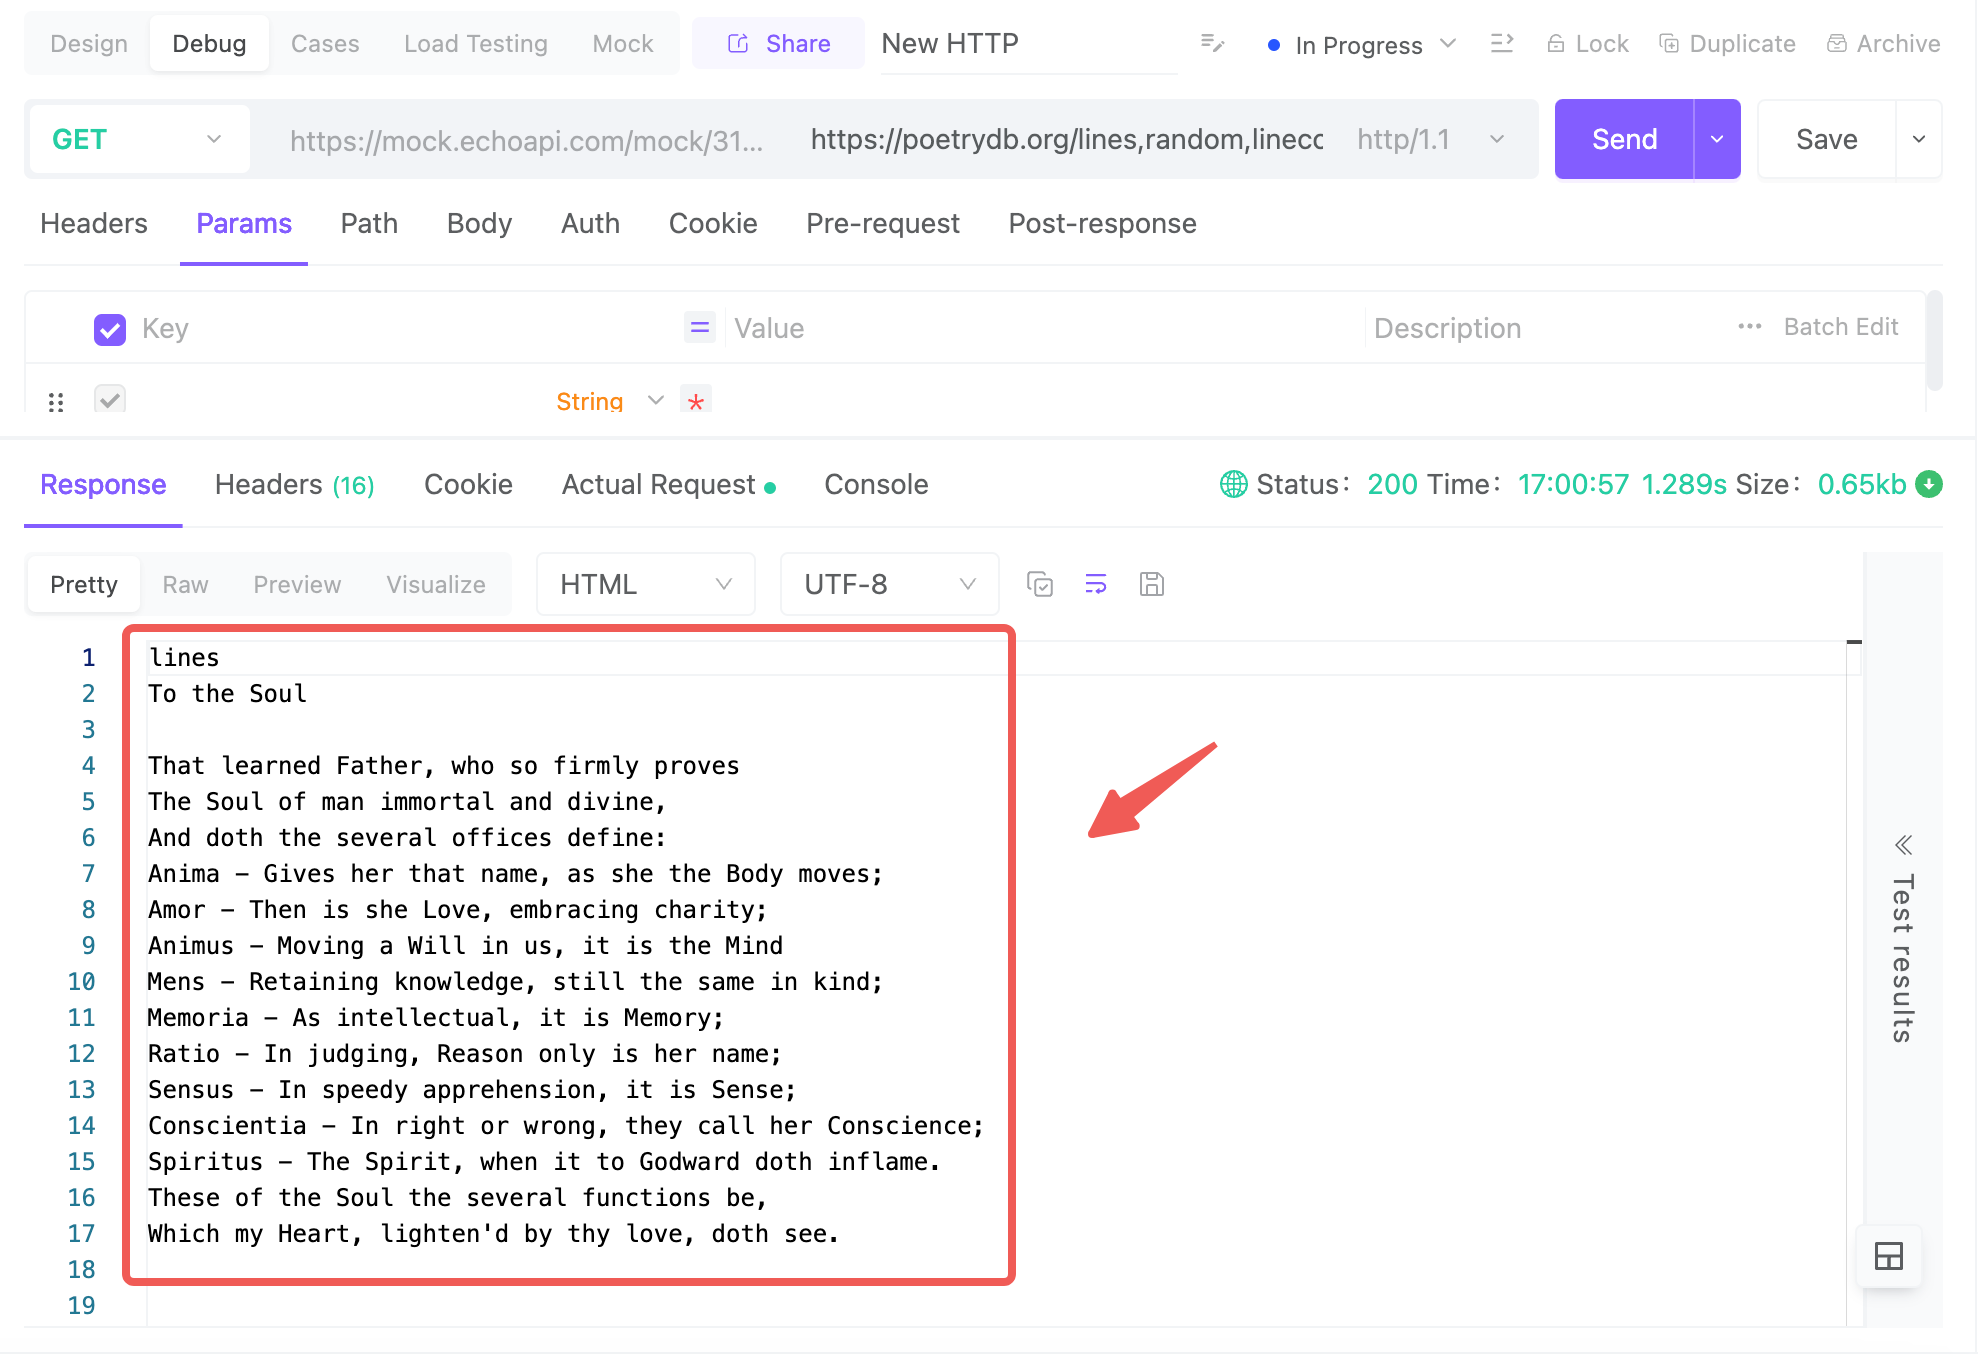
Click "Send", and thanks to the API designer, we’ll receive a beautiful love poem ready to share with a loved one.
Third: Set Up the Gift API
Just like we did before, we can set up a new GET request, but this time let’s add something to make it more interesting!
Step 1: Design the API with Query Parameters
In the Design section, we can define different query parameters. When others use this API, they can input key-value pairs, and based on the input, we’ll return the corresponding response.
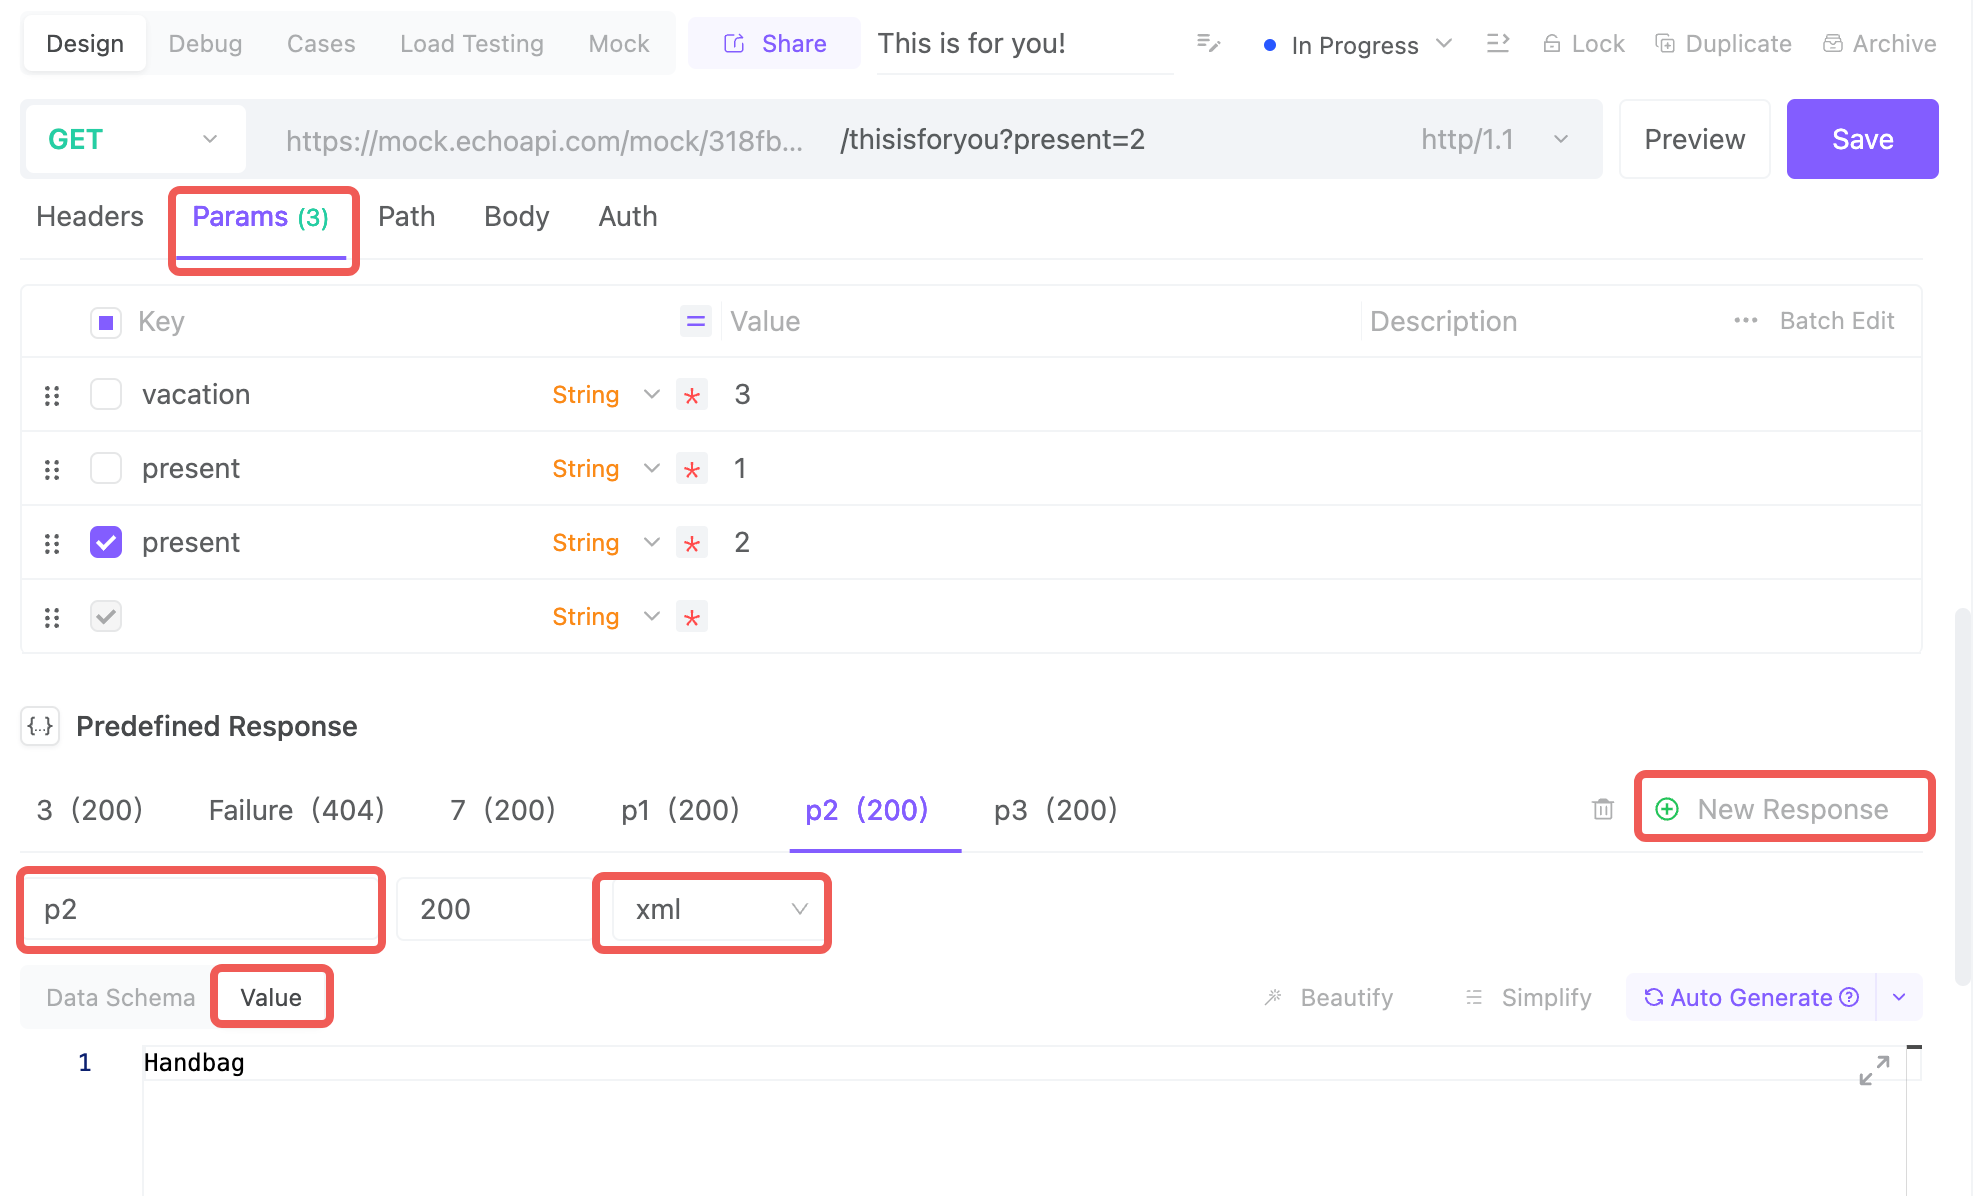
1. Set Query Parameters: Design the logic so that each response matches a specific query parameter. For example, I want to return different responses depending on whether the input for the key-value pair is "present" with a value of 1,or key-value pair is "vacation" with a value of 3.
2. Add Predefined Responses: On the same page, go to Predefined Responses and add new responses that match the query parameters and values you want to use. I’ll create three different responses: p1, p2, and 3, each corresponding to a different set of query parameters.

Step 2: Mock Section Setup
Next, let’s head to the Mock Section:
1. Turn on Mocking: Make sure the mock button is turned on.
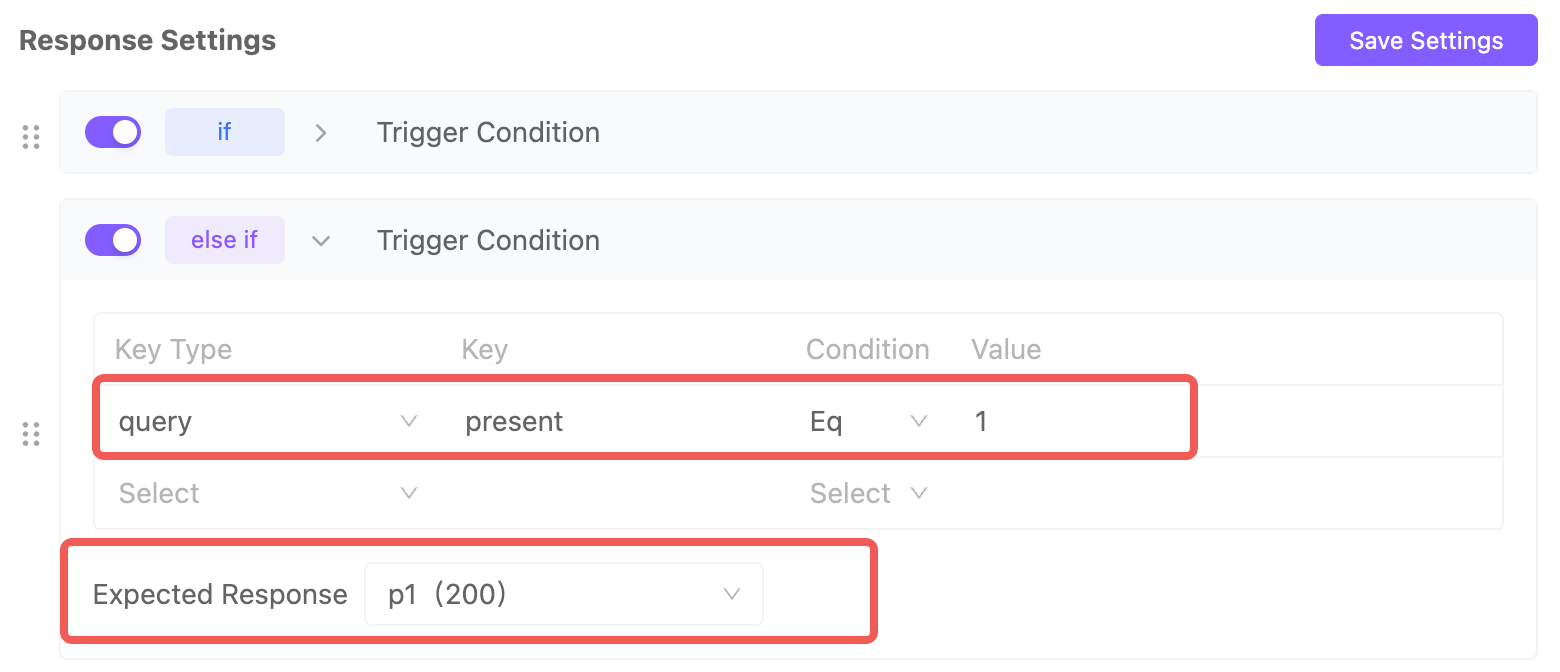
2. Configure the Response Settings: We want the correct response to be triggered when a specific query parameter and its corresponding value are entered. In the Trigger Condition, set the key-value pair that should match the response. For instance, I’ll set the key "present" equal to 1 and associate it with p1 in the response settings. This ensures that when "present" and "1" is input, p1 will be returned.
Step 3: Save and Test
1. Save All Settings: After configuring everything, make sure to save your settings.
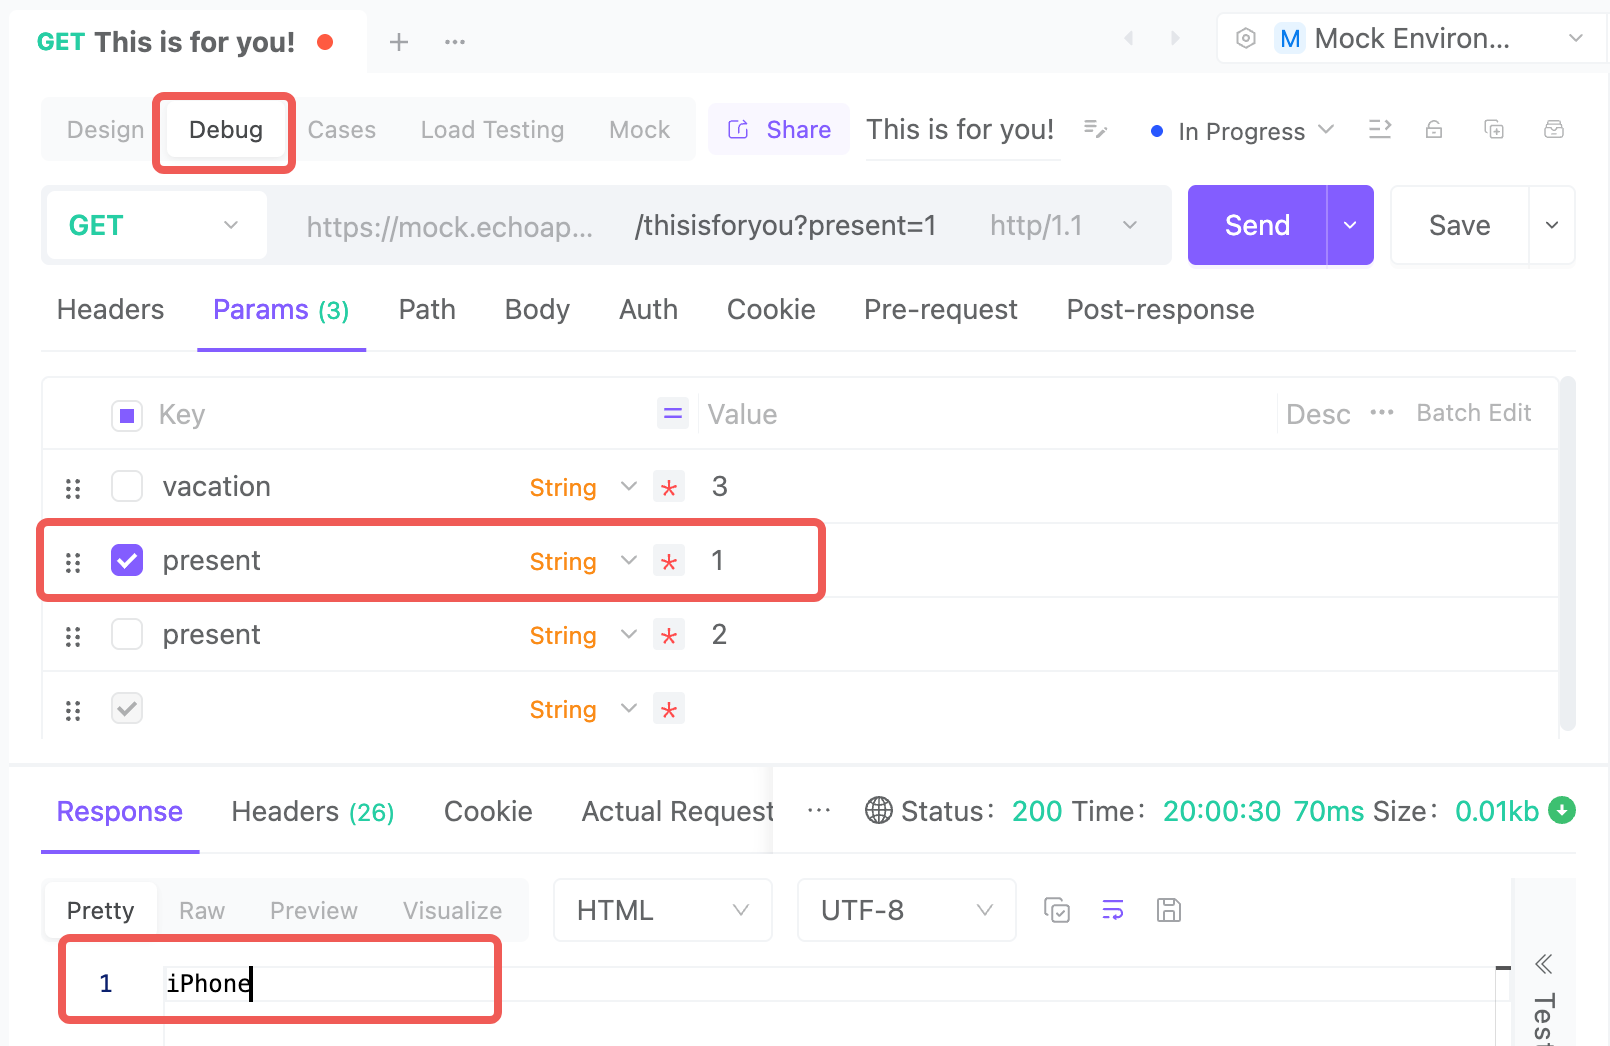
2. Go to the Debug Section: In the Debug section, click on the parameter you want to test and click Send. You’ll notice that the response matches what was expected based on the query parameters.
3. P.S. If the expected response doesn’t show up, here’s a quick fix:
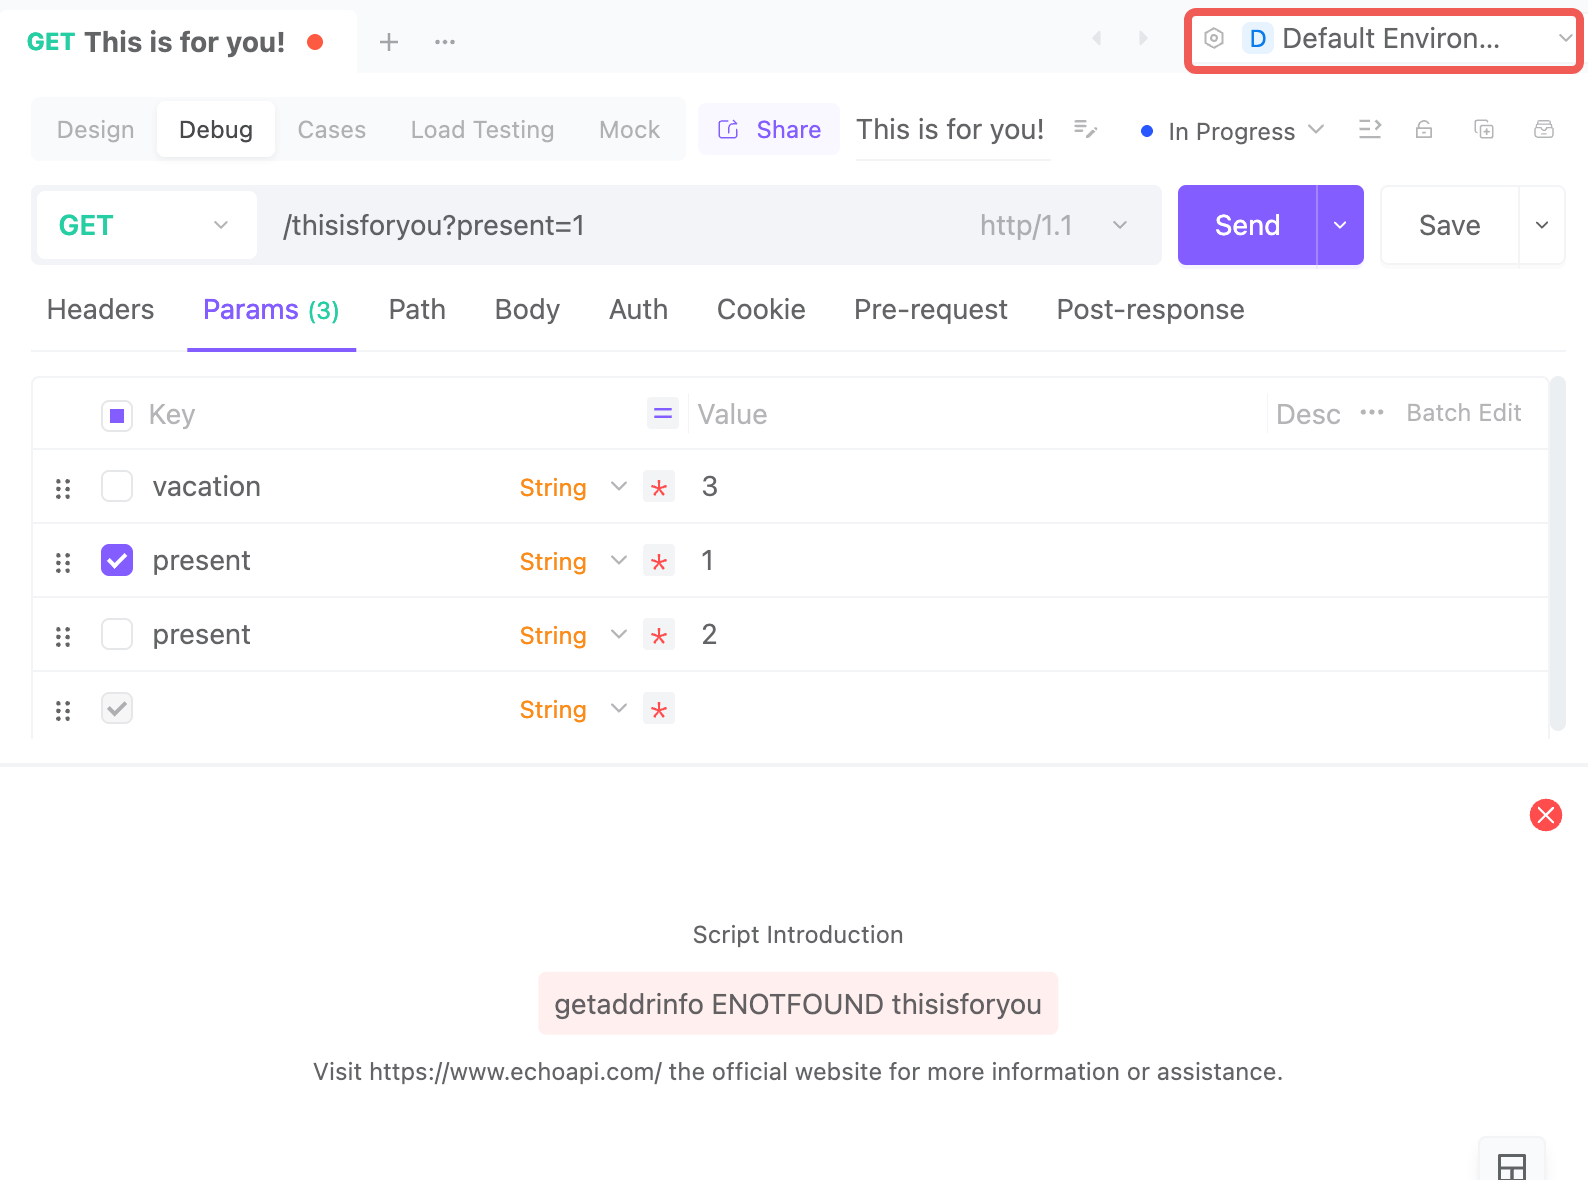
Check the environment settings. Make sure you’ve switched from Default to Mock Environment. This will ensure the mock responses are used correctly.
Now, you’ve created an interactive API that returns different responses based on user input!
Final Deliverable: Share the API Documentation
Now that everything is set up and working perfectly, it’s time to share the love! The final step is to share the API documentation with others so they can enjoy the interactive experience you’ve created.
Here’s how to do it:
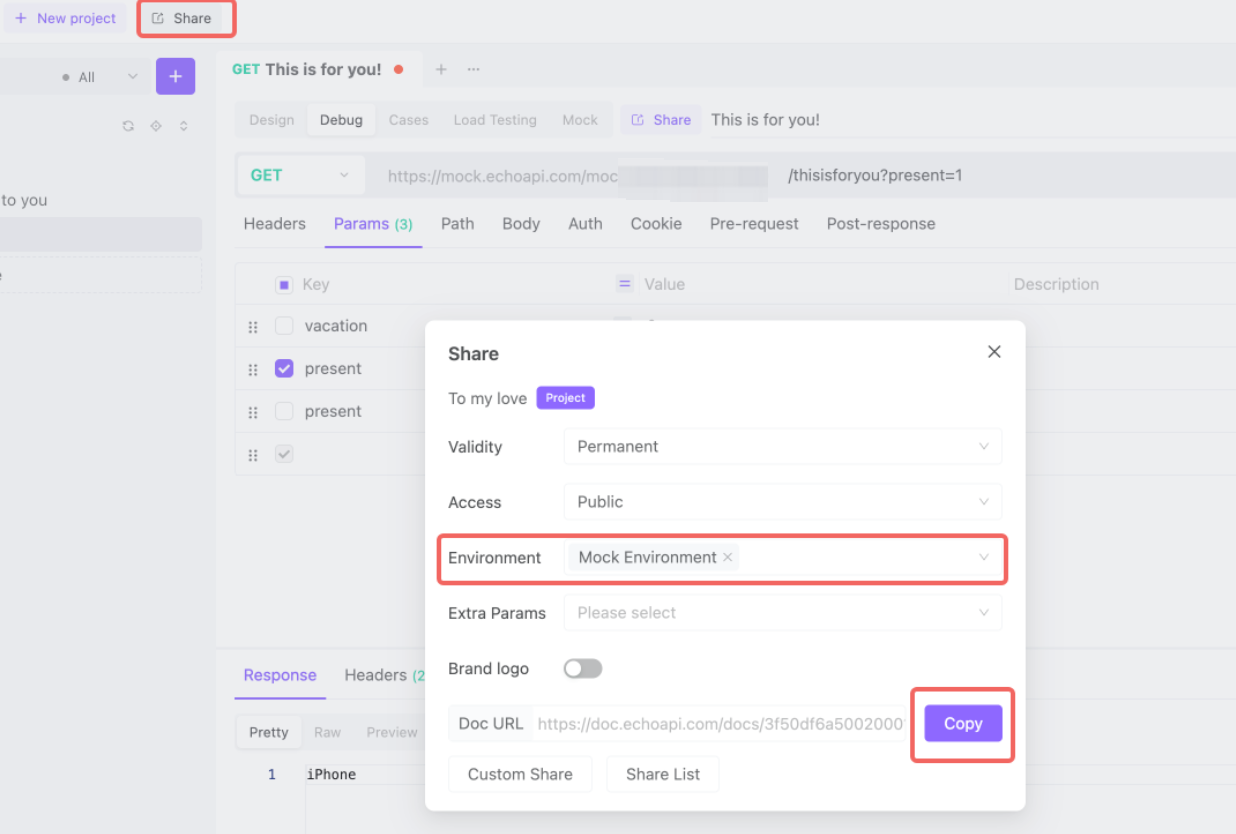
Generate the Documentation:
Using EchoAPI’s documentation sharing feature, you can easily create a link to the entire API documentation.
- Click on the Share button located next to "New project". This will ensure you share the entire project, not just a single API endpoint.
- Make sure to change the environment to Mock Environment. This ensures that the APIs will work as expected, even though they haven’t been fully deployed.
- After adjusting the settings, click Copy to grab the API documentation link. Now you have the link ready to share with others! This link will give others access to explore the APIs you’ve created, see all the endpoints, and interact with them directly.
Share the Link:
Once the documentation link is ready, share it with your loved ones (or anyone else you want to surprise).
When they click on the link, they’ll see all the APIs and be able to test the responses.
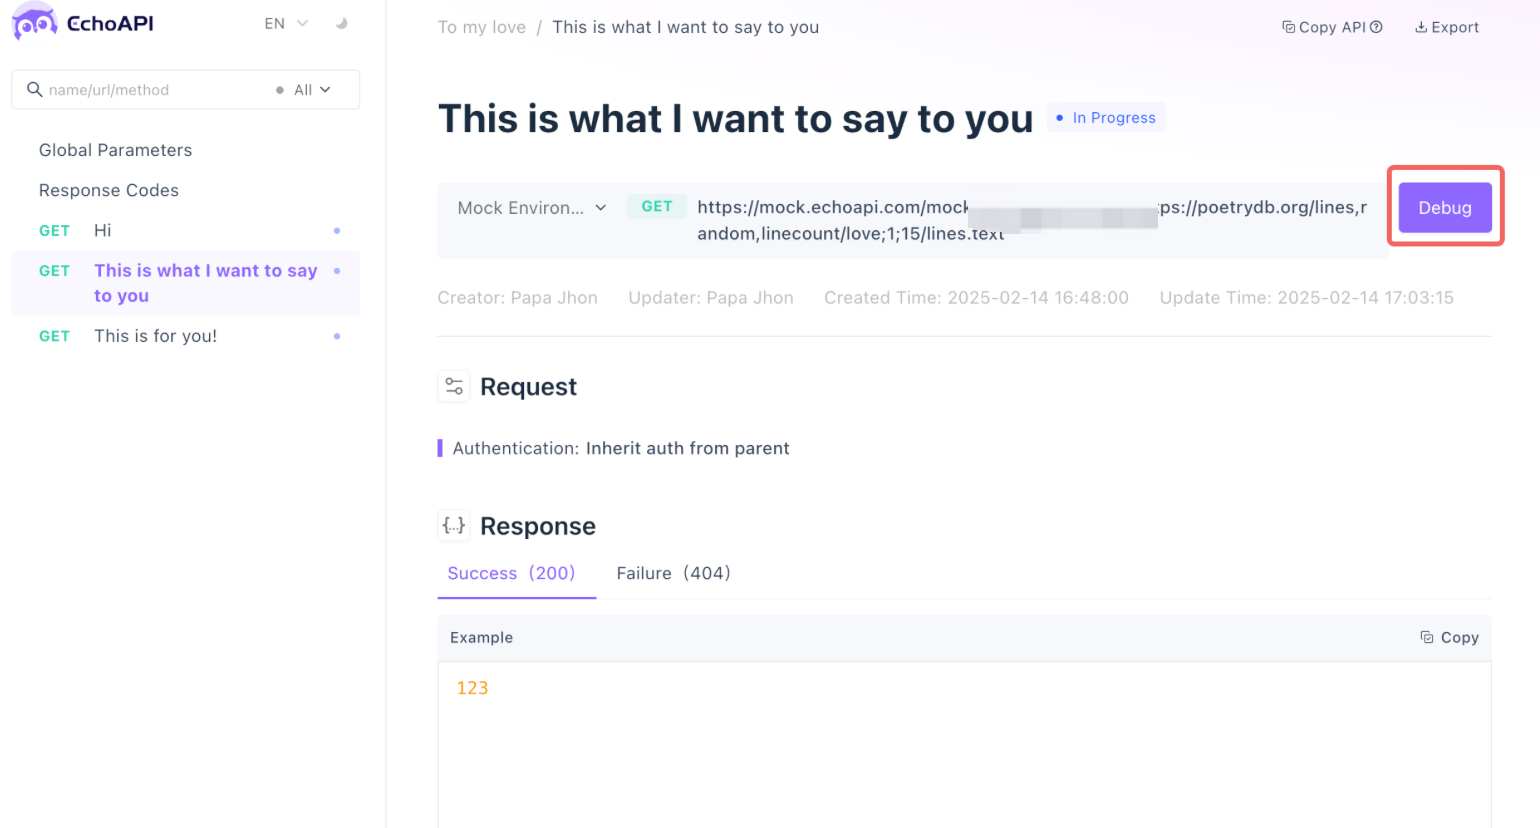
Simply by clicking Debug. they can interact with your thoughtful messages without needing any extra setup.
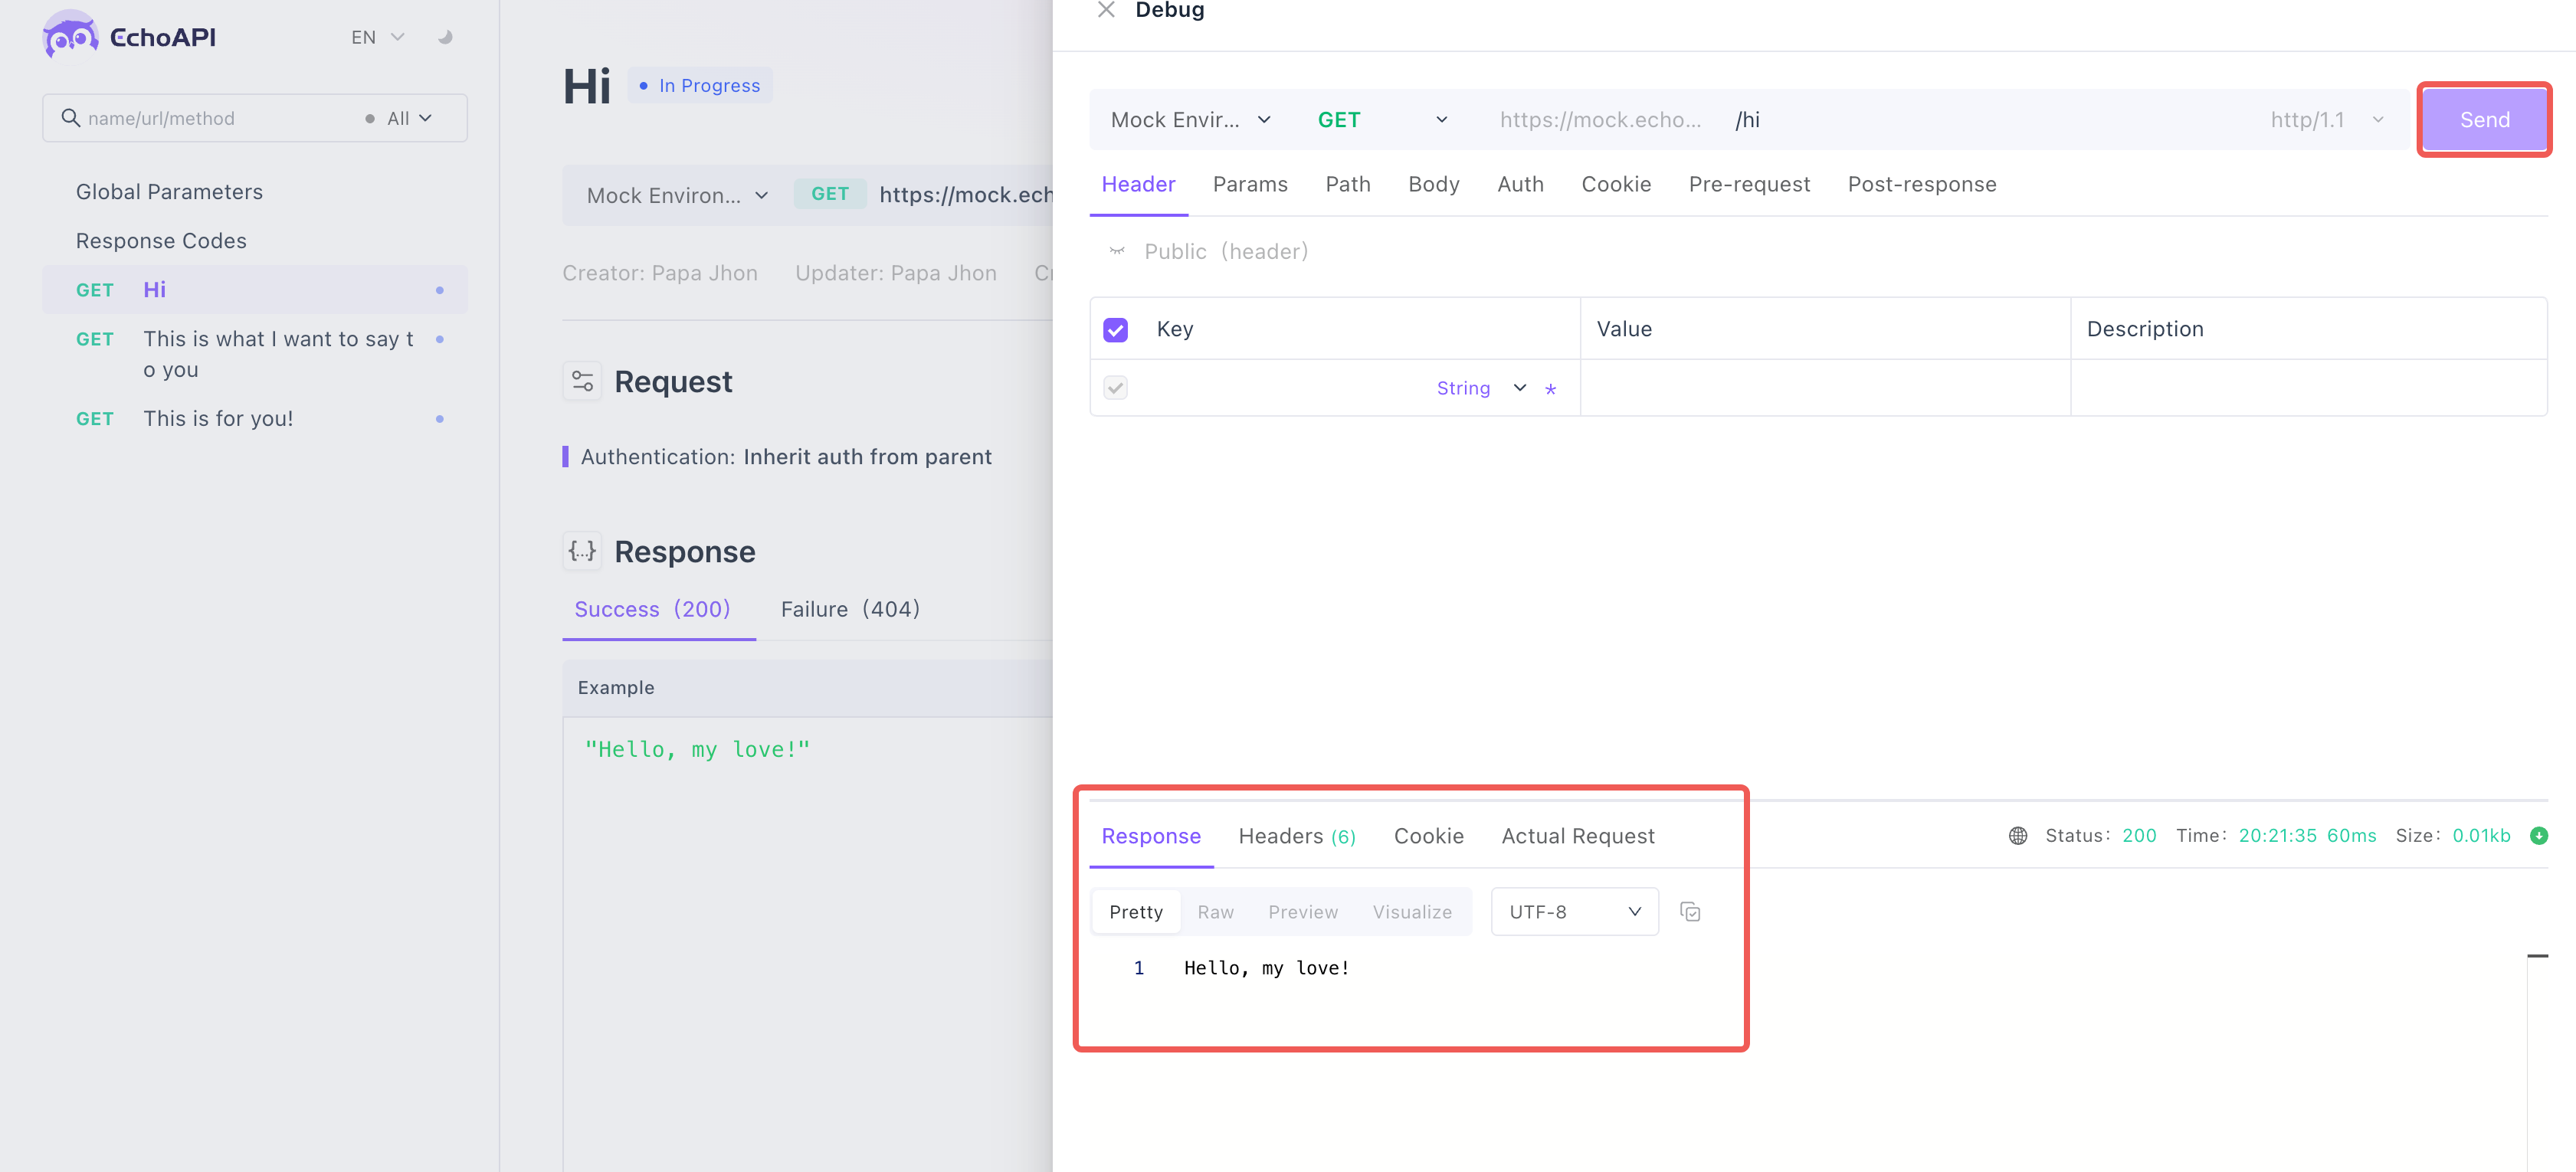
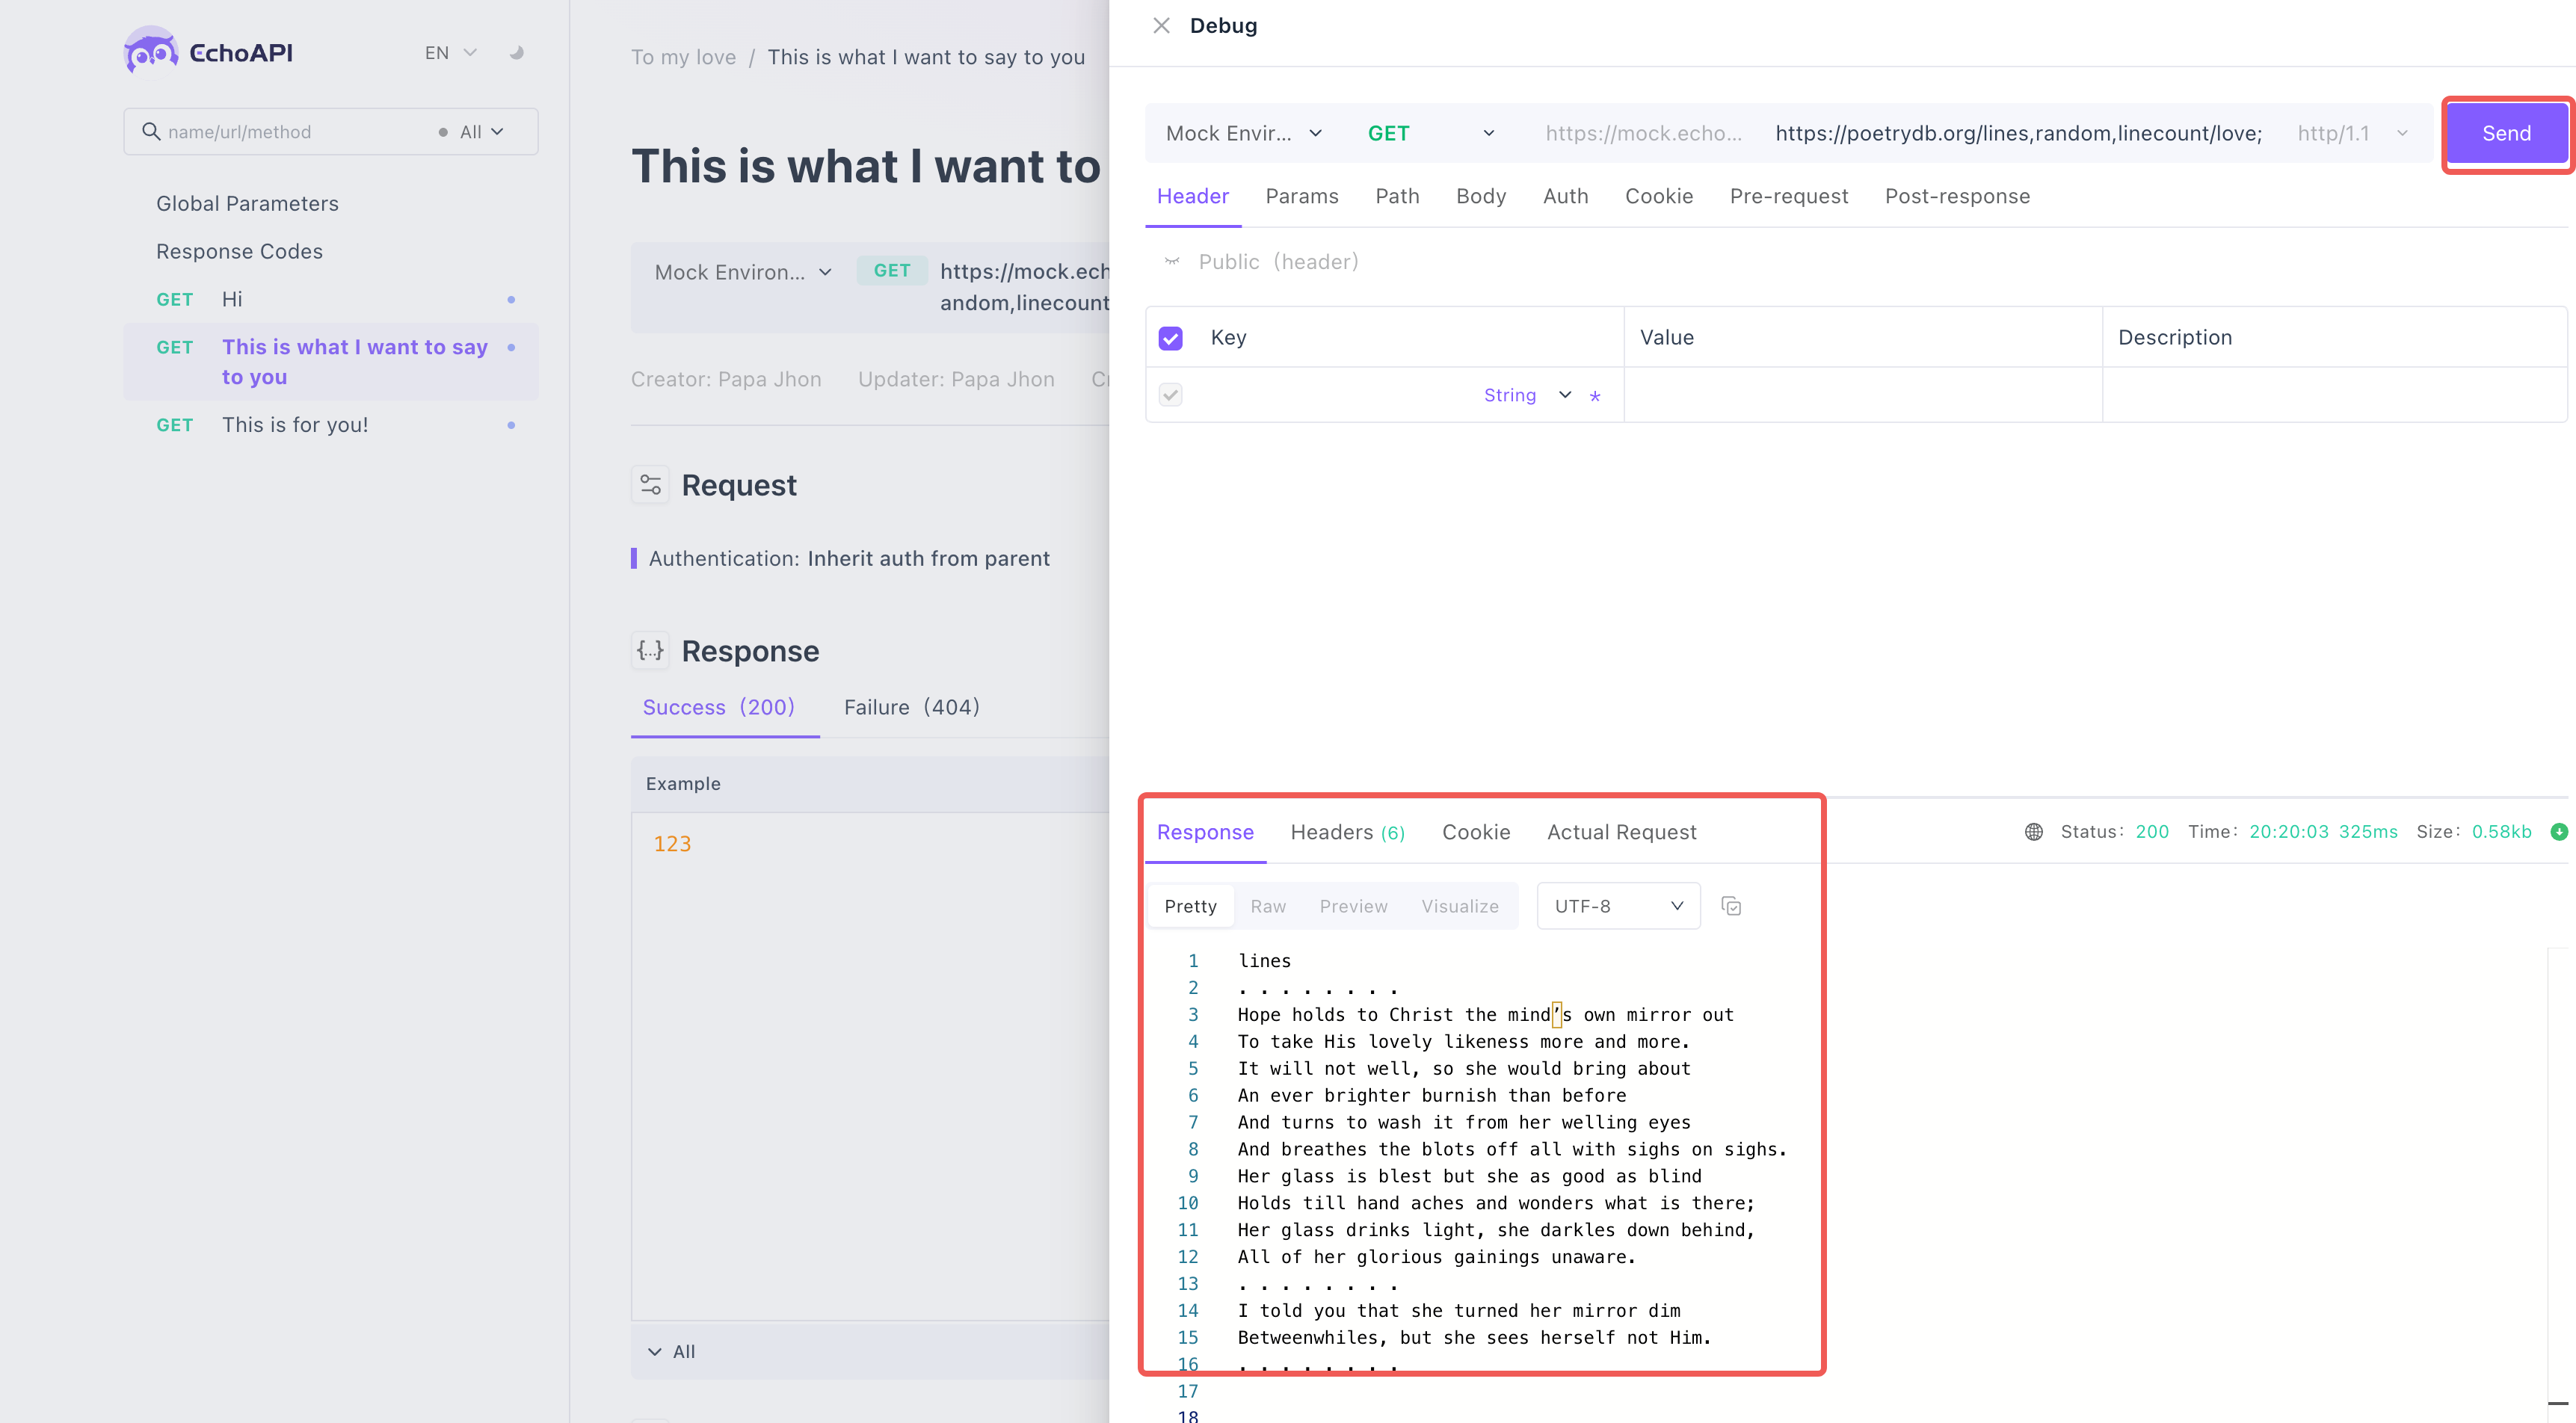
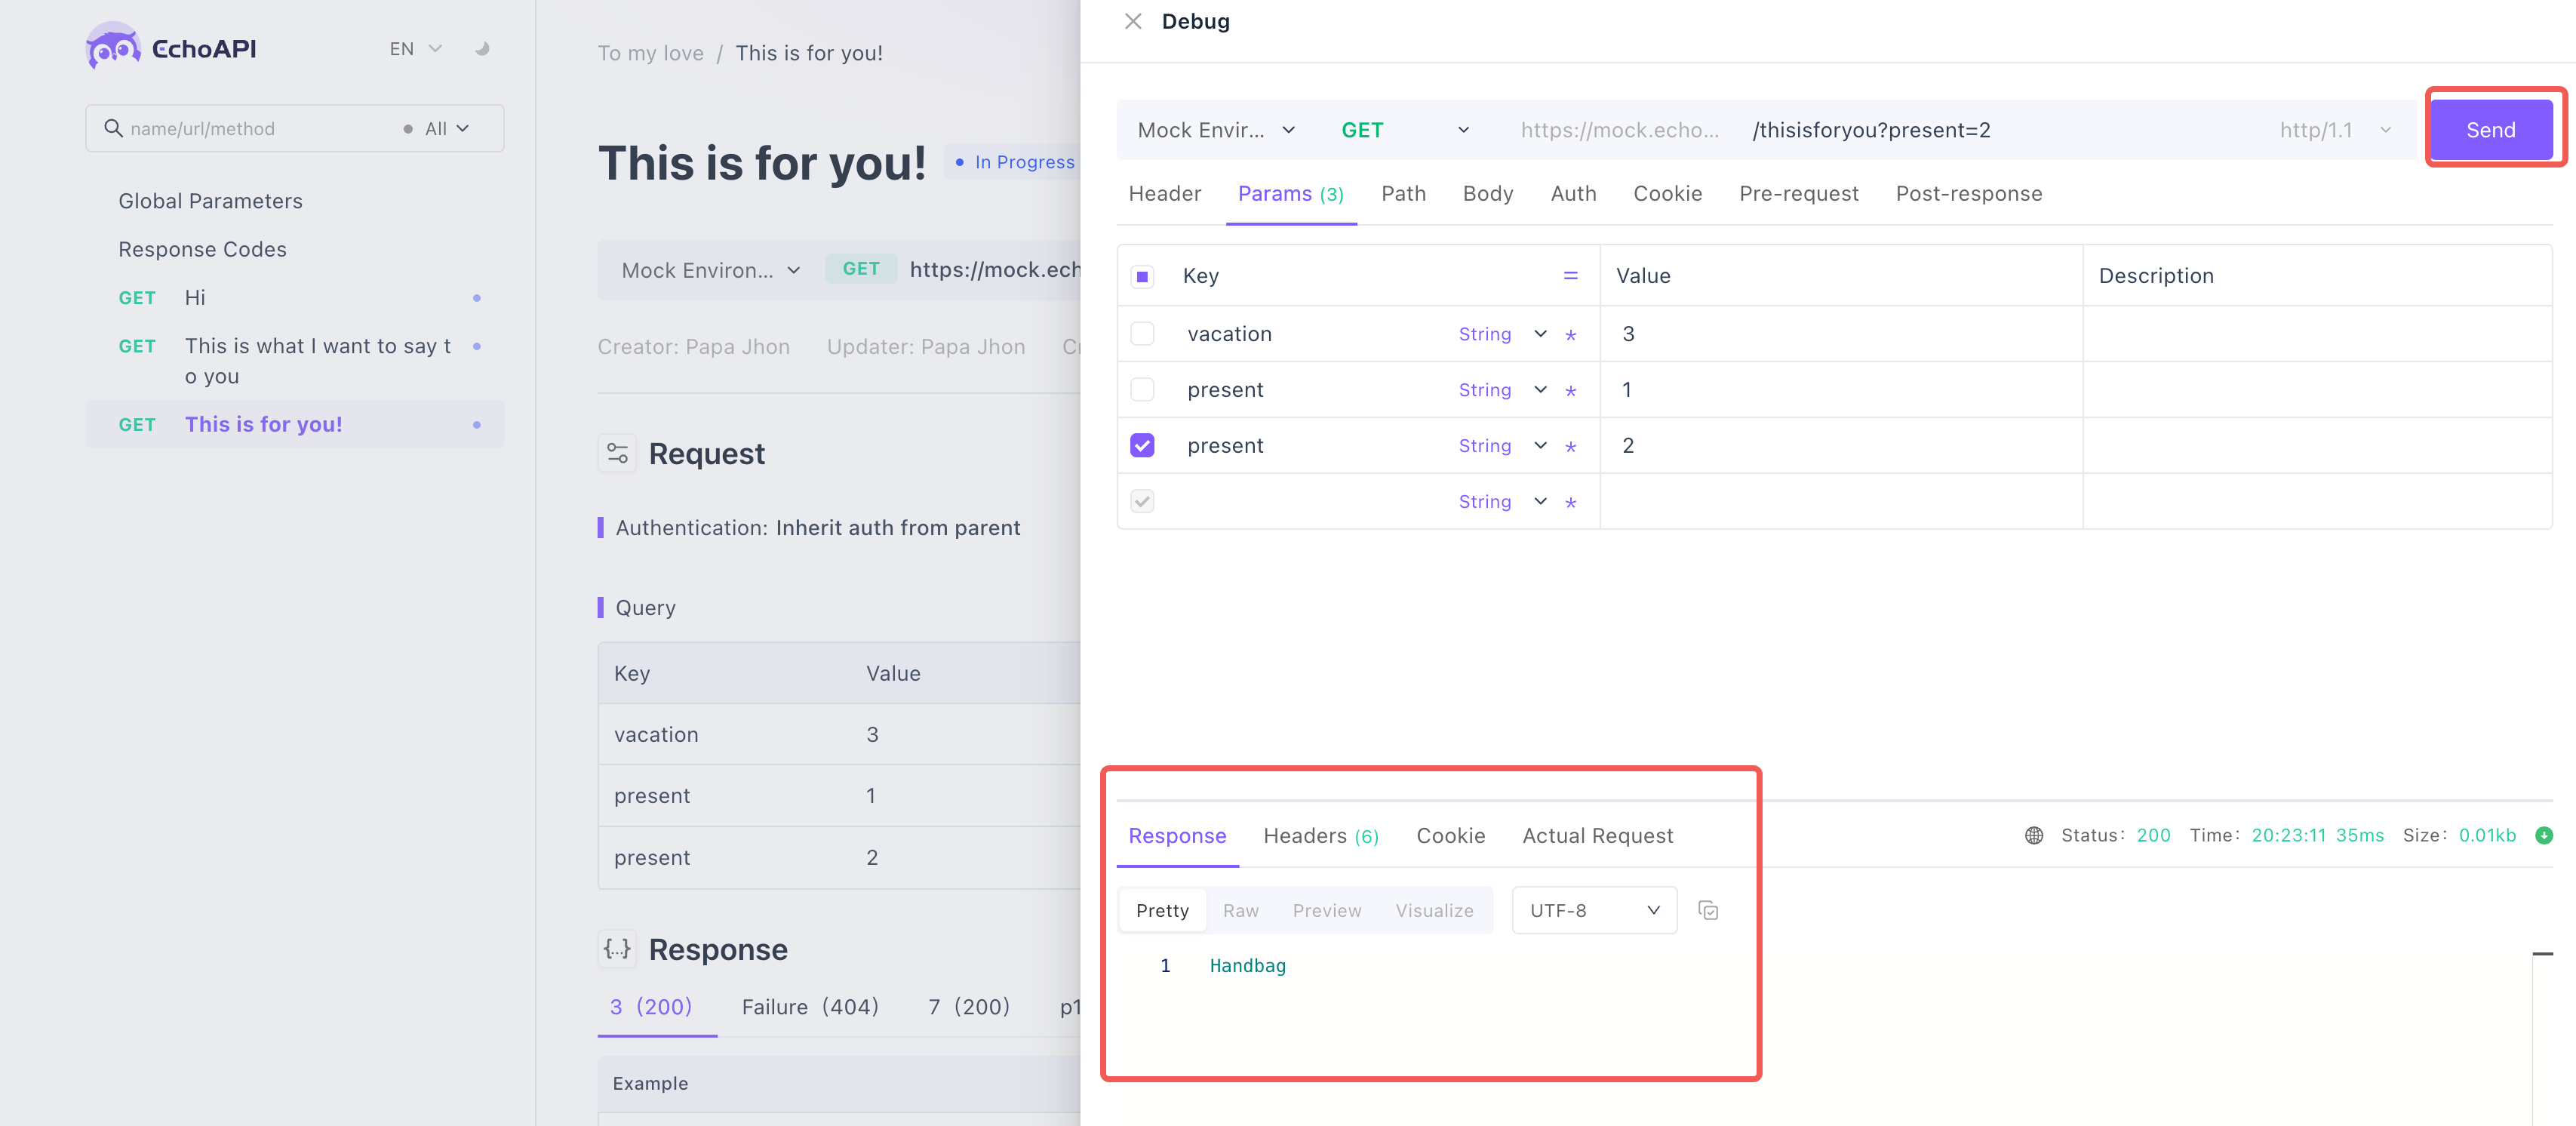
Enjoy the Experience
As they use the API documentation, they’ll discover the love and creativity you’ve poured into each endpoint, from heartfelt greetings to love poetry. It’s an interactive and memorable way to show affection!
With EchoAPI, it’s easy to create a meaningful experience that goes beyond the usual card or gift. Share your creation and let others see how tech can bring love to life!
Happy Valentine’s Day, and happy sharing!


 EchoAPI for VS Code

 EchoAPI for IntelliJ IDEA

 EchoAPl-Interceptor

 EchoAPl CLI
 EchoAPI Client
 API Design
 API Debug
 API Documentation
 Mock Server


