Mastering OAuth 2.0: A Step-by-Step Guide to Google API Access
Before we dive into how we can implement OAuth 2.0 with Google to access Google APIs, it is helpful to understand the high-level flow that we’ll be dealing with.
Integrating Google APIs through proper authentication allows your web application to interface with various services on behalf of your users. In this article, I will guide you through the process of configuring your application to authenticate with Google APIs using OAuth 2.0. Although the examples will primarily focus on the integration between Infisical and Google, you can easily adapt the concepts to suit your specific requirements.
To begin, we must set up an OAuth application within the Google Cloud Platform (GCP) and implement the OAuth 2.0 flow in our application. For those unfamiliar with OAuth, a comprehensive overview can be found in the primer linked here.
The high-level overview
Before we dive into how we can implement OAuth 2.0 with Google to access Google APIs, it is helpful to understand the high-level flow that we’ll be dealing with.
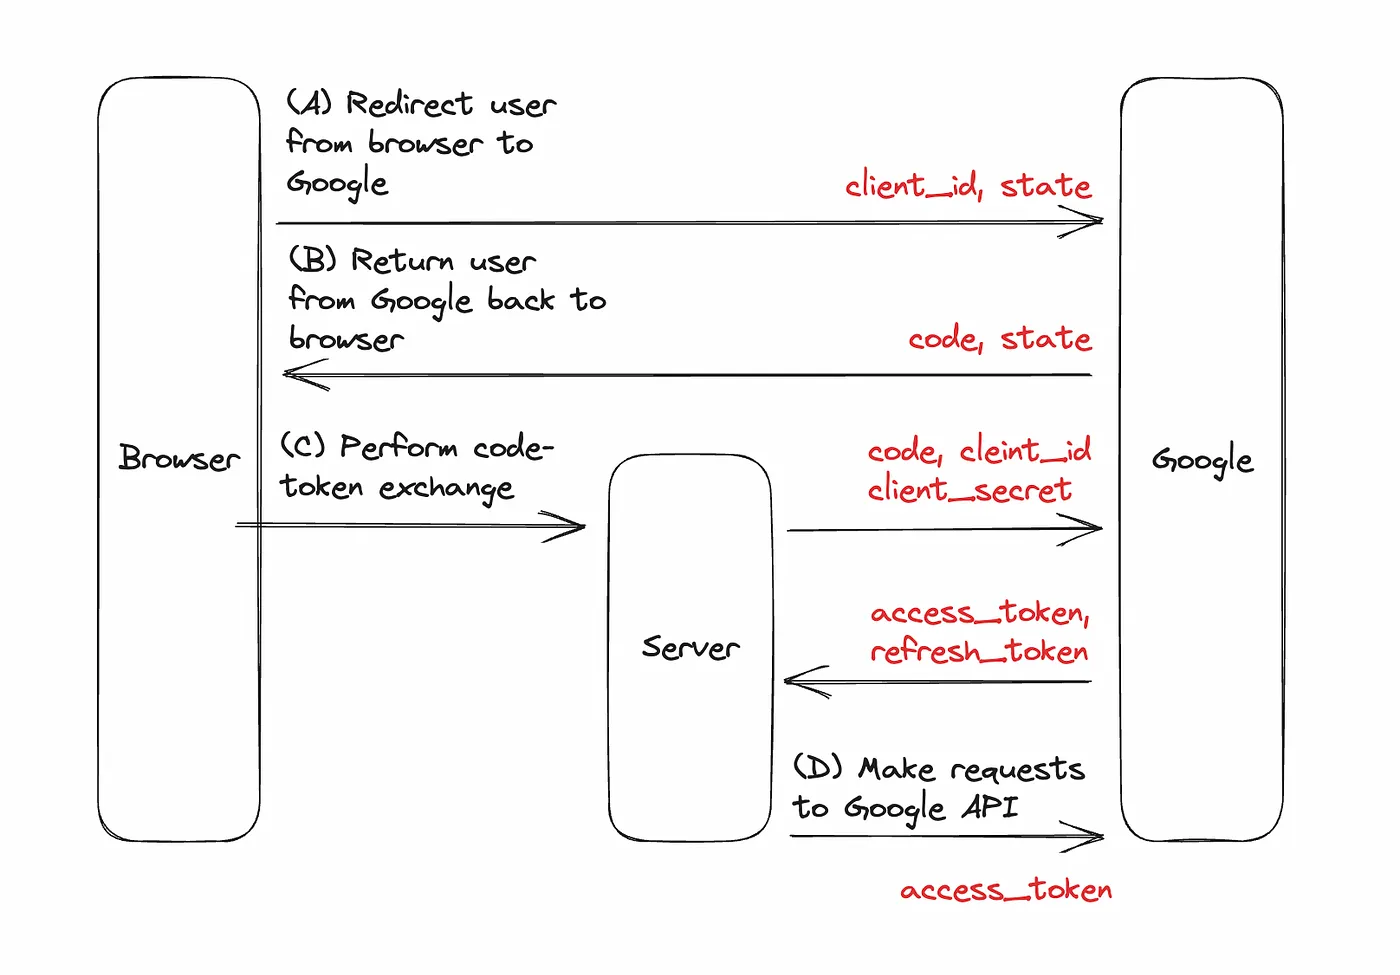
(A) Redirect the user from the browser to Google: The user presses a button in the browser and gets redirected to Google where they can grant the application access to their Google account.
(B) Return the user from Google back to the browser: After the grant, the user is redirected back to the browser with a code.
(C) Perform the code-token exchange: Send the code from the browser to the server to be exchanged with Google. After the exchange, we should receive an access_token back from the service, and often a refresh_token.
(D) Use the access token to make requests against Google APIs: With the access_token, we can now make requests to Google APIs on behalf of the user. If the access_token expires, then we can use the refresh_token to obtain a new access_token.
Cool beans — We’re now ready to implement OAuth 2.0 with GCP to access Google APIs.
Configuring an OAuth application in GCP
- Create an account with GCP here: https://cloud.google.com
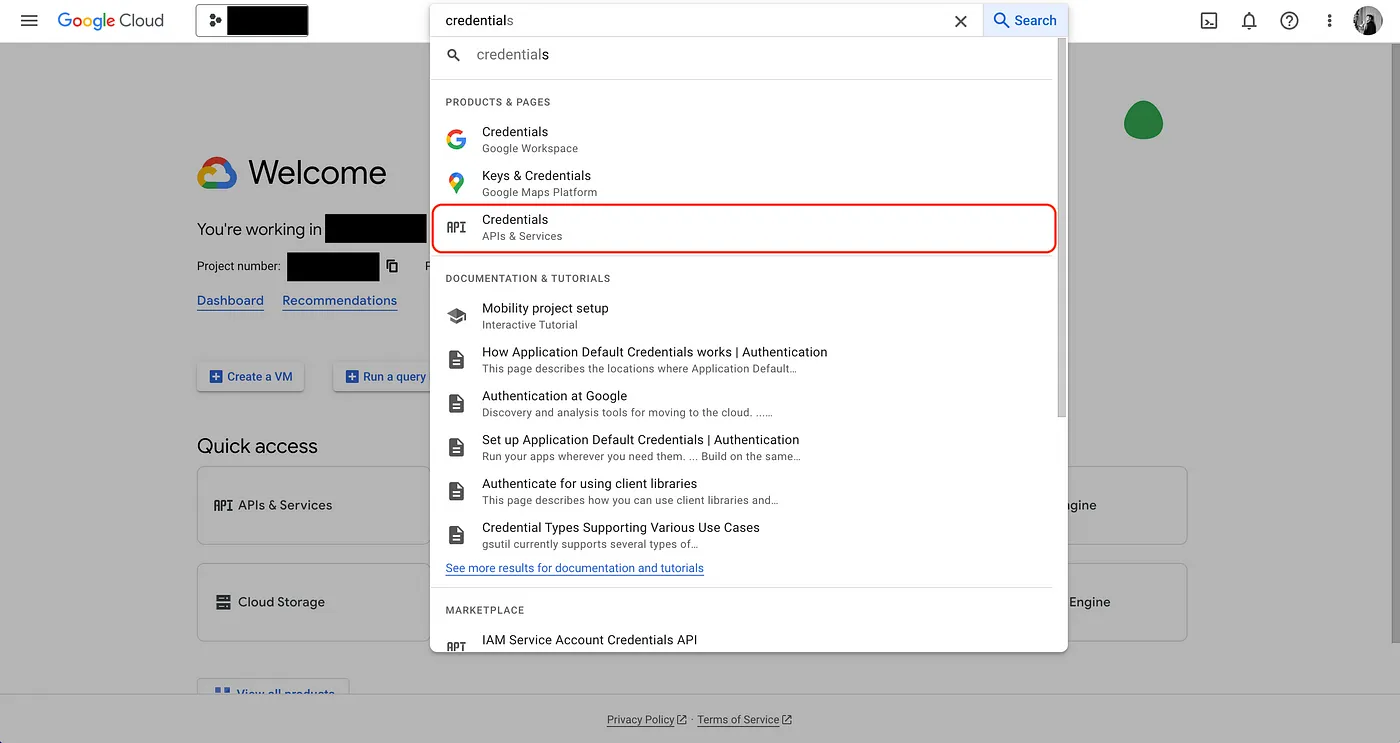
- Start by navigating to your project API & Services > Credentials in GCP to create a new OAuth application.
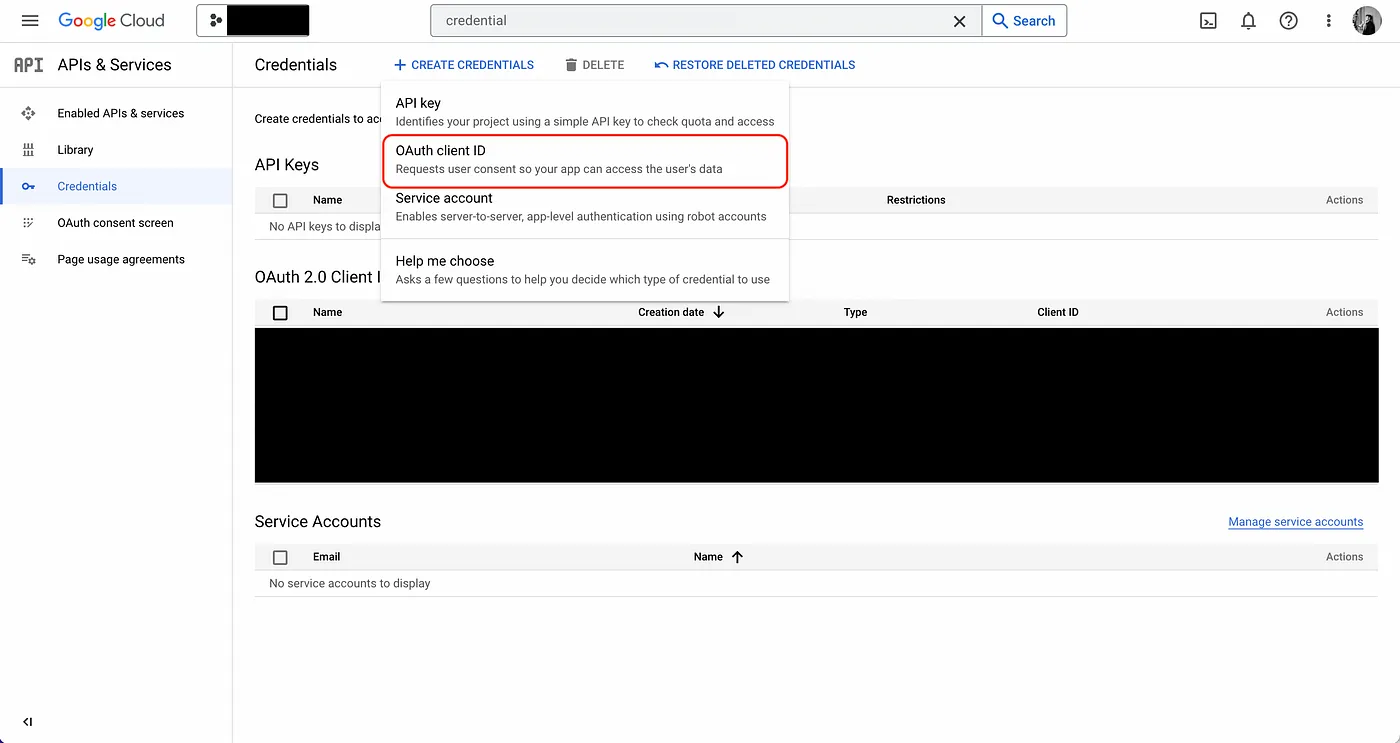
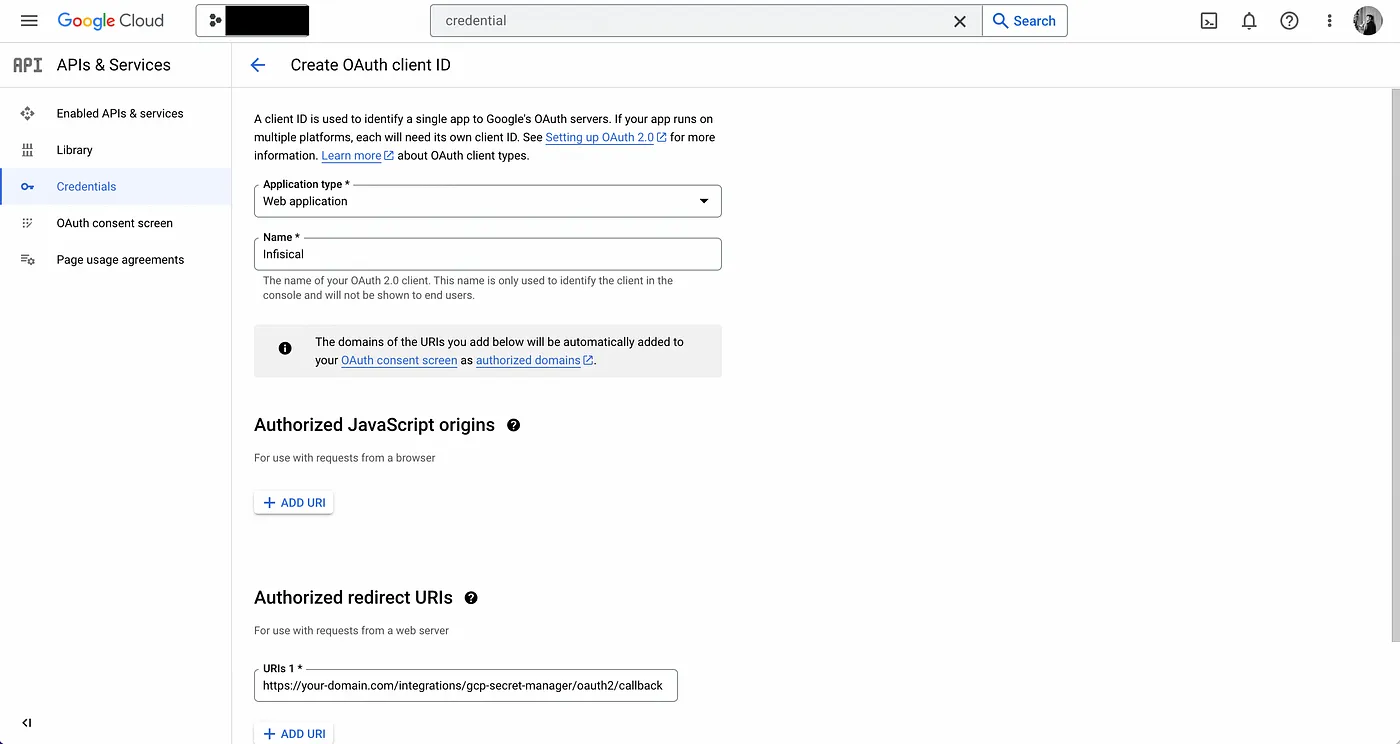
- Create the OAuth application.
As part of the form, add to Authorized redirect URIs a redirect URL such as https://your-domain.com/integrations/gcp-secret-manager/oauth2/callback; you can of course pick your own redirect URL based on your desired routing structure. This is the URL that Google will redirect the user back to after they have authorized the application to access their Google account.
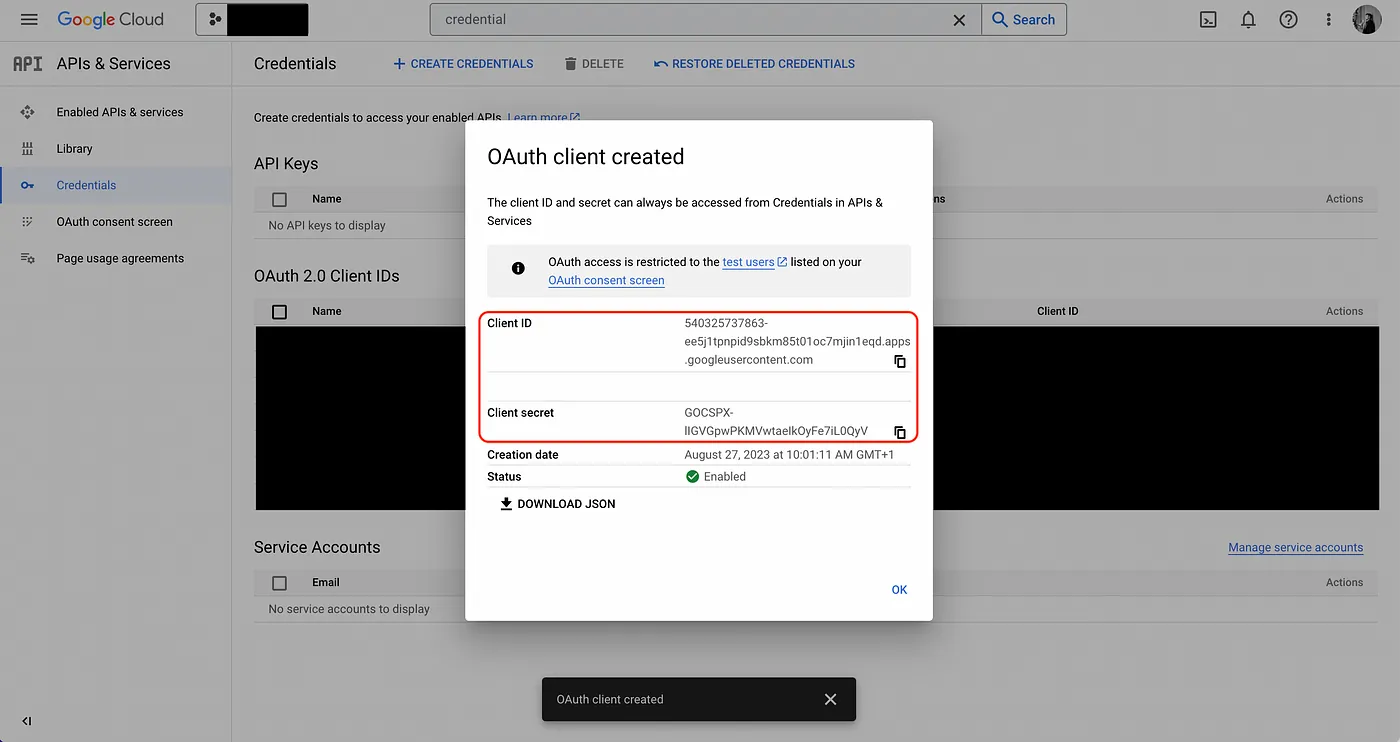
- Obtain the Client ID and Client Secret for your Google OAuth2 application; keep these handy.
Configuring your web application to work with the GCP OAuth application
- Redirect the user to GCP from your web application frontend.
In your web application frontend, create a button that, when pressed, initiates the OAuth 2.0 flow by redirecting users to Google, so they can log in and grant the web application access to their Google account. The button handler should contain the following logic:
import os
import random
import string
from urllib.parse import quote

# the client id from GCP
client_id = os.environ.get("GCP_CLIENT_ID")

# create a CSRF token and store it locally
state = ''.join(random.choices(string.ascii_letters + string.digits, k=16))
# Simulating local storage for the example - in reality, this would be handled by your front-end.
local_storage = {"latestCSRFToken": state}

# redirect the user to Google
redirect_uri = "https://your-domain.com/integrations/gcp-secret-manager/oauth2/callback"
link = f"https://accounts.google.com/o/oauth2/auth?scope=https://www.googleapis.com/auth/cloud-platform&response_type=code&access_type=offline&state={state}&redirect_uri={quote(redirect_uri)}&client_id={client_id}"
print(f"Redirecting to: {link}")
Here, we generate a CSRF token to be stored in local storage and sent along as the state parameter to GCP; this has to do with mitigating Cross-Site Request Forgery (CSRF) attack which is beyond the scope of this article.
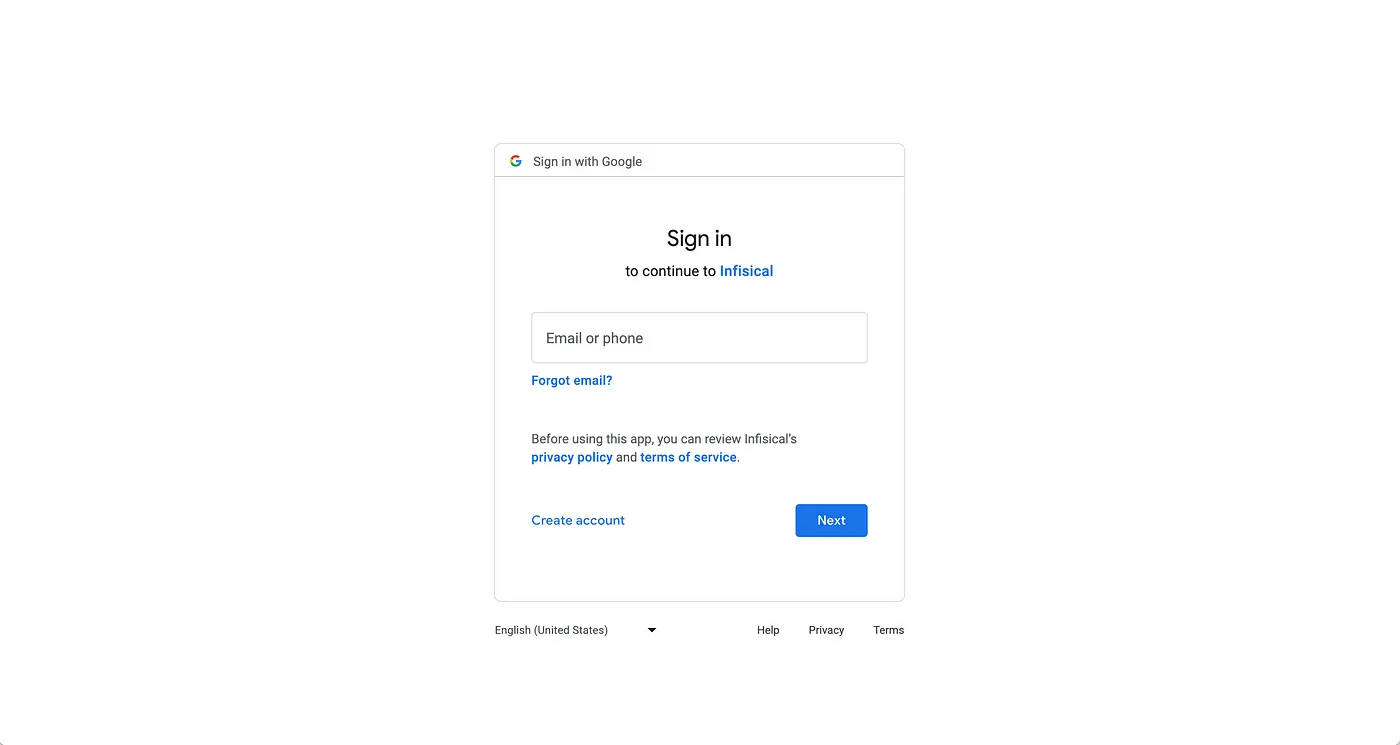
Note that you should replace the redirect_uri in link with the one that you registered in step 3 in GCP. When users press the button, they should be redirected to Google as shown below:
- Validate the state parameter upon the user being redirected back to the web application and send code to the backend.
Since Google will redirect the user back to redirect_uri after they have logged in and granted the web application access to their Google account, you need to make a page for it to handle the next part of the OAuth 2.0 flow. Here, the redirect_uri will come with a code and state parameter; you should parse these parameters off the URL and validate that the state parameter matches the CSRF token in local storage from step 5. If it’s good, you can proceed to send the code to the web application backend to perform the code-token exchange.
from urllib.parse import urlparse, parse_qs

url = "your_redirect_uri_with_code_and_state"  # This URL will be provided by Google.
parsed_url = urlparse(url)
query_params = parse_qs(parsed_url.query)

code = query_params.get("code")[0]
state = query_params.get("state")[0]

# validate the state parameter
if state != local_storage.get("latestCSRFToken"):
    local_storage.pop("latestCSRFToken", None)
    # send the code to the backend
    print(f"Sending code to backend: {code}")
- Exchange the code for an
access_tokenandrefresh_token.
In your application backend, you should now perform a code-token exchange with the Google API endpoint.
import requests

token_response = requests.post(
    "https://oauth2.googleapis.com/token",
    data={
        'grant_type': 'authorization_code',
        'code': code,
        'client_id': os.environ.get("GCP_CLIENT_ID"),
        'client_secret': os.environ.get("GCP_CLIENT_SECRET"),
        'redirect_uri': redirect_uri,
    }
)

token_data = token_response.json()
access_token = token_data['access_token']  # used to access the Google API
refresh_token = token_data['refresh_token']  # used to refresh the access token
expires_in = token_data['expires_in']  # used to know when to refresh the access token
- Use the
access_tokento access the Google API on behalf of the user.
You can now access the Google API on behalf of the user by including the access_token in requests made to the API.
- If the
access_tokenexpires, redeem therefresh_tokento obtain a new access_token.
You may have noticed that GCP returns two additional fields that we bind to the variables refresh_token and expires_in. Since access_token is a short-lived authentication credential for the Google API, the expires_in field helps inform us when it will expire. Once we know the access token has expired, we can make a special API request containing the refresh_token to the token endpoint to obtain a new access_token and continue to access the Google API on behalf of the user as in step 8.
refresh_response = requests.post(
    "https://oauth2.googleapis.com/token",
    data={
        'client_id': os.environ.get("GCP_CLIENT_ID"),
        'client_secret': os.environ.get("GCP_CLIENT_SECRET"),
        'refresh_token': refresh_token,
        'grant_type': 'refresh_token',
    }
)

refresh_data = refresh_response.json()
access_token = refresh_data['access_token']
expires_in = refresh_data['expires_in']
That’s it! You now know how to set up your application to authenticate with Google APIs using OAuth 2.0.
Tips
Implementing OAuth 2.0 correctly is critical for your application and user security.
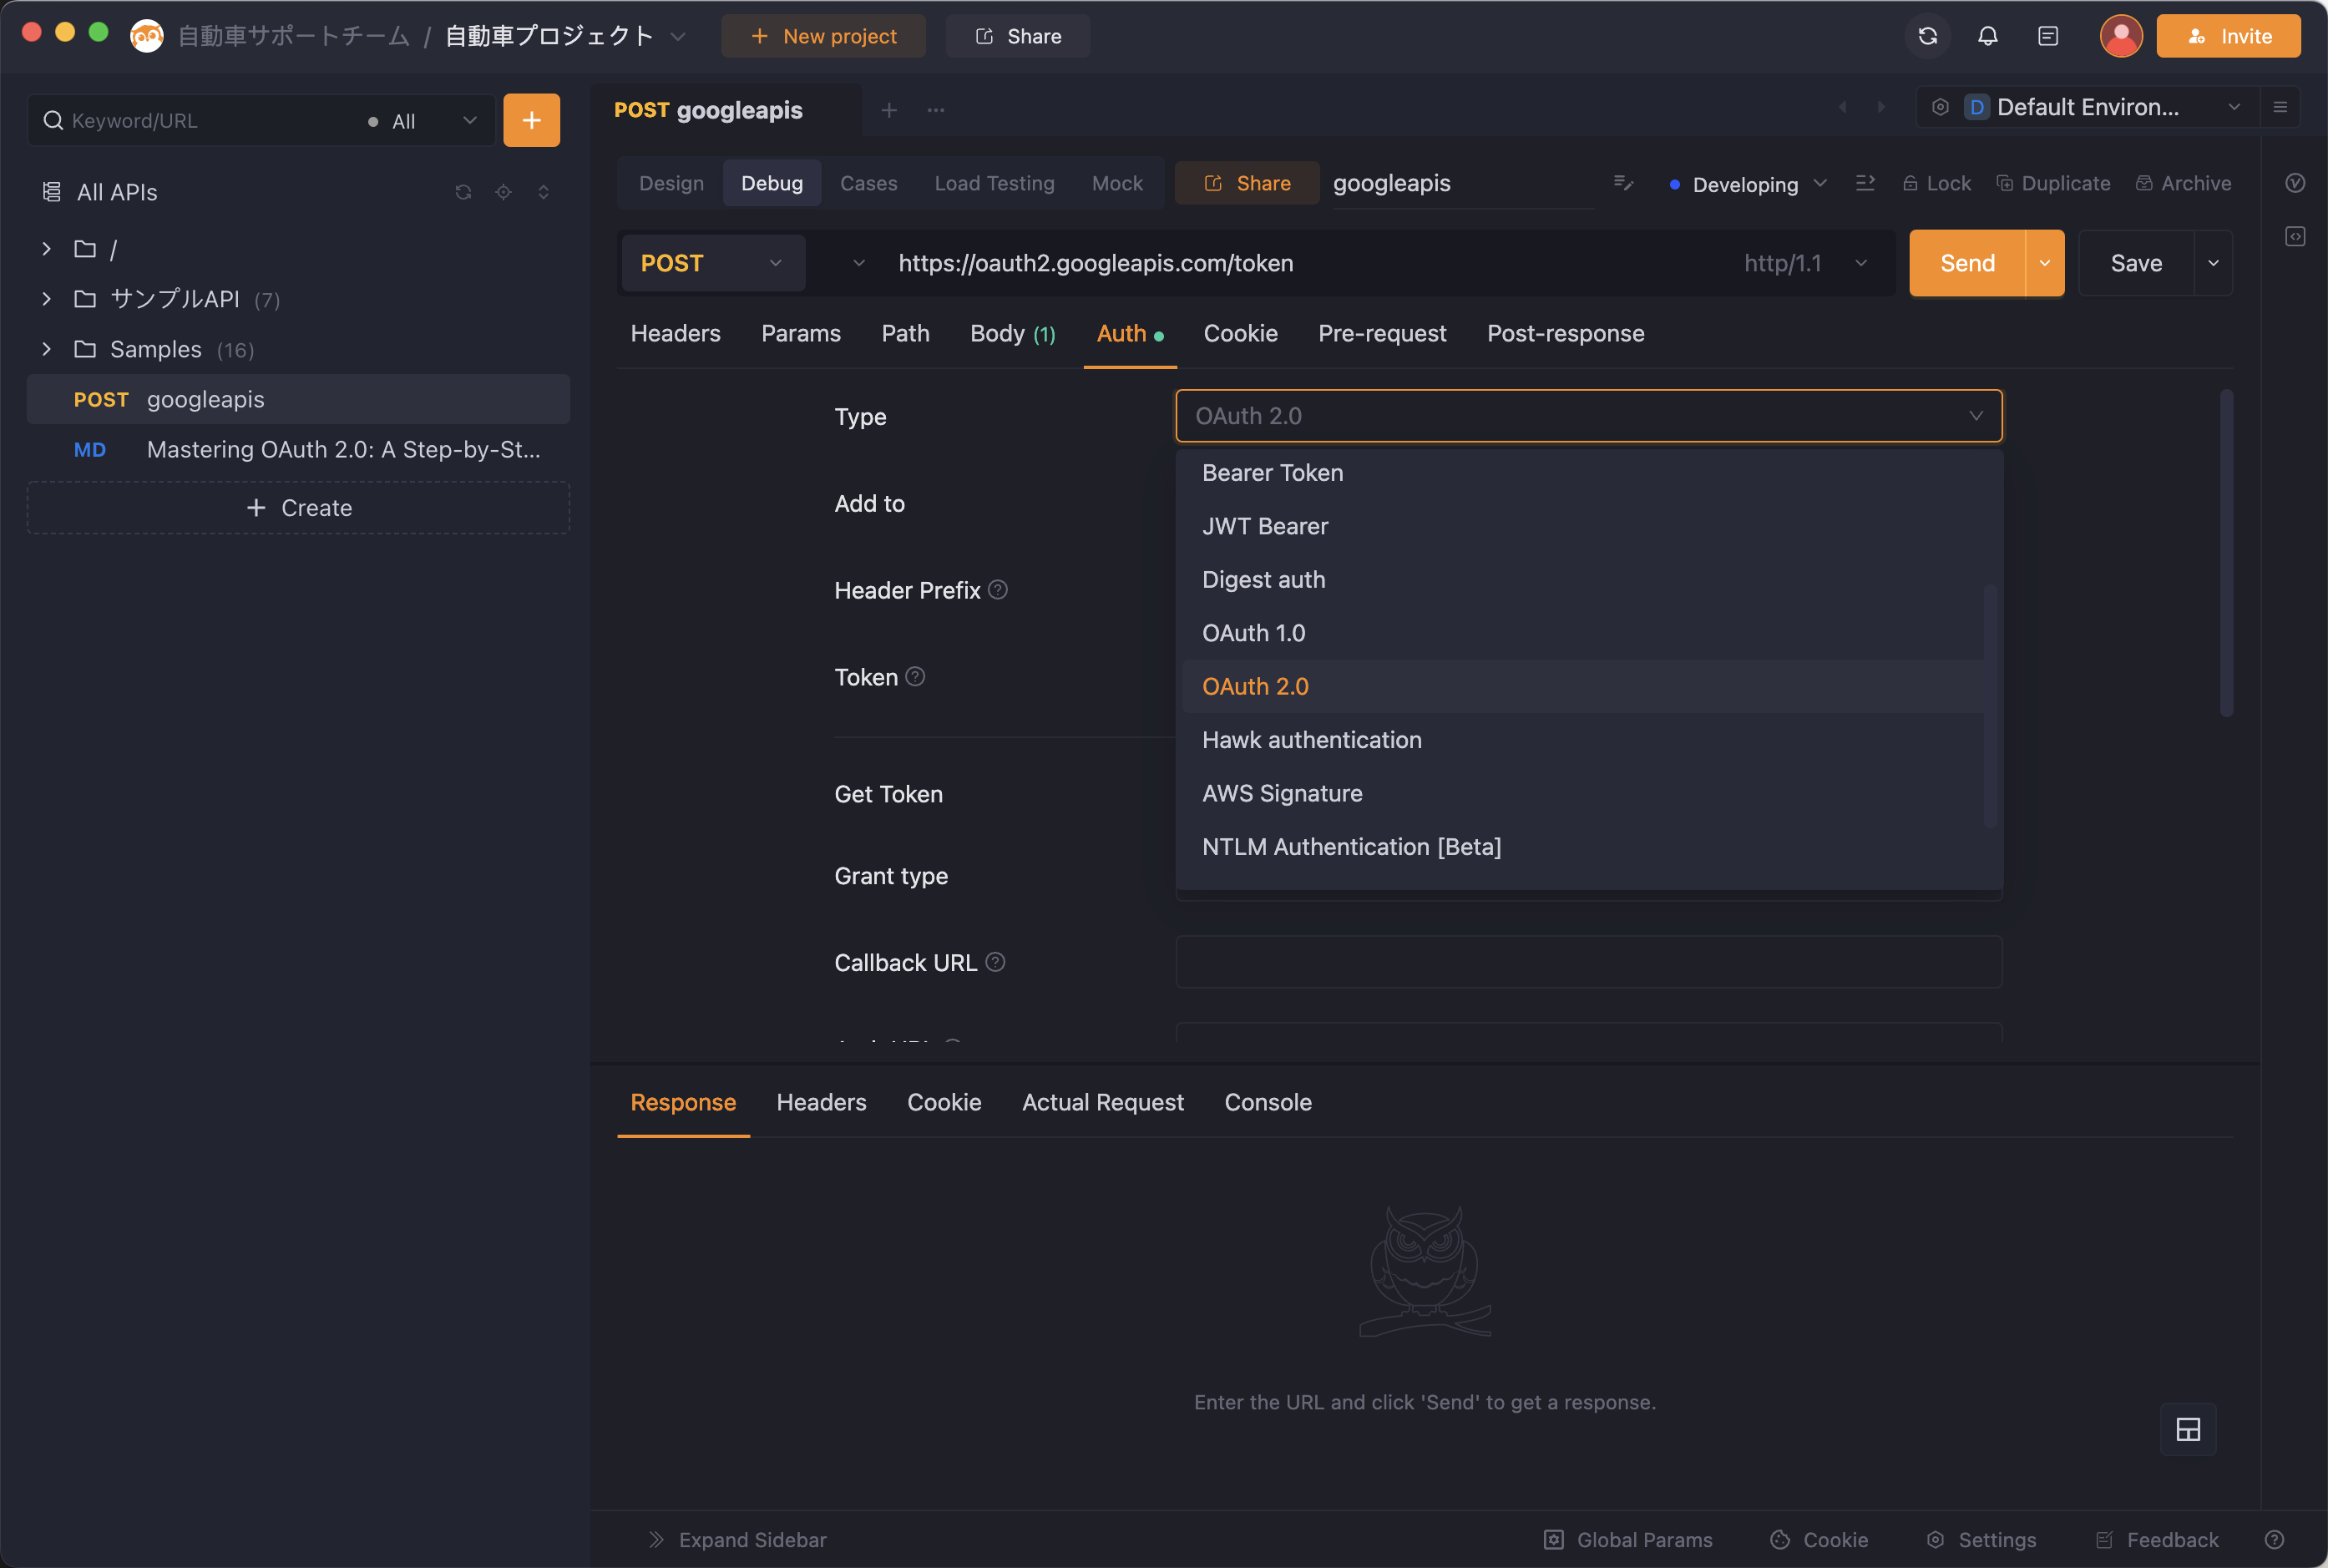
By the way, we can also do quick OAuth 2.0 testing with tools like EchoAPI and Postman, which makes things super convenient!
Here’s some practical advice that you should keep in mind:
- Avoid hardcoding the Client ID and Client Secret within your codebase. Instead, securely store these credentials as environment variables for your application. A more robust solution involves utilizing a secret management tool like Infisical to safeguard these credentials and retrieve them securely at runtime.
- Refrain from executing the OAuth code-to-token exchange multiple times. This process should occur once, after which you can effectively manage access and refresh tokens for all subsequent API requests. To ensure the security of these tokens, consider using a secret management solution, similar to the approach for storing your Client ID and Client Secret.
By following these guidelines, you can enhance the security and functionality of your application while integrating with Google APIs effectively.


 EchoAPI for VS Code

 EchoAPI for IntelliJ IDEA

 EchoAPl-Interceptor

 EchoAPl CLI
 EchoAPI Client
 API Design
 API Debug
 API Documentation
 Mock Server


